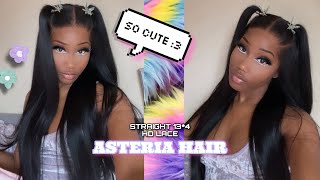
Business In The Front, Party In The Back! Two Braids W/ 30” Of Curls! | Asteria Hair
- Posted on 14 April, 2022
- Full Lace Wig
- By Anonymous
Hey, beautiful! Today we've got business in the front, and a party in the back! Two braids w/ 30” of curls from Asteria hair. One of my favs! Hope ya'll enjoy
HAIR DETAILS:
Direct Hair Link➤https://bit.ly/3v1vHxl
Hair Info: 30inch curly HD 13*4 lace front wig 250%density
Buy One Get One Free Wig➤https://bit.ly/3LMKiDJ
❤#AsteriaHair Official Website➤https://bit.ly/3ugYe2R
Asteria Hot Selling Hair★ ★ ★ ★ ★
Top1 #asteriawaterwave Lace Wig➤https://bit.ly/3uufMsF
*Invisible Skin Melt HD Lace Wigs➤https://bit.ly/3uk1VEU
Affordable 5*5 Closure Wigs➤https://bit.ly/3v0iMMh
✨Win Free Wig In Facebook Group!Join Now➤https://bit.ly/3pcfZOo
#asteriahair30inches #asteriawig30inches
Wholesale or promotion? Contact Asteria Hair:
WhatsApp: +86 15238065852 Email: [email protected]
Instagram @Asteria__hair https://bit.ly/3Lobbxq
YouTube @Asteria Hair https://bit.ly/3m5EBoA
PRODUCTS:
***affiliate links used***
Rat tail comb - https://go.magik.ly/ml/19t0l/
Comb, edge brush combo - https://go.magik.ly/ml/19szo/
Duck bill clips - https://go.magik.ly/ml/19t0o/
Kendra's Boutique hot comb
Ebin active spray - https://shop-links.co/cgLgEQkkSxX
Sebastian shaper hairspray - https://go.magik.ly/ml/19t0s/
Ors grip gel - https://go.magik.ly/ml/19t05/
Ors creme styler - https://go.magik.ly/ml/1h775/
Edge booster gel - https://shop-links.co/cgLgGGHH2cc
Saweetie edge fixer - https://go.magik.ly/ml/19t0s/
LA Girl concealer - https://go.magik.ly/ml/xch2/
My FAV eyebrow razors - https://go.magik.ly/ml/19t0x/
Bedhead 1/2 pixie flatiron - https://go.magik.ly/ml/19t0x/
FOLLOW ME:
https://www.instagram.com/beautyviajal...
https://www.twitter.com/Beautyviajalea...
https://vm.tiktok.com/TTPdhrhj1p/
BUSINESS INQUIRIES?
MUSIC:
https://www.semionem.bandcamp.com
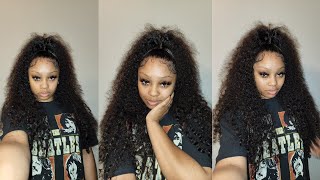
Hi beautiful and welcome back to my channel in today's video i'm going to be doing this two braid install. I use blue line, use glue in a little minute. This curly 30 inch, hair flowing and being just as beautiful as it wants to be, was sent to me by exterior hair, so shout out to them responsibilities, video and sending me this unit, i'm a fan of the unit. I really like it stay tuned and keep watching. We can get into this install in style. All i got ta say is, and you already know who it is back to plucking my own wig. So here i am my bleach and pluck this unit, and this is me just showing you the lymph and the curl pattern of it is 30 inches and 200 density with the 13 by 4 hd lace, 13 by 4, all the way around frontal. So let's go ahead and throw that bad boy on and let's get it adjusted to the head. I'M gon na go ahead and go ahead and do this. This is me putting the threat tail comb by my ear, filling it out, and then i'm gon na go ahead and cut off where my ear tab needs to come on out. So my ear can pop on out i like to take an eyebrow razor and just lightly tap. It and it'll just get the back of the ear for me, so i can make sure i get all the lace back there. It'S easy for me to see what i'm doing and control it. So that's why i like doing it like that and then once i do, that i'm gon na go ahead and put my three slits on there and push my wig to the back slide it on back like like that there right there and then i'm gon na Go ahead and use my erica j hold me down active skin guard adhesive skin guard yep! That'S what it is, and i'm gon na just use a little cotton round and just dab it all over the area so that i can get ready to get this lace because i'm not gon na use no bald cap. All caps lately have just been teaming like an afterthought um. Do we really need them? No because i'm gon na kill this install with no ball cap and even this little uh wig cap, that's on my head ain't, even gon na be on it's gon na, be nothing but my hair up under there. So here got my first layer of glue to hold me down erica j glue, i'm spreading it out so thin and smooth and and when it dries down completely i'll, go ahead and throw back on the wig. So we can get to installing. I don't know why. I showed y'all the glue i used after i hadn't already used it, but that was the glue i used hello, hello, hold me down, go ahead and feel it make sure everything is where it needs to be, laying that and when it is i'll push the wig To the back again, i kind of like the order i did this in because it got the wig ready for me so that when it was time to do what i had to do, just slap it back on and get to doing it. It'S the second layer of glue, we're only doing two layers of glue today, because i was feeling lazy and you know had somewhere to be so i have time for the other shenanigans for real. So here's me fanning down making sure it's tacky when it's tacky, i'm gon na pull the lace back to the front. Now somebody left a great comment and said that a way to stop buckling lace is to crisscross your um, your elastic pieces. In the back. You know what i mean like where you can go if you've seen a weight before you know what i'm talking about the back of the back. You criss-cross them as tight as you can and that helps with the buckling because, as you can see, your girl got a little bit buckling here. I was trying to figure it out and like place it accordingly, but i could tell my laces finna buckle, but i will say this is me the next day and i got uh the same milk band on that you'll see in a minute and it is flat. So i'm just hope that you know when i take my shower and blow dry, my lace back down that it lays flat again. But those are the tips that i have for now on how to help and prevent lace buckling. But let's go back into this, install i'm spraying out the glue, nice and thin, like i said before, and right when it's tacky, i'm gon na go ahead and lay the lace down back on it. It'S about that time. The lace is the lace. The glue is tacky, and now the lace can get pressed on into it. I'M using my comb, i'm pushing it in with a sweeping motion. Y'All see me y'all feel what i'm doing. Then. I got this hysteria edge. Milk band that came with my wig shout out to stereo for sending me this, because i really like this band. It'S not like it's not like elastic, it's like soft on the inside, so i think it was really nice and i like use it to sleep in and everything i like that band shout out to them for giving me that, and i hope that come with everybody Order that better be in everybody's order, i'm here to tell y'all that they finna get in edge mail asteria. Please, please give them the edge. My bands, because i like to get mine so then i went ahead and raised it off the lace, but as you can see in some places where the some paces, where am i from some pieces of lace that didn't get glued down all the way? And i'm going to lift that back up and use the edge of the eyebrow razor to just get a little bit of glue in that crevice in the end of my rat tail comb to press it back on in. We can continue on with the regular scheduled programming and go ahead and keep razoring off that lace, as we were before making sure i'm using a zigzag motion, because that's what i like to do and i'm just going to keep razor and razor and off. Until all the lace is gone once i get all the lifted lace pieces, i put back on that little milk band and i get in my middle part - rocky was my middle part in the middle. No, is it ever really? No, but i tried my best each and every single time and it's close enough and nobody can be my ass about it. So here's me using my easy edges edge. Stick just make sure everything is nice and flat. Now i'm not hot combing. The hair too far down because i don't want it to lose its curl pattern. I just needed enough to make it flat and look presentable. So that's what i'm gon na do and then once i get that going, i'm gon na go ahead and pull out the hair for the braid. I'M gon na be doing i'm taking a little bit of extra hair from the back of the unit, because the frontal hair is a bit shorter than the back, i'm taking it so that the braid looks the same length as the hair. So keep that in mind i'm using a hot comb to press everything back so that it's separate from the front and then i'm going to go ahead and two strand twist it so that it can be separate from the back and i'm repeating on the other side. Now i can't stand when hair be interfering with things when you don't need the hair to be interfering with things so that we went ahead and got sectioned up in the back. Now i'm gon na pull out my edges so that i can start formulating the braids that i'm gon na have in the front of the unit. I'M loving this plucking job i did, and i know y'all are pestering me about this plucking tutorial and i can't tell y'all enough that i'ma do it one day, one of these days, but for now here's me still doing this, but i promise i pinky promise you That you will get a tutorial when is a good date that i can say that's realistic by the end of the year, because so just so, y'all can stick around and say keep getting subscribed to me. So y'all can wait till the end of the year. See this plugin tutorial is that, okay with you, okay, clearly i'm joking, but like i'm gon na, do it i just i don't know when and so here's me hot combing is making sure everything is laid away. It needs to be laid, i'm with it. As you can see it's looking like my hair, i went ahead and pulled out a little piece at the bottom because i don't like when my wig gets too lifted on the side, because i don't use a lot of glue on my sideburns. So we just eradicated that whole problem by this leaving out a little piece i'ma, come out the hair from the root, not the root from the tips of the root backwards, because you know we don't need all the hair pulled out the front. That'S not cute! Your friend are gon na have bald spots. You you being on negligent with your unit. You know take care of your unit, okay, take care of your real hair as well, and comb from bottom to top a little bit of edge control on the edges, just to make sure that everything is nice and slick as it needs to be. It'S looking amazing to me already, and i don't even hit this braid on you, yet i ain't even get started on the braid yet comb, it back, making sure it's slick, making sure everything's laying like how i want it to lay it's looking real fantastic. I don't know like y'all, see what i'm seeing y'all seeing this live action. Hd 180 p. You know like it's not 4k, we 4k status yet, but it's definitely 1080p for sure. Hd. Look at this braid, i'm braying! That'S why i love when i got no nails on, because i'd be bringing hardcore now towards the end, i'm making sure to add water so that it doesn't get detangled and that the end can curl up like it needs to i'm gon na try to breeze through This braid, because, like oh, you see how i added that hair as well and then at towards the end. I used a little bit of mousse and just wrapped the curl around the finger a little bit and then i'm gon na give me a cute little curl like that. Like that right, there braid done i'm gon na. Do the other side cool transition time bow aside done, i know y'all being up my little turn transition because, because i'll be eating it up, that braid was on the other braid, but it was okay because you know: where are you supposed to be sisters, not twins? Anyways, you know raising off the the baby hairs. You know, you know, i can't stand i'm straight across baby hair, so we don't add an angle because it adds a nice little bit of texture to it. Sebastian paper plus spray so that the curl gets hell and i'm gon na comb that through so that it's all over the hair, bad pixie, curling iron. If you want a curling iron like this, you can go ahead and check the description box down below, because i got the link for it right there. It'S an affiliate link you're going to support your girl by clicking it from me. There you go hit both curls on it, i'm going to do the other side for you all right. I'Ve neglected to show you all this other side, but i like the way they be dropping when i'm done with them. So i showed them to you because i like the way it looks, look how it's going to curl out when it's done look look look bam. I was excited about that myself. As you can see now, this baby hair technique has eradicated so much time. I'Ve spent you know, fixing up my baby hair unnecessarily this this baby hair routine, now by just combing it at first and then adding the edge control and gel that i'll be using as you can see there, and if you want to know everything, i've been using. Go ahead again, description box, it's all there, but just by combing it out before i um add the gels just makes it the process a whole lot easier, as it's already laid down. All i need to do is just add some final touches and some final swoops and such, and that gets it going and look at that. Somebody hit this sideburn for you right, quick boom brush it out, comb it out, for it lay it down real nice, get it looking how you want to look and then, when the time is right, go ahead and get that extra hair, because we don't need that. Long-Ass hair in there and then add that edge control. Add that ors grip gel comb it out it's gon na look so good, live action real time in front of you at this point. It'S time to get worried about that hair. I do have a little bit of conditioner left on this hair and i thought it was going to do a good job, but i don't think the conditioner did a well enough job of maintaining the frizz level. So you're going to see me go through and add some water and conditioner, but what i did on the other side of the hair, which i didn't record, which i wish i did at this point because the rs creme styler gel - i mean it's not a gel. It'S definitely a cream, as it is said in the title: it's a creme styler for curly, hair and straight hair as well, but i think it definitely helped maintain the frizz level a lot better than this conditioner did so just hey. Imagine that instead of the mousse and a conditioner that i'm just using the rs cream styler, i have a link for that down below. I definitely recommend that over this process way more, but the process is the same. Nonetheless um just wet wetting it up finger detangling. You know making sure everything is coated in the product and yeah, but instead of this bottle, just imagine auras instead for sure final touches, final little brush, throughs, making sure everything is nice and saturated in the product and then here's the difference between the side that i Did inside i didn't do here's my tik tok that i've been making the whole time and that's it. Here'S the final! Look that you see how the other side looks a lot more like shinier. I don't know it just looks better. So trust me that rs is what you need, but here's the real life julia to. Let you know what i think well that wraps up today's video. I hope you guys enjoyed it. I really love this hair, like i'm gon na, say just look at it. I love dense, thick curly hair. I got a full head of curly hair right now i mean exactly if you guys want more information on this hair, be sure to check the description box down below again. Thank you to esteria here for sending this unit and sponsored today's video and, if you're looking for any products, i use be sure to check down below they'll, be there follow my instagram like comment on this video, i made a tick tock during courses. Go follow me on tick, tock beauty and i think that's all going to say thank you for watching i'll, see you next time, bye, beautiful! You
Comments
amari jordan: can i just say, i loooooove how INFORMATIVE your videos are. often times, when people make similar videos, they explain what they're doin, but not WHY---which is useless for beginners. like, instead of just sayin " oh i put the glue on then blow dry it", they should say say " hey, put the glue below your actual hairline / cap and blow dry until its completely clear, and not tacky blah blah blah". THANK YOU soooo much for including technique!!!
Lv.ppariss: Another Video?? Whatttt everybody better like her video this is my 3rd like saying this but sis been working over time! Give her her coin and click those affiliate links
morgan simone: lemme learn how to braid real quick so i can try this style you always got me wanting to learn new things
Kiraa: The best to ever lay a wig !
Ijeoma Alanza: I love the fact that she be adding her TikTok’s at the end of the videos
Stacey Garcia: Gorgeous
Authentic Beauty: Tiktok made me stalk you I love this look you did that ❤️
Sammy Da Goat: This Curly Hair Is Super Cuteee
CP THE PG: , I’ve been looking for a curly wig for my birthday I just need to know is this big head friendly?
Dianna Belcher: Simply Gorgeous Bye Beautiful.
Tatiana Bee: THE HAIR GOAT❤️
Mukbang Community: It always givesssss‼️‼️
Ms. Verna: My favorite YouTuber
Mya: 9:45 the scream
Alyyx Lovely: ❤️❤️❤️❤️ my favvvvvv
Djediane: Ma’am imma need a class
Djediane: GOAT
Chrissy Johnson: now yk we wanna know the lashes
Zay Marie: From tiktok