$73 Get One Swiss Hd Lace Wig Ft Wavymy Hair
- Posted on 27 August, 2021
- Full Lace Wig
- By Anonymous
Back To School Sale: 40% OFF For Human Hair Wigs
Extra $26 OFF with: bst26
A Free Wig +$35 OFF Over $299 with:bts35
Buy Now, Pay Later,Zero Interest.
EXTRA coupon for all hair,code:wm20 get 20% OFF
♡♡♡♡♡ #WavymyHair ♡♡♡♡♡
The same hair→https://bit.ly/37u5uw4
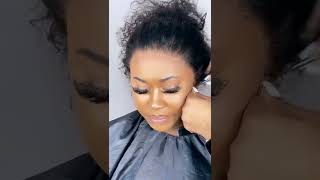
Style:Swiss HD Lace Loose Deep Wig
Density:180%
Length:20 inch
Wavymy HD Lace Closure Wig→https://bit.ly/3yxpp9p
Wavymy HD Lace Front Wig→https://bit.ly/3lJYELt
Wavymy HD Lace Curly Wig→https://bit.ly/37qJUsm
Wavymy HD Lace Water Wave Wig→https://bit.ly/3ix5cLq
Wavymy Highlight Body Wave Wig→https://bit.ly/3jEIJv2
Wavymy Highlight Kinkly Curly Wig→https://bit.ly/3An87fv
Wavymy 4x4 Lace Closure Wig→https://bit.ly/3CuoIQB
Wavymy 13x4 Lace Bob Wig→https://bit.ly/37u6ZKI
More New Arrived HD Lace Wigs:
https://wavymyhair.com/collections/hd-...
Youtube: @Wavymy Hair
Facebook: @Wavymy Hair
IG: @wavymy_hair
Twitter: @Wavymy Hair
E-mail: [email protected]
♡♡♡♡♡♡ #Wavymy ♡♡♡♡♡
Hello and welcome back everyone. It is your girl, cassandra, olivia, and today's video is sponsored by a company called wavy. My hair, this video is me reviewing a closure wig that they sent me so real briefly, i'm just showing you guys the packaging. I thought the box on the outside was really cute with, like that triangle print with the different rose, gold and white, then you have a mask a wig cap, the wig and also a hair pin, so they sent me a loose deep unit. This is a 4x4 closure and this is 20 inches. So i'm just taking it straight out of the packaging showing you how it looks, and this is the natural texture how it comes, and you can wet this, which i'm going to do and i'm going to show you when i install it. So once you take out the paper from the inside, they do have the three standard combs in the side and then the extra comb in the back, as well as this extra lace that i'm gon na cut off. Before i install it and then your adjustable straps and then i like to use the straps and just put them like on the same exact one, because you guys know i have a really small head and then it also has like you know the closure at the Top so i'm just showing you guys how it looks, and then i'm also going to show you guys how the knots look. The knots to me were a little bit thicker than usual, so i definitely went in and bleached them. I um put a snippet of in here me bleaching and not i did it off camera just because i um left my ring light stand, so i just let that sit for 20 minutes. I just mixed some uh source cloth blonde me with 30 volume developer and i let that sit for about 35-40 minutes and then i've rinsed it out with the purple shampoo. And here we are so. My hair is just slick back and under a cap already ready to go, and i'm just fitting this wig on, i already adjusted the straps in the back, how i like, and now i'm just pulling everything down and just seeing where i want to wear this wig. I, like the curls, and i like how full this is. I thought i was going to do like a free part situation, but i am going to go in and show you guys how it looks when you part it different ways. This is me just trying to figure out what i'm going to do and i was shaking this back and forth. You already know i do the shake test guys because i wanted to see if this unit will stay on um. If i don't do the combs in the front, so all i used was the elastic band in the back and i was good to go so now. I'M just cutting the lace and then i'll be back in just a second right here. I'M just showing you guys where the tracks start just so you can be mindful not to over, like park too close to that. You just want to make sure that, whatever you have falls in front of those um lines on the side, because you don't want to pull it back and show your tracks that are on the side. This is a machine made wig. So here i am just going in and spraying this with just water, i didn't add any conditioner or anything, because i really want to see how the how the hair was going to curl. Once i added the product - and i mean oh, my goodness - i wanted to see how the hair was going to curl once i added the water without any product, because i want to see the natural curl pattern. So i just saturated this pretty well and they had like this little white tag in the back. I don't know if that's like something that they do or if this was just like a little mishap, but that was me just cutting that out and now i'm just going to fit this, i'm going to show you guys parting, a couple different ways: more specifically, a Middle part and a side part because that's what i prefer and then i'll be back in just a second. So now, i'm just going in with some nairobi foam wrap just to set this part in the front just because it was trying to like not park. The way i wanted it to so i'm just applying this to the top just to slick that hair down a little bit better. So that way, it's not like those two pieces just being weird like sticking out, so i'm just going to comb this through and then i'm going to let that dry and i'm going to start scrunching, my hair, just to add a little bit more volume and texture Back into the curls okay, so now i'm really trying to shake test. Now that i already wet the hair and i'm ready to go - and this is how it looked once i was done fully saturating it. You see how the curls just came to life, so i was really feeling this and i'm just going to sit here and play around with this. You guys, let me know, um your thoughts down below and i'll also drop all the information down below for waving. My hair and their information, they are having a back-to-school sale, so i'm believing that they have like a whole bunch of discount codes and things that you can use so get in where you fit in. This is like a really easy pop on the go type of unit. You really don't have to do too much to this besides, just part it and wet it down. Um again, i haven't put anything in this. Besides the narrow beam, just at the top just to make sure that the hair wasn't stuck with that weird part, so now i'm just going to play around with the side part and the middle part, and this is pretty much me styling it once i'm done. I'M just going to show you guys the curl pattern, how it looks overall - and i just really appreciate everybody so much for watching and bear with me at this point - i'm just having fun styling this hair. I wasn't quite sure what i wanted to go with. So here i am just going in just playing around with the side part versus the middle part, um shaking it around just doing my own thing and um yeah. This is pretty much it, i'm just going to keep playing around with it until it does. What i want it to do and i'm just adding a little bit more foam wrap just because i felt like i was moving the front around so much that it wasn't really giving it a chance to lay down the way i want it. So i did go back in with just a tiny bit um. You can wrap your hair down with a scarf. If you want, i opted not to, because i do want it to be um curly and have volume at the top. I don't want it to be. Curly at the bottom and then flat at the top, which is why i decided just to do it like this, so that way, when it curls back up, it'll still lay where i wanted to, but then it won't be too too flat. So here i am just wetting the hair a little bit more and i will show you guys how it looks when i'm done. Thank you guys so much for watching again i'll drop, wavy, mine's information down below make sure you like comment and subscribe and follow your girl on instagram at underscore cassandra olivia, and i will see you guys in the next video bye. You
Comments
MissExclusive4: I really like this unit! The price is perfect too. I love your voiceovers the curls look pretty with just water added too
CammyjOfficial: Here for it cause I know you gonna kill it
Cassandra Turman: looking good.
Claudette Carrothers: Very Nice
Tommy O: I see you! newest sub!
anna Lewis: hi cassandra you got a tan lol
Melanie Fuifui: Did it have a smell ?
MissExclusive4: Early
Jada Bolden: Hey Cassandra