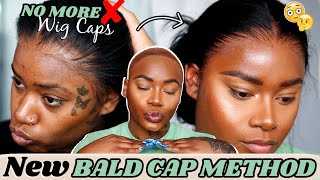
Easy To Follow Wig Cap Method Got2B Glue Full Lace Wig Application | Faux Loc Goddess Locs Wig
- Posted on 30 April, 2018
- Full Lace Wig
- By Anonymous
Instagram: @jazznicole https://www.instagram.com/jazznicole/
Please COMMENT, LIKE, & SUBSCRIBE XOXO
MY AFFORDABLE WIG SHOP:
https://www.customcrowncollection.com
MY AMAZON STORE
~ My Recommendations for Hair & Beauty Products ~
https://www.amazon.com/shop/jazznicole...
----------------------------------
*PRODUCTS IN THIS VIDEO*
Got2b glued ultra gel
Got2b glued gel
Got2b glued freeze spay
~COUPON CODES~
EBATES:
Get money back just for shopping online! Up to 25% back at your favorite stores! No, seriously.
Referal link: https://www.ebates.com/r/SINCER282?eei...
----------------------------------
~BUSINESS INQUIRIES~
All serious business inquiries, such as branding opportunities and sponsorships please email me @ [email protected]
----------------------------------
~ FILMING EQUIPMENT ~
Filming Camera: Canon 70D http://amzn.to/2i78Bk4
Editing Software: iMovie
Lighting: Natural Light and 2 LED Barn Door Lights http://amzn.to/2i5dytI
Are you a vlogger or a blogger looking to make revenue from product links?
I use MagicLinks for my ready-to-shop product links. Check it out here: https://www.magiclinks.org/rewards/ref...
----------------------------------
Video Music:
https://www.soundcloud.com/Lakeyinspir...
and/or
https://soundcloud.com/soulection
----------------------------------
Hey guys, it's Janice, so sandwich show you guys how I apply my full lace, lock, wigs, I'm going to be doing me weight cap method because I feel like it does protect your edges better, even though to me it is a hassle doing the wig cap method, But it does feel better when you take off your wig and I see couple bikes every single night, so I need something that's easy to remove, but does not damage my hair so right now all I've done is just put some got to be glued black bottle On my real hair - and I have the scarf on to lay my real hair back so take my scarf off and put it on my wig cap, we'll use this one today, the color is really up to you. Whatever color you want to do mine. Is this color so just make sure that it's your scalp color, I be seeing people try to do their skin color? It'S like you Scout this on your skin color. Your scalp is lighter than your skin color. So do your scalp color late so go ahead and put your cap on and and pull it down over your eyebrows. Pretty much so you know look crazy for a second but oh, be their eyebrows under your earlobe and yeah. Those are my eyes, okay. So what I'm about to do now? You start putting this got to the yellow bottom one, a cap, I'm just going to use this makeup brush here. This is just a foundation brush and taking your needs. A lot of this so just be prepared to you a lot mm-hmm, especially here right here. The two like areas by your side burn are like a movingly hard to lay down, so just be prepared to just use a lot. Okay, it's really no way around that. You'Re gon na have to be use a lot. So just put this right on your hairline to about an inch, an inch and a half back, and I like you to the brush because I'm able to spread it further than I would with my fingers. And it gets a nice even kind of layer when I use a brush and it's less messy. So you just like an old makeup brush, even a color brush and a dye brush would work. And now I feel, like I have a nice, even first layer and now take your handy dandy, blow dryer and because my extension cord, I'm gon na, have to kind of leaning down. So I can do this, but put your name on high or low whatever, but make sure it's on the cool setting, otherwise he'll take forever to dry. Okay. Now I'm going to do one more layer now that I've dried that a little bit. I do one more thin layer, really artisan focusing here. My eyelids are like right now and you guys can tell yes, my hair is blonde. I'M going through some things. Okay, it's not ready into Shona when she's camera ready using my real hair, but I'm going through the process of becoming a blonde girl. Okay, so it feels like it's drying and I'm just gon na cut this here in the center with the wig cap method. Of course you want to do makeup afterwards, because your whole top have to be ruined. We do my hair, oh no. I pull it up like that and then just kind of let it continue to dry. I'M gon na do one more layer on the sideburn area, which you really press to make sure that the cap sticks to your hair. That'S like okay! Now it's a final layer as it's continuing to just kind of air dryer. This last one I'm just going to take a little bit of this - really steal that thing on there make sure you have some makeup. Remover wipes, handy, cuz, it'll, definitely come in handy, and I have sticky fingers. I'M gon na be messing with the way you don't wan na, have any sickness or got to be residue or anything. So it's our that I did and now for the last time on this cup, I'm going to finish drying this, but I'm gon na take this comb and press. While I Drive I'll have to do a comb compress because it has slots. So the air strong gets through, and I'm just going to really press here and make sure that this really sticks out. Okay. Now I grab your scissors and start to carefully cut around your hairline and, of course my sideburns are still not stuffed down the side friendlier. I struggle I just want to give up on all together. Okay, so same thing on this side, it's sticking down, but I am gon na go over it one more time, just to make sure it stays do whatever all right. So that's good enough. So just kind of pressing that down it's saying I can move my face and it still go back in with the other bottle and my brush. I'M really just going to go on the hair line just right here and I'm going downward, because that's the way to cap those - and I don't want the cap to roll up so I'm kind of pressing it downward. And when I was my skin, I can easily just clean off with a makeup: remover wipe or anything really. So don't worry about that now take the got to be spray, and this is really like the final final step and go ahead and close range spray it on the hair line and because it likes to drip down - and it's kind of have my fingers here - ready To make sure that it stays right here, and this is what really seals the deal literally, I've tried numerous times without using this and run step, and it's just not the same. It'S just we have to sing so this combination of the gel and the spray is really what will make it so that you're we I mean you can do a lot. Okay, you could do a lot. Okay, you can, you can do a lot anything going over and then spray really makes all the difference. Honestly, just keep that in mind. I mean you can do without little bit little bit stronger. We use the spray it's the final step. So now I'm just gon na let this air dry a little bit while I grab the wig and get that ready. Okay, so here is the wig. This is a full lace, traditional style of lock, point that I made and by the time this video goes up. This video, on how I made the wig will already be up. So if you guys don't already know about the construction, so basically you have three clips in the middle one in the back and you also have an adjustable strap in the back. So I already know how I like my link to fit so I'm gon na go ahead and take my adjustable, strap and put it on the second notch on both sides, because I already know that that is the most comfortable secure fit on my head. But you can go ahead and test yours out and see exactly where you need to put your adjustable strap. So I just put it right there and my baby hairs are left alone right now, because that's how I get my baby hairs out of the way for the first time I apply it and then cut it out, there's already on there. So one way to do now is push my baby hairs back, while I cut around the edge of the way and get off all that excess lace, all right, you guys, so I have taken off the excess lace here it is, and so now, though, it looks Like this, and what I'm going to do is take the back home and pretty much just place it right underneath my braids and it's really just kind of going to tuck everything in when I put this clip under there, so be careful, because this is tacky right Now so I'm gon na place my weight behind the tacky area. All right. Take all these hairs out of the way. Now we're going to carefully pull this up, pull it up and place it down. I like to start in the middle and then go on the sides, and now I'm taking the back of the wrap top cone and when I started kind of pressing, my mouse tedious, but in between each press. If you just want to take a wipe and kind of clean it off, it will really help with making sure that you don't have any crusty gel pieces on the hair, so just press with the comb. So you don't even going under the locks, I'm not just going on the part, so I'm going under the locks in between the parts everywhere. I never want when he's tricky sides. Okay. So since this is my size, I'm gon na take a little bit of this. Is brain put it right there, let that sit for a second take. It hold it down and then start pressing all right so far, so good yeah! So far so good. So before I go in with the baby hairs, I'm going to kind of just lightly go over. My hair live with the blow dryer. Okay! So now I'm going to tackle these edges so, like I said before, I left them long to get them out of the way just for the application and now I'm taking them down, so I can cut them and start to scoop them. This will give a lot in this white residue. That'S one dry cleaner, because that's not one in the hair that is on my skin and on the cap. It'S almost it's one of the skin and on the cap, it'll dry, clear. It was on your hair. It is gon na dry white, so yeah that white resin is going not on the actual hair, I'm going to take a little razor little eyebrow razor and just start. You know cutting my baby hairs to desired length. I think I am going to keep them pretty long. Okay, so now that I got my edges cut, you can like barely see them, but here's the thing you do not want to use that you can I've done it before, but it looks a little crazy if you've got to be blue gel or any hardcore gel Or, let's not any of that on your baby hair, it's going to look hard, it's going to drive hard, but what dries softer and more natural-looking is mousse. So I just have some trust, make moves here and what I like to do is give a little shake and then pour and then take a little edge brush and start start flipping with this. It'S kind of feel awkward, but trust me. It'S kind of look better and if you were to use Jo all right, you guys, so I did my edges and then I let it dry. While I was doing my makeup - and this is how the final look turned out - I absolutely love this unit and this method, but this thing is so secure. Okay, oh, this thing is really secure. Even after took off the wig, the cap still stayed on my head for about three days. You know all that thing's not going nowhere. I'D wash that thing off and I think it's definitely worth the extra step. So if you liked this video make sure you would a thumbs up and I will see y'all in my next video bye,
Comments
Amy Armstrong: Your the only person who took out time to show steps. I respect you and became a fan!
Ruthies Hair Journey: Everything in this video is just soooo on point. You killed it sis
kiemarian Edwards: Great job! I use the braided cap, so I won't have to use glue or gel. It's a great protective style!
Althea Staples: BEAUTIFUL I LOVE IT ESPECIALLY THE COLOR AND IT LOOKS GREAT ON YOU GREAT JOB
Shay Jenny: You did that. loved how it turned out. I Tried Got2B once , but it caused my head to itch like crazy...do you take it off the unit everyday or leave it on for a few days?
B W: The final look is gorgeous c:
Jade Styles: How did you get rid of your scars so quickly? skincare video needed! X
ByEFelicia: Ooo your face looks so good! Skin glowing and amazing
Zoe .Azukaaa: Pleaseee do a skin care routine because i have recently been watching ur videos and ur skin has come a long wayyy!!
ebony ramiah: Beautiful
Joyce Clark: I love it!
MARZz B: Great Job!
Plush Furr: Gorgeous
Michelle Middleton: How do you take the wig off or the cap off without damaging your edges
Mistress J: The most detailed step by step video..... Very helpful......
ZEPIE: i am S N A T C H E D, this one video might get me into lace wigs
minime diamond: yasssssss jazz make it look so easy tho
Tanya Faithful Preoidt: Great job Queen
Kierra Malone: Great job.
B W: Isn't all that glue\gel going to seep through the stocking cap unto your hair?
Joyce Clark: Do you sale the wig cap you used to make the wig? Where can I buy one?
jmarie1719: So cute.
Conscious Progress: Girl your skin
TORRIE.: The wig itself is cute af & I want to invest in one but I dont want it to be stiff. Do that loosen up after a while? Do you have an old one you can show us how it looks now?
chestnutvsg 2016: Yo legit..can u do my hair!!!
LongHairDontCareAlwaysSlayedRingnBaed: hi hun ...........can this unit actually be cut into a bob?
Rene Potato: did you color your natural hair?
Slimtinaa Turner.: ✨
Tamika Phidas: Do u make wigs? :)
Danna Danna: Pretty
BeezyBaby28: Is it heavy
LongHairDontCareAlwaysSlayedRingnBaed: hun........... glue on the hairline????????? maybe on the forehead but the actualy HAIRLINE??? goodness
Erica M. Cross: Catfishing hard..
Mallory Rathon: Lola Lolelole
Mallory Rathon: Lole