How To Get A Secured Super Flat & Melted Lace Closure Install| Ossilee Hair
- Posted on 14 October, 2021
- HD Lace Wig
- By Anonymous
Welcome to IAmBeautifulHustlerTV .
Be sure to SUBSCRIBE & TURN ON YOUR ALERTS
——————————————————
MY PERSONAL YOUTUBE CHANNEL : In The Life Of A BeautifulHustler https://www.youtube.com/channel/UCB9xX...
——————————————————
----------OssileeHair----------
Hair Details: 5x5 HD Lace Closure Wig Straight Hair 28inch
Use code: “ossileehair” to save $6
Direct Hair Link➤➤https://bit.ly/3BEQcC2
4x4/5x5/13x4 HD Lace Wig
https://www.ossileehair.com/collection...
13x4/13x6/360 Lace Frontal Wigs: https://www.ossileehair.com/collection...
4x4/5x5/6x6 Lace Closure Wigs: https://www.ossileehair.com/collection...
Highlight & Coloful Wigs: https://www.ossileehair.com/collection...
Non Lace Headband Wig: https://www.ossileehair.com/collection...
Bob Wigs: https://www.ossileehair.com/collection...
Ossilee Hair Official Website:➤https://www.ossileehair.com/
Ossilee Hair on Aliexpress Shop Link:
https://www.aliexpress.com/store/14152...
Contact us
Facebook: @Ossilee Hair Products
Instagram: @Ossileehair1
Email: [email protected]
Wholesale Inquire Whatsapp: +8619303748555
Follow My Socials:
Instagram:_Beautifulhustler
@thebhslay
@iambeautifulhustler
Twitter:_Beautifulhustl
YouTube :IAmBeautifulHustlerTV
✨For Sponsorships ,Reviews,& Questions
Email:[email protected]
786-571-1313
To Purchase Hair & Products Www.ibhslays.com
Allow 3-14 Business Days For All Orders
——————————————————
#Youtuber #YoutubeVlogger #YoutubeReviews #Hairtutorials #Miamihairstylist #Miamihair #Duluthhairstylist #TravelingHairstylist #YoutubeTutorials #GeorgiaHair #GeorgiaHairstylist
#Atlantahair #Atlantahairstylist #Celebrityhair #CelebrityHairstylist #SouthCarolinaHairstylist
#thebeautifulhustlerbrand #thebhslay
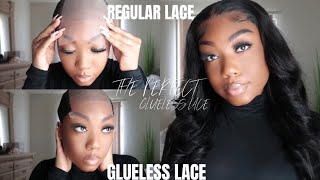
So welcome back to my channel guys and don't forget to click the subscribe button and turn on your notification bells, because we are back with another video and more videos to come. Okay, so today i'm going to show you guys how to get a super flat, melted lace, closure, wig, install okay, and today this hair is provided by australia hair. This is a 5x5 hd lace, 28 inch straight wig, okay, and for today's look, i'm going to achieve a bust down the middle, with some wand, curls and a little layers of wand curls and oh also, i did color this wig black. I forgot to mention that this wig does come in natural brown, but i did water down the wig using a royal navy and they didn't have any jet black. So i used one bottle of royal navy and one bottle of off black by the brand adore, and it got me this nice little black here. Okay, so for today's model we'll be using my cousin, brittany. I know you ain't seen britney in a minute, but britney is back and it is britney's birthday all right, so we is hanging out with outside. Okay, so got ta get my girl right. You know i'm saying like. Oh, these birthdays and these liver seasons, jesus christ, but shout out to all my lovers out there libra gang if you're a libra, just drop some love down in the comments. If your birthday is upcoming or if you will pass virgo, i don't really like burglars, but shout out to my virgos as well, but uh i'm just playing y'all, but let me show you how i got this um closure wig slayed. Now, for starters, i did go ahead and do her bobcat method off camera. I only apply the glue on the cap where the closure is going to lay, and i just sewed everything else around it now. For starters, um. This is a hd lace, so it should blend perfectly it's going to make that lace, disappear and y'all know. Hd lace is like the best lace out right now. So with that being said, um the first thing, i'm going to do of course place the wig onto her head and you want to line it up in the center that way. Um. You can place the closure like in the right place and i took some um. I used level now for brittany. I use the level 16 palette. Okay, the level 16 palette and the ruby kisses brand is the darkest set of foundation that they have, and i use that lighter brown shade. That'S in that level, 16 palette. Every time i do britney and it gives the perfect blend for her every time, so i use that lighter brown foundation to put in the inside of the lace and before i even begin to glue the lace down, i am going to cut the thick straps off The side of that lace closure, which will give you a more seamless look when it's time for you to you, know, cut and style your baby hairs it just make it just give it that frontal effect. Okay! So now that i have that out of the way i'm gon na go ahead and go in with my layers of my lace, mud, adhesive and i think for brittany, i would say i did three or four layers, maybe three, maybe four, i'm really not sure, but Either way it goes, the closures were secure, so, as y'all can see, britney is another victim of in this family, with the high low hair line, y'all see how high that forehead be in the middle, but on them size is kind of low, but that's okay, because I'M going to apply that glue the same exact pattern of her natural hairline and i'm going to tuck that closure down to follow that same exact pattern of her natural hairline. So right now, i'm just focused on getting that glue from like temple to temple, and you just want to spray that glue out, like i tell you guys, spread it out nice, nice and thin as flat as possible. That way, it could turn clear quickly and you know do what it has to do. So i'm just gon na go ahead and go in and really just spread that glue out and i'm going to add all of my layers and once all of my layers is going, then i will go ahead and tap the wig down so stay tuned and keep Watching so those hairs out of the way just to make sure no hair get where it's not supposed to be, and then i'm going to go ahead and start with the center of that lace. Closure place it down into place and, like i said, i'm going to pull it to match the same flow of her hairline. So on the center is going down the center. You know pretty normal normal placement, but i'm going to stretch and pull that wig to go down her sides the same way her natural hairline goes so her hairline is still going to flow the same way of the natural um, her natural hairline, okay. So i'm not going to pull it all the way down to make it look straight across no, i'm just going to curve that lace to match her hairline and i'm going to have her hold each side as i comb. You know that lace into place - and i sew it down all around, because that's key to getting a super super flat, install especially like with closure ways is to make sure or just wigs in general one your foundation needs to be nice and flat. Two, you need to make sure you're sewing the wigs down nice and flat as well, because - and i know this for a lot of us - because i have this issue on a daily basis. Right now, when you use the scraps on the inside of your wig to tighten it in the back, it gives you this big airy space in the middle of your hair. So with that being said, even if you did the perfect foundation, even if you parted your thing and laid it out flat once you tighten that wig with them, scraps is going to give you that big space bubble and it's going to make your hair not look Flat anymore, so what you will have to do is go in sometimes on the one: okay one. You can sew around the perimeter of the wig like i'm doing here, because this is a closure wig. So, of course, only lace in the middle and then there's the tracks and everything else on the side. So, as you can see, i started from the side of the wig and i am sewing that wig down to that stocking cow, which will give it a more secure, hold around the perimeter and then towards the end of this tutorial. I'M going to go in about an inch down from where that closure is, and i'm going to lift that hair up stretch the wig down and then sew it across the middle of that wig. Okay and that's what's going to give you that super super super super flat, install whether it's a closure or a frontal okay, that makes a big difference. So let me say this again: yes, it's important to sew down a perimeter of your wig. That way, you don't have to worry about your wig coming up flying up, but keep in mind when you do use the adjustable straps in a week. It gives you that big, every space at the top or in the middle part of your head, so to ensure that your wig is going to be super flat after sewing it down and tightening it. You will have to go back towards the middle of the wig like towards the top center, and you need to sew that wig stretch that wig down some more and sew it down, so the wig is super flat. So this is the first part. I'M doing here sewing around the perimeter stretching that wig out. I also adjusted the straps on the inside, so it did give that airy effect. But, like i mentioned towards the center end of this video, you guys will see me go in towards like about an inch down from that closure, part and re-sew the wig to make sure that it's super flat and that's how i was able to get her closure. As flat as possible, so use those key little tips and i promise you y'all it's gon na get you a long way. They'Re gon na, say grill. The weeds is on flat flat left left leg. Do that with every install every frontal wig closure, whatever, like the flatter, the raw, the neater, the more perfect the look comes together. Okay, so, as you can see, the wig is secured. I haven't even tied it down with the melt belt yet and usually y'all know. I do that twice in the install, but i'm just gon na go ahead and start by cause. It'S just so melted. It'S so stuck. I just went in and i was like you know what let me just go ahead and raise off that extra lace or whatever and then i'll just do the you know the tresemme and the time it down. You know just one time with this video, but i went ahead with that lace, glider and i raised off that lace and then i'm going to go ahead and begin to part the wig off pull down the baby, hair sections and prep it for you know, like You know as far as hot combing and using a wax stick to prep it for that melting uh process, but it's already getting scattered. Keep watching and listen. Y'All make sure that part is straight. Make sure that part is in the video. You want to make sure that you get that thing. I don't care if you got a partner with 66 times, go from the center of the bridge of that nose, and you work your way towards the back and just go over it. Okay, but here is that step that i was telling you guys about like you guys see, i went ahead and parted that closure. It looks flat, but it's not as flat as it can be. You guys will see the major difference, because it has that puffiness that i was telling you guys about. So what i'm doing right now is i'm pulling down like i lift those tracks up, and i stretch the wig downward that way that air that's at the top, will stretch all the way out and like completely flat and i'm stitching right in between that area. Okay, so you want to make sure and i'm so mad, i'm sorry! I did not turn the camera for you guys to see, but it's just like sewing in between your wig. That'S basically what you're doing, but you want to stretch your wig completely out that way. It'S laying nice flat and tight, and your client will also feel the difference. They'Ll be like okay yeah. I can feel that it's tighter now that you did that so because that's what i asked her so yes ooh, my booty is looking good y'all in the little sniper gun shorts but anywho. But, yes, you want to make sure that you sew in between that area. Up there and it's going to make a major difference and now that i laid the wig down - and i go back in with that hot comb - it is going to be super super bone straight neat. Yes loving it. I love it but y'all. Let me know checking down below and the black is definitely giving like. I was a little nervous using the off black because they didn't have any more jet black or black velvet, but for me to use one bottle of navy and one bottle off black, i'm surprised they got this black, like i'm, really really shocked. But i'm happy, though so, but who excuse me y'all what we're going to do now is just go in with that foundation again tap that lace, which didn't make a difference. It was already melted, but i'm going to spray that trust me holding spray across the hairline and a little bit on top and just hot comb. Everything on out and i'm not even gon na lie y'all. With this install boy, i made sure it was not a hair out of place. Do you hear me like when i tell y'all when y'all see the the final look? At the end, when i told y'all, i sleep that thing down with that westy like it was no flyaways baby, it was none. Okay, like not one - and i was just here for the energy - was here in this tutorial - i'm just loving it, so i'm tying her down with that melt belt and um. The wig was still a little damp because we did kind of like let it air dry. So i think i did just you know: go in and blow dry some, but as far as like the curls and stuff that we're going to do for today, i did do like some wand curls and they kind of like teased it out, and i just added Some light layers off camera. The reason why you guys can you know, didn't get to see that process, because my phone had actually ran out of space very irritating if you're, a youtuber and you'll be recording. You know how aggravating it gets when you're in the middle of the tutorial, okay, but nevertheless, so that part you guys won't be able to see, but for as far as everything else pretty much the majority of the tory tutorial, you will see, like the main main Part like that was the only little part that you guys won't be able to see in this video is me actually adding a little light layers to the wig after i had curled it, and you know, tease it out, but right now my focus is to just Get this top part really flat. Like i mentioned, the wig is a little damp, so i'm just going to go in and blow. You know blow dry it after i get it in place and you know do whatever i need to do, but um once we remove this milk belt, we will get into these baby hairs and, of course, the one itself so keep watching. So now that that wig is dry, i'm going to continue to just sleek everything down super super flat, and i just like to make that part across the back of the closure to hot comb. That hair uh backwards should just give it a more clean and seamless transition. So yeah, i see britney. She is singing shoes and her feelings baby, but yes, um, i'm partying off the other side. I'M going to, of course go with that. Wax stick slip that one down and you know, do what i got to do so. Let me get my tools: yeah yeah, yeah yeah. So, yes, i'm adding that elastic sleeking, that down with the hot comb, and once i get all this sleek, i will go ahead and remove that milk belt and begin to scoop the baby hairs. So, yes, do y'all see the melts. Do y'all see how flat the wig is like she really feels like she got no braids. The wig is definitely getting flat. The wig is definitely getting melted, yeah yeah, yes, as it should love it love it love it super flat. Super neat super melted. So let's do these baby hairs so we're going to go ahead and um, you know, cut the hairs down short, oh my god y'all. When i tell y'all i'm in love with the sleek. Oh, that thing look but um yeah we're gon na go ahead and get into these baby hairs. Um. Of course, y'all know i like to cut the hair short and i get to swoop swoop, swoopity swoop, so yeah, let's get into it, look today. So that's what we're gon na do. Um! I just cut the baby hair shorter in the middle because i just like that kind of like i don't know if you want to call it like a dimension, i don't know, but i just like it to look short in the middle and they need a little Bit bigger on the side, so i'm just going to go in with the moves to soften and wet up the hairs and begin to scoop and cut them more if needed, with the little scissors and then once i get a desired. Look that i want them to be like moldy into. I will go in with that tresemme holding spray, and you know add that holding spray to give us that nice firm hold, even though the mousse will give you a firm hold with the once it dries completely. But just to give you like a hold hold, you know um and still achieve that soft. Look! That'S why i went in with both of those and i'm going to pull some of those hairs out right there on the side, because it was getting too thick around the edges of that closure. So i did go in and pluck some of that hair out or whatever like that, but nevertheless focusing on getting it nice and sleek and all blended to perfection. And then we will work our way over to the next baby here. So just keep watching. So when i tell y'all i'm in love y'all, i really really love this install. I love this oprah. Look the closure, the baby hairs, the melt, the blend, the flatness, the neatness, just yes y'all it was given. Let me know what y'all think down below though, but it was definitely giving, even if you don't think it's giving, i feel like it was getting so it's given period so um. Now that we got that all squared away honey, we're gon na go ahead and begin to add these curls. Like i mentioned y'all, i will be doing some long curls, so i'm going in with my gem curling one, it's an interchangeable, so you can take it off. It comes with like four different sizes, so i'm using like the second biggest size and i'm just curling, both sides away from the face, and i'm just gon na go ahead, and just do that. You know this part here was just repetition over and over. Oh, i forgot to show y'all. I did go ahead and conceal. Why didn't conceal the part yet, but i did go ahead and black spray, the part, but i will conceal it like afterwards, but i'm just gon na go ahead and one curl the hair away from the face and yeah i'm just gon na. Do that to both sides, so so so now that the hair is all curled up, i'm just going to kind of like tease the curls out finger them out. You know release them. I don't like on curls. I'M sorry me, i don't like tight wand curls. I don't like when it looks like look like you only have a little bit of hair on your head, so it'll, be me i'll, be like yeah. I'M gon na have to brush these out baby because i hate that thin type of looking curls um. It'S just not for me so, like baby i'll, be having to go in and brush out and finger comb, and you know just really bring the curls to life and, like i said, i did go in off camera and add some layers because it was just get It it gave it more of an effect when i added some layers in but um. Like i said, y'all, not one hair was out of place, it was so smooth, it was so neat absolutely loved it and i did go ahead and conceal the part, and here is the finishing look. Let me know what you guys think down below about this install cause. It'S definitely giving. So. Thank you guys for watching i'll, see you next time.


Comments
Na'Asia Handy: yessss, this install is so clean & bomb!!!!
lneal2800: Yayy! Another slay! Can't wait! This is Gorgeous!
Chiomytata: Another great video. I wanna do this type of install ASAP.
𝙺𝙴𝙻𝙻 𝙻𝙰 𝙱𝙴𝙻𝙻𝙴: this slay is to die for!!!
LeahReena: Hey ladybug, simply amazing and beautifully as always
Stacyann Burgher: Wow can’t believe I just discovered your Chanel am impressed good job you teach me a lot thank you ❤️
Shevell Scott: Beautiful install , your waist be looking snatched girl!!!!
Jamarah Williams: It gave a frontal install, instead of closure!
Stephanie Smith: Definitely giving what it was supposed to be giving
Ja’Kia Unique: Yesssss girly come thru with the slay
Michelle Junior: Beautiful!!!
Forever_Dee: Beautiful
Savage Slayed Me: Flawless install , really the underrated goat
Queen Leo: Another amazing slay queen. Question, did you have to pluck the closure or no?
Teshan webbe: My fav! Bomb install! So basically you would sew down where the puff is? Or its better to sew on top for that super flat look?
Heis Prettycool: This is SO bomb
Ariona LaShe: Can we get a video of you sewing in between your wig ? I love it
G3na D: Happy Birthday ❤❤❤❤❤❤❤❤❤❤❤❤❤❤❤⚖⚖⚖⚖⚖⚖⚖⚖⚖⚖⚖. Amazing work as always.
Lunese Serano: Is your glue long lasting for installs ?
Lorrie F.: Satisfying to watch as always!!! My favvvv YouTuber
Lashea B: She slayed this
MrsQueen LadyRed: Yes I Can't Wait To See Mamacita I Definitely Missed Your Videos & Seeing You Slay
Derril Bland-McLiechey: YESSSSS I been waiting on a new slay
Toria Bull: Love this #LibraGang ♎
AshiaGirl: Omg i didn’t know you sale the melt belt cause I’ve been looking for that particular same one, When you gon restock the lace belt cause ?
Anita Bonita: At this point I need to come take your class
Empress Eemaj: It’s definitely GIVING ‼️‼️
Kim Ivey Makeup: Who already here waiting for it???!!!!!!!!
Chanya X: What are those curlers called?
AllexusBriana: sometime when i remove the melt belt , it gives me that “sticky” look. could this be because of the glue not fully dry or maybe the type of meltband ??
Daisia Lanae: omg finna watch all your videos. no way i’m just finding you
DollFaceDeluxe: Come O'wan with this here slay miss ma'ams.. its not a sandwich, cause this heres a WRAP! ☺ ( im sorry for my corniness) but this is too cute..
deseraymiles87:
Tava LaSha: Pressure
stephine brown: ❤️❤️❤️❤️!!!!
M. Janell: can you do a video on a girl that has a shaved head. i have waves and i want a wig but i don’t have any hair to sew onto lol
nikkistayfocused: beauty,now u always give a melt but this one right here if it had fly away hair outta place u said better sit your $5 a$$ down
Laria carpenter: Yesss
kismicjones1987: You did that
Adiis World: is tht cap really needed if you don't have hair at all
Made In Designz Slay: ; ii like the curls
Daisy Law: Please if you May .. Can you Read a Disney Story while you make the Video I love your Voice GOD Bless you Ma Hun
Kara Hutchinson: Yass
kponepm: Nice!! .... ♎♎Gang
Jasmine Doll: It’s Giving Fasureee
ANOINTEDHAIRSOLUTIONS: Bomb
LifeWithDaron: Libra ♎️ gang 10/07
The Chambers: Yasss ♎️ gang 9/30
The Lace Bandit: Where is that hot comb from, baby it gets hot hot!!
Shshsh Shahin:
Khaila Iman: I have a high low forehead too
JAMAYLA M.: i have a high low hair line
Tiana Redd: 9/27 ♎️ ❗️
Zharia Hosea: My birthday is tomorrow
BAINES TV: Bawdyyy okkk
Ruby Standokes: I don’t like virgos, or Leo’s..Libra gang
ISRAA AL DUHUN: Hey bob