Very Detailed Hd Lace Closure Wig Install With Highlights Ft. Tinashe Hair
- Posted on 12 May, 2021
- HD Lace Wig
- By Anonymous
To book an appointment with BeautiiByDay
Follow on Instagram @BeautiiByDay
TINASHE HAIR:
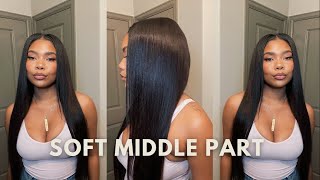
Hair Details: Body Wave 5x5 HD Lace Closure Wig 180% 22 inches.
Shop Now➤ https://www.tinashehair.com/product/5x...
Invisible HD Lace Wigs➤ https://www.tinashehair.com/product-ca...
#TinasheHair Official Store➤ https://www.tinashehair.com
Lace Front Wigs for Sale➤ https://www.tinashehair.com/product-ca...
Colored Wigs ➤ https://www.tinashehair.com/product-ta...
Use code "LWIG02" to save $10!
#Tinashehair #lacefrontwig #HDlacewig
Instagram @tinashehair: http://bit.ly/2Isud9X
Facebook@Tinashe Hair: http://bit.ly/34FxUAm
WhatsApp: +86 17537405381 Email: [email protected]
Hey beauty, queens welcome back to my channel. I know it's been a minute, but i am back um. This wig we're going to be reviewing in this video is a 5x5 hd lace, closure wig from tinashe or tanashi. However, they pronounce it i'm not too sure, but whichever one um, it's 22 inches, it's body wave and it's really really really convenient. We are not going to be glowing this unit down. All i'm going to be using is some um sebastian shaper and some got to be free spray. So you guys can take this wig off every night. I didn't even put a band inside of it. It'S only the two straps that come in the back which are adjustable, so you guys i'm going to what you see me just do was take the sebastian shaper just to get all of the hair out of the way um. You don't want any flyaways to be trapped when you're, trying to um spray, your lace down, so here's the guy to be free spray. I just sprayed some in between um the hairline and i'm going to make a part, and then, after this i'm going to take my beauty band and i'm going to tie it down so until it dries so to occupy my time. I usually try to get my part in before i tie the hairline down just so that i can be doing something and not just waiting for the lace to dry um, so she's getting a middle part. So i'm going to put i'm putting the middle part in now and then i'm going to tie it up and then i'm going to blow dry the hair straight um. This is just how it looks after it was why it was bleached, washed and combed out. But i can say that this hair lifted really well, it's really soft um. So far so good. Now our hairline is out the way we do our regular steps that we would do with any other lace. You want to get your part sleek and flat. We don't want no lumpy units over here got to make sure that your part is completely flat. You want it to look as natural as possible, so i i put on narobi on the top. Now i'm just combing it through and then i'm going to use my blow dryer to dry it. I don't really see a lot of people using this method that i use, but for some reason i really really like the way the blow dryer gets. The part really really flat um. You could also mold the part by putting it in a ruby um, getting your part in place and then putting your client underneath the dryer you can use the wrapping strips you could do whatever it is that you are comfortable with doing me. I love using my blow dryer if you've been following me. You know this is how i mold every single part and that's how i get my parts flat. You can also use this time to get the rest of the hair straight. You know when you blow dry, when you wash your hair or wash your wigs either you let them air dry or you put them in a dryer, but the hair is never straight. If you wanted to get straight, this will help with your straightening process. This could be the first step to your straightening process, so i try to mold the part and get all the hair straight as well. This way, i don't have to worry about if i'm doing curls the blow dryer kind of gets the hair straight. So i can just go right into doing the curls instead of having a flat iron first, so we removed our beauty band. This is how the part is looking so far. If you see the hairline, the hairline looks so natural. When you put the band down, it makes the very front of the hairline lay flat already, so that's one tip in customizing, so that you can get the hair down and look like a real scalp um. Now i'm gon na make sure our part is perfect. It was a little wide, so i'm going to use our concealer use the la girl concealer rather and get the part to match the exact color i needed to match and then i'm going to make the part smaller. So when you're working with five by five or four by four closures, if it's not a middle part - and you want a side part - you can shift the whole wig to one side. If you wanted a deeper part um. But if you wanted to put it back to the middle, i would say just try to get your part as deep as you can have it from putting the closure in the middle, because, if not and you're trying to cut it in layers and stuff, it might Be a little uneven um, but that was just another tip. You know for you guys, you don't have to place the closure on the side when making it just because it's a side part you can just put it as deep as possible. But if you wanted something deeper, you would have to shift the wig over um. Now i'm going to cut our lace off, so i use the scissors to cut the very middle of it and then i'm going in with the eyebrow razor to get rid of the rest. Now all i used to lay down the lace was got to be free spray. I did not use any type of adhesive to keep this closure down. We want to be able to take this closure off at night and i just feel like with closures. You don't really have to glue the closures down um. As you can see, it looks just as good um with using the spray. So once you get rid of the lace with the eyebrow razor, then i took the sebastian shaper and i sprayed it just to make sure that there was no lifting in the very front, because sometimes when you take the when you start to take the lace off The very front of it may not be completely down, so just for the reassurance and security i just spray again and then i pat it down, and then i do the same thing with the next side and then i'm going to tie it down again just to Make sure that everything is secure do all we're gon na do is flat iron. The hair straight we're gon na leave our band on the entire time, just to make sure that the lace is melted in the front. So i'm going to speed it up. You guys don't need to see me, you know roll by roll, slowly, um flat, ironing the wig, but i do want to let you guys know that this hair colored really really well. Even after coloring it. It was not brittle. The hair was not dry um. You know it was really really good and easy to manage. I was very surprised actually so now it's time for us to remove our band um. She said she wanted like a little bit of baby hair who don't love baby hair nowadays, so i'm gon na give her some baby hairs. But, as you can see, it looks so natural. She doesn't even need the baby here, but we know the baby is in. So i'm just going to section out two pieces on the side to give her some baby hair. So just to give you guys a little bit of background information, i use l'oreal quick blue um. That is a bleaching powder and i used 40 developer to lift the hair. What i did with the two pieces in the front i put those in aluminum foil, because i wanted those to be a little lighter than the rest of the ombre here and then the hair that i um ombre. I just left out so, as you can see, the two pieces in the front are more blonde than the rest of the hair, so she is leaning forward. So you guys can get a closer view at the baby here, because the hair is light and her skin is pretty light, so it's blended in together, but you can see it now as she leans up now we're going to do the other side. Okay, guys. We are all done. This is a 5x5 hd closure wig, it is body wave, but as you can see, it gets super super straight. It'S super flat. It was very convenient easy to install. If you follow all the steps in this video, you definitely will be able to execute this look. Um. Follow me on instagram, follow tanashi or tinashe here on instagram as well. All of the information will be left in the description box and you guys already know. I will be back with another video sorry, it took so long for me to post, but we are going to get back to it and i hope you guys are subscribed.

Comments
Phoenix Beauty: You slayed the mess out of that hair !
Alisha Taylor: ✔