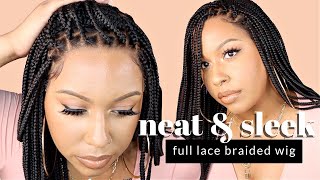
Watch Me Slay This Hd Lace Curly Wig & Create Big Fluffy Curls Ft. Junoda Wig By Sezzle✨
- Posted on 20 May, 2022
- HD Lace Wig
- By Anonymous
Within 30 Days NO Reason Free Return Only for My subscribers Place Order
●▬▬▬▬▬▬▬▬▬♛ #JunodaWig ♛ ▬▬▬▬▬▬▬▬▬ ●
I am wearing HD water wave wig in video: https://bit.ly/3MyUUaa
https://www.junodawig.com/ ➤HOT SALE wigs: https://bit.ly/3agvDU1
More Affordable HD Wig Available: https://bit.ly/3wH8UI0
hair information: 13x4 HD water wave wig 24 inches 180 density
Using Special Code To Get 15% OFF: JA15 For New Costumer Get Extra $$$ OFF
AfterPay & Klarna & Quadpay & Sezzle PAY 4 Equal payment Within 6 weeks!Can Not Miss!!!
Invisible lace frontal Wigs available: https://bit.ly/3NkCvxE
New Trending Affordable wig: https://bit.ly/38Fnckz
Recommend human hair bundles with closure: https://bit.ly/3yOLinI
YouTube @JunodaWig: https://bit.ly/3xborzP
Instagram @junoda_wig: https://www.instagram.com/junoda_wig/
Facebook @JunodaWig: https://business.facebook.com/JunodaWi...
Want To Promote? Order Problem Contact: [email protected]
#junodawig#junodahairstyles#junodahair#vparthairwig#lacefrontalwig
#waterwavewig#skunkstripewig#kinkycurlywig
Welcome to My Channel
Be sure to SUBSCRIBE & TURN ON YOUR ALERTS
——————————————————
MY PERSONAL YOUTUBE CHANNEL : @In The Life Of A BeautifulHustler https://www.youtube.com/channel/UCB9xX...
——————————————————
Follow My Socials:
PERSONAL
@iambeautifulhustler
BUSINESS
Instagram:_Beautifulhustler
@thebhslay
@girlsniteoutapparel
Twitter:_Beautifulhustl
YouTube :IAmBeautifulHustlerTV
✨For Sponsorships ,Reviews,& Questions
Email:[email protected]
786-571-1313
To Purchase Hair & Products Www.ibhslays.com
Allow 3-14 Business Days For All Orders
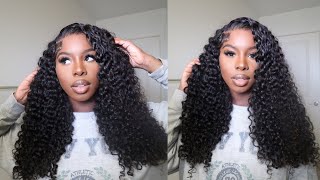
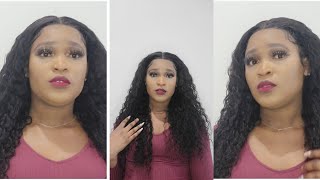
He'S gon na die what's up beauties and welcome back to my channel. Today we are back with another video and today's hair is from janata hair. Now, i'm going to show you quickly what came inside this packaging um, along with the wig for one they gave me a wig brush which wig brush i always needed, definitely always need those. They also give you a little card with instructions and their social platforms. I got some lashes, a silk wrap, a stocking cap, a edge brush and, of course, the wig itself. Now this is a curly wig. It is a hd lace. It says 180, 80 density, um, curly, lace, front wig, and this is what the wig looks like straight out of the pack um. It'S giving me like deep, wave type of pattern, um, but just to be sure, make sure you guys check out the description details down below, and this is the parting space it's only like in the middle, because it's a regular lace front and not a lace frontal. But nevertheless, i'm going to show you guys how i installed my wig today and did the styling that i did now. For starters, i did go ahead and bleach. Those knots and uh pluck this lace a little bit in the front. So we can have a more of a natural appearance and with the first time when we put my wig on it, fits my pretty uh, my hairline, you know pretty well, so i'd be happy about that. I don't have to fuss and tussle with the wig to get it to you know what i'm saying match my hairline. So that's a good thing right there in my size cap is medium um. You guys, i typically get my capsule medium, but if you ever get a wig with the elastic band on the inside, i recommend going to size up because it's like something about those bands and the way they place them kind of makes the wig hard to kind Of fit your head because it's like you know it only stretches so far, but nevertheless um. As i mentioned, this is a medium sized cap and it fixed my head perfectly. So first thing i'm going to do is go in with my ruby, kisses foundation, i'm using palette number 16, but i'm using the lighter shade of the brown in that palette and i'm just going to apply that all over the inside and just a little bit on The edges, on top of the lace as well just to ensure that my lace will be super melted and blended, with my natural skin tone and as you can see, as i pull that lace down, you can tell it's going to look perfectly fine and then, once That'S done i'm going to go in with my adhesive now, as i mentioned in my previous tutorials guys, we are dropping a new scented adhesive in our next restock that will be coming and it is strawberry, scented, okay, so today i'll be using adhesive um. Just to you know, you guys get comfortable with me using a different smell, because it's still the same strength still holds super good. It just smells much better. It'S more appealing to the nose okay, so i am using the strawberry scented adhesive and i'm just rubbing that you know one end: you want to smooth it out real nice and flat, so it can turn clear and um for today's install. I only i think i only use two layers honestly. I believe i only use two layers for this install, so i'm just going to smooth this out and as it starts to turn clear on camera, as i'm smoothing it out, i will go ahead and begin to add that second layer and then once that second layer Is completely clear, i will go ahead and begin to tack down the wig so now that the adhesive is ready to be tacked down, i'm just going to go ahead and i'm going to start with um the side. I showed you guys this method about two videos ago, because you know usually i start from the middle first and then work my way to the sides. But when i realized that when i started my wig from the side um, it gave me like a tighter compression feeling on my lace versus me just laying it down and it's just there and i don't really feel it. But i like to feel that tightness that snatched effect. So that's why i started pulling my wig from the side and then i went around because i don't know it just feels a little different. It feels a little more tighter and a little secure, as i mentioned before, and like my not my last video but the one before that. But, however, i went ahead and placed that lace right into that glue and, as you can see, my lace is not going anywhere and i'm just taking the hot comb hot comb, the lace back and the hairline, nice and smooth. And now i'm going in with that blow dryer on the heat setting and just blowing drying that lace on in as well before. I secure that and tie that down with the metal belt. Now today i decided to kind of style my hair before i actually uh, remove the melt belt and cut the extra lace, but, as you guys can see, this wig is super. Super super super full, and this is a hundred and eighty percent density wig. So today i decided to do some really really tight big fluffy curls with this wig, so i'm taking little sections and i'm taking my very, very, very tiny, um curler and i'm going to wrap around the hair as if it's a curling wand and just curl. My hair all over now, because this process is very tedious and it's also a lengthy process. I did not show me curling my whole entire head, because it would just be a long, extremely long, video and repetition for no reason. So i'm going to curl um a few pieces on camera um, all i'm doing is just grabbing sections, curling grabbing a piece curling grabbing a piece and curling, and i'm just going to show you different videos of the process like little snippets of me getting you know, Most of it done and then about halfway and then completely halfway, then i will remove that milk belt and you know, cut off the extra lace and do all the extra styling and everything else. Okay, so um. All i'm doing, like i mentioned, is just pulling small sections um and just curling it up with this curling iron. I can't remember where i got this from it had to be like a hairstyle or something, but if you just get your a really tiny curler, you know always check amazon. I'M a big amazon prime shopper check amazon and see if they have it, but anyone should do this. One here goes up to 450.. I believe it's a golden hot one, if i'm not mistaken, so check the brand golden hot and just get this really tiny, curler or just any color that gets really hot and it's this size, and it will give you the same effect now, even though this is Deep wave, you can also do this look um with well somewhat with body weight. It depends. I would recommend shorter hair, though, if you're gon na do a look like this, but um, just these curls period on curly hair is gon na give you a really bomb effect so just give this um. You know this technique a try and let me know how you guys, like it: okay guys. So here is a quick little update. This is how much i have got done so far. Okay, super super super pretty very, very pretty and nice and tight, and this is when i did the rest of the head - and i just have this little section here at the top. So now i'm going to show you guys how that you know i basically did the rest, so just same old thing, just grabbing it wrapping it pulling it down grabbing it wrapping and pulling it down. So i'm going to repeat these steps until i have all the pieces um this last little section of pieces curled up so now that all of that is curled up it's time to remove that melt, belt and cut off the extra lace and style the baby hairs And then, of course, the big little tease out, so i'm just going with my scissors, really quick split the wig down the center and i'm just going to go in with the razor and razor off all the extra lace. That lace has been sitting for a while. Y'All, so i know that thing is melted to the tee, but of course, if we still have any lifting which we do um to where i did not apply any glue, i will go ahead and just slide the glue under those places and just get my wig Completely melted, but it's definitely giving a girl scalp period pearl. Yes and um love it like this lace, blended perfectly. It was nice and thin and you can't complain when you got your good lace like what people have to understand. Beauties is like the better the lace, the better your outcome on your install, like i know in beginning before you know we got into this hd lace. It was transparent, it was the other laces. You know some was dark brown like brown, whatever whatever and we used to make a do, what to do with those laces as well. I'M not saying that they can't be melted because they can. I have done this. Lay by jordan has done it. Other youtubers have done it, but what i'm saying is when you get that hd lace like on a whole nother level. Okay, it gives you that ultimate blend that ultimately like the ultimate scalp. Just everything about hd lace is just raw raw raw. So, keep in mind that the better your lace, quality, aka, hd lace and the better your installs will come out the more natural they will look, and also stress this to your clients, beauty, okay, stress this to your clients, see me: i'm telling you my clients can Only bring me transparent, hd lace, nothing else, nothing else and honestly i don't even prefer i don't even care for the h, uh, the transparent lace honestly anymore. I really don't care for it because some of them be too thick as well. So if you want hd lace wigs, i highly recommend it. Okay, it costs a little more because of the lace quality, but i do highly recommend that all my beauties purchase, hd lace, is going to give you the best and the ultimate results. Every single time, like with hd lace, it's going to hit every single time. Okay and then you know plug in and loosen. The knots, of course, just makes it even more realistic, okay, but nevertheless i'm just taking that uh strawberry, scented adhesive and just rubbing it underneath those little spaces under the lace, and once i push that on then and everything like that, i will go ahead and pull Down a section for the baby hairs um get that tied down. You know what i realized. Y'All did. I i don't know i'm trying to see if i retired, on my lace in this video or not, but we'll get to it. But after i finish adding this adhesive, i will push that lace in and begin to pull out the section for my baby hairs. Okay, so now that we have all that lace, tacked down, i'm just taking a little holding spray and spraying the curls, and i'm also going to take a little orange in my crimina just ocean and spray. The curls um as well. Just give it a little shine and then i'm going to um pull down a section for my baby hairs, prep them out hot comb them down and plait them up, because y'all know i'm going to tie my hairline down with that milk belt. Once again after spraying, our upcoming lace melt melting spray. So once i do that and remove the melt belt, we will come back on and style the baby hairs, and now that we have that baby hair section out the way i'm gon na go ahead and kind of tease these curls out just a little bit. But i'm also gon na hop, take the hot comb and um hot comb, the roots back, to give it that nice little push back effect. You want to um do like, because i'm doing like that, no part. Basically, so you just kind of like hot comb, the hair in directions where it covers up the track, but it still gives you like that push back type of look. So that's what i'm doing here just going in with my hot comb on 500 degrees and just fluffing it out, and now i'm just taking my fingers and just kind of pulling the curls and stretching it out to give it that big fluffy look um! I don't really like the super super tight look. So of course, i'm going to fluff it out a bit, but now i'm going to take my little sections and put them together and spray, my hairline with the melting spray and i'm just tapping it tapping it. You don't have to spray too much just a little lightly and you know push it in with your um fingertips and then taking that melt belt and tying it down once again, but once we remove that melting for that second time, y'all already know he is going To swoop and do the baby hairs and do like the little finishing touches and now that that meltdown is secure, let's just go ahead and finger comb out the curls and give it a nice big fluff. When i tell y'all these curls is so so pretty my god love them, love them, love them, love them, love them, nice, full and fluffy. How i loved it, how i love my wigs, so i'm just teasing them out with my fingertips, just rubbing my hands through it and just giving it that nice, big fluff, that i want and when i tell y'all all around these curls, it's just so bomb. I'M gon na give you guys a 360. um when i'm done with the complete install, but now it's time to remove that meltdown and we're going to get into those baby hairs. So all i'm going to do is just raise the uh. You know razor cut the baby hairs down and then take my same curl that i use to curl my hair with and curl the baby hairs upwards and just get to swoop in, and you know when i do my baby hairs, i don't ever have an exact Look i'm going for sometimes i just get in there and just do whatever comes to mind. Do whatever i feel is cute in that moment. So if you guys notice, i'm not like a my baby hairs, the same way every single time type of person. I just like to give different looks, and especially with the baby hairs, like you know, it's just part of being a stylist being part of your creativity like you just want to do some cute stuff, so i just freestyle my baby hairs. Every time like, i never have in mind how i'm going to do them. Like i mentioned whenever i do a style, because sometimes i curl my baby hairs upwards. Sometimes i curl them underneath just whatever i feel like doing in that moment, but i'm going to take um some holding spray, um, the melting spray or whatever, and just get to sweeping those baby hairs. Until i get my desired look or you know whatever is cute and once i get it cute in a certain type of way, i just secure it same with that holding spray. So just take your time, do you do what comes to mind because at first as you can see, i started with just a regular, regular little scoop and then i end up like halfway into my baby hair flipping some the other direction and just like i said, Freestyling just going with the flow going along with it, so i'm just going to continue to swoop and play with my baby hairs until i get it, how i like it, which obviously you guys seen the finishing look, so you have an idea what it's going to Look like, and then i just get one part section how i want it to be like get one section: how i want it and then move on to the next side of my baby hairs. So just keep watching and now it's time to hit that sideburn same thing, raise it down curl, it upward get the swooping and soup and with the holding spray until i get the finished desired. Look that i want, and sometimes you really got to just play and swoop swoop swoop, get it how you want it, and that was just me showing you guys. I am using the lace melting spray holding spray for my baby hairs as well. Not only is it for your lace, glueless installs, you can also use it for a nice firm and soft looking baby hairs, because y'all know i like still give off that soft little fluffy look, but i like my baby hairs to kind of be in place, but Don'T get it misconstrued, okay, um! Even when you use the holding spray out of you know a little bit. Your baby hairs will still move because they're not um like completely secured with the gel. So, even if you want it to just be in place for that day and then you want to brush it out um, you won't even have to brush it out, because over time it will loosen up and just be fluffy. So yes, oh y'all, see that thing. That thing is cute yeah, so um after i do this side. I will go ahead and start on the other side. Okay, here we go and of course same thing on this side, we're going to razor cut, curl upwards freestyle style. You know i didn't. I didn't do both sides exactly the same. I just did what i did so yeah um curly freestyle is swoop to do. Holding spray of course go in get the swooping and doing my thing and then um. I will show you guys the fencing, look and give you that and give you guys that 360.. So you guys can definitely see how the back looks, even though you know i don't have no eyes on the back of my head, but it still look good all around. I just went ahead and did the last sideburn off camera. As you can see, this is what the hair is. Looking like. I see me shaking my head. Fluffing it all around trying to toss the curls up. Yes, thanksgiving baby hair is thanksgiving. Lace is melted. It'S giving scalp period purge. I don't like to put that little behind me a little piece, but i'm just going to go in with the hot comb one more time and just top up those roots. Once again, i'm also going to go in with a little holding spray and uh spread it on the hairline again and give it a little toss toss toss because y'all know, like i mentioned um this is that no part, you know with curls and baby hair. Look um, so we just want to make sure it's nice and secure. We don't want those tracks to show because remember guys, it is a regular lace, front wig. It is not a full lace, frontal, so uh secure it toss it up. Go for the look that you want play with it to get a desired look and then i'm going to go ahead and give you guys that 360.. I don't want to change my clothes. Yeah y'all see the crust. Yeah don't play with the girls. Yes, curls for days nice, full fluffy, big fluffy, nice curls, as it should mm-hmm and there was a no-feel salute which i know had done it. It was a i got no makeup on today, but i hope you guys enjoyed this video and thank you for watching.
Comments
KAITLYNN LAUREN: Hey girl! Hair looks BOMB as always! When doing braids underneath our wigs, how many should we do?
Sam Willis: love this style on you!! I like how you added the curls to give BIGG BIGG Energy.
Kimberly Smith: Let’s go sis ready for another slay
Christine Zapata: Bomb per usual yessssss love this look very grown and sexy
Desiree Gulley: Another one (Dj Khalid voice) never miss!! Love this look
junoda wig: OMG so pretty sis, thankyou for review!!
Princess Toyia: Another slay from the goat!!!
Sammy Da Goat: Lovely Hair Popping Curls
Zai Hill: Love this
LaTrael Maddox: is your glue sweat resistance as well ?
Shea Baee: Has the clear glue dropped yet ?
nikkistayfocused: curlz,curlzzzz for the gurlzzz
modelchiic17: Yazzzzzz sis ! Absolutely
I am Gary Wyatt: ♥️♥️♥️♥️
Lucas Lima: Yaaaaaasss
Rushell's TV.:
I am Gary Wyatt: ♥️♥️♥️♥️♥️
Mz Chocolitt:
UloveStepphanie:
Destiny Green: Period purrrrrr