Juicy Goddess Curly 13X4 Lace Front Wig Ft. Tinashe Hair | Petite-Sue Divinitii
- Posted on 11 April, 2022
- HD Lace Wig
- By Anonymous
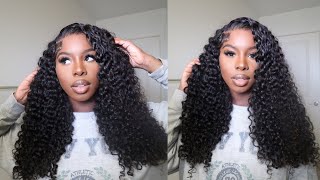
Juicy Goddess Curly 13X4 Lace Front Wig ft. Tinashe Hair | PETITE-SUE DIVINITII
Hair Details: Deep Wave 13x4 HD Lace Front Wig 26 Inch
The Same Hair in The Video➤https://bit.ly/3xcGM1s
#Tinashehair Official Store➤https://bit.ly/3oMf6vg
Use code "TSIG" to get 15% off!
❤Invisible HD Swiss Lace Wigs➤https://bit.ly/3LwEvms
❤Trending Colored Wig➤https://bit.ly/3rVyOXD
❤New In Glueless Wig➤https://bit.ly/3Kv7Ywd
❤Lace Front Wig➤https://bit.ly/3Lukvkh
#Tinashehair #lacefrontwig #hdwig
Instagram @tinashehair: http://bit.ly/2Isud9X
Facebook @Tinashe Hair: http://bit.ly/34FxUAm
WhatsApp: +86 16649781957 Wholesale: +86 17537405381
Email: [email protected]
Click to Subscribe! http://bit.ly/subpetitesue
Check out my Hair & Makeup for Beginners Playlist! http://bit.ly/PETITESUEBeginners
CONNECT WITH ME:
Instagram: https://instagram.com/petite3ssence/
Snapchat: https://www.snapchat.com/add/petite3ss...
Twitter: https://twitter.com/pdivinitii
WATCH ME VLOG! http://bit.ly/PETITESUEVLOGS
WANT A DISCOUNT?!?
Discount Code: SUE15/Petite10 | RPGHair: https://www.rpghair.com/ambassador.htm...
Discount Code: SUE70 | Vanity Planet: http://vpwow.com/sue70 | 70% Off, $30 with code
Discount Code: Petitesue | www.Boulounguise.com
Discount Code: FLING | Mayvenn: https://divinitii.mayvenn.com | 15% Off
Discount Code: XOPETITE | Fashion Nova | 15% Off
#BOXYCHARM: http://mbsy.co/fDCHn | $21/Month with new sign up (4-5 products worth $100 each)
VIDEOS YOU MIGHT LIKE!
THE BEST WING LINER! | Beginners Friendly - https://youtu.be/Txemnjkv9_4
Techniques for Flawless Makeup - https://youtu.be/24OHzAcSdt4
Apply False Lashes Like A PRO | Step by Step Tutorial - https://youtu.be/IiH8RXf2f4s
UPDATED Eyebrow Routine - https://youtu.be/ELtvxfsPvYY
DIY CRANBERRY CRUSH Hair - https://youtu.be/iP00INkOTr8
Apply Eyeshadow Perfectly Step-by-Step (Beginner Friendly) - https://youtu.be/SYZRgHBGlO4
BRONZE GLOW + Poppin Lips | WOC - https://youtu.be/kfTkFi45o2M
Make a Wig w/ Lace Closure START to FINISH ft. RPGhair.com - https://youtu.be/GuuvWWOrV18
UPDATED SKINCARE ROUTINE | How to Get Clear & Glowy Skin - https://www.youtube.com/watch?v=pLsvdb...
BUSINESS INQUIRIES:
For all business & branding opportunities, please email: [email protected]
For public relations & appearances, please email: [email protected]
About PETITE-SUE DIVINITII:
Welcome to PETITE-SUE DIVINITII official YouTube Channel! I focus on makeup, hair & fashion videos. I believe in the products that I feature on my channel and I hope to bring you the best makeup tutorials/ get ready with me(s), fashion try-on hauls/ lookbooks/#OOTD(s), and hair/product reviews . I hope you enjoy my videos and always be sure to leave a comment and like so I can know your thoughts and what else your interested in seeing here on my channel.
[Video Title]
[Video URL]
PETITE-SUE DIVINITII
https://www.youtube.com/makeupbypetite...
Today, i'm here with tinashe hair, yes, um last time i got a package from tina a week from tinashe, i loved it so we're here with them today again um same packaging as last time. I also got this bag extra bag with goodies and stuff. All that's. In the box here is the wig which i'm so excited for i'm so excited for it, my favorite texture, so you guys can tell already what it is. So this bag is brand new. This bag is branded tina, shea hair or tinashe. Rather, oh, i got a bonnet nice. I got a wig cap. I also got two of these clips: a pair of lashes edge brush and comb and a rat tail comb. So that's a really nice little goodie back there. Oh in the box, i also received uh. You know a regular pamphlet with the information on how to care for the hair has all their social media listed and all that good stuff, so yeah, so for today's wig, i'm so excited for it. Oh it feels so lightweight, but it's oh my gosh. This is so good, it's really nice and soft okay. So this is a 26 inch. 13X4 lace front, curly wig! So that's how it looks it's a hundred and eighty percent intensity, but it really doesn't feel like super heavy. It'S really soft! I love that. Look at the curves, nice and juicy defined curls. I need some inches that we're working with. I love this love. Love love this. This is how the inside looks. It has a total of four combs um adjustable straps in the back, and it's also lightly pre-plugged. You can go and apply it more if you feel like. I really do believe that so yeah, that's how it looks really nice, so i'm gon na jump into installing this okay guys. So, as you can see, i slipped on the wig and i jumped straight into plucking it it's been a while, since you guys see me pluck my the front of any wig right. That'S because, for you know a lot of the recent weeks, they come deeply pre-plopped, but this one today it was like very lightly pre-blocked and i decided that i wanted more graduation. So i took my time and i kind of wanted to kind of speed up the whole process. So that's why i'm doing it on my head, so i could i just align it with my hairline see how i want it to look. I didn't do like a super super deep, graduation or anything, but i just wanted a thinner, the very front there, a little bit more as you can see. You know i comb it back. I comb it down and i just kept on eyeballing how much of the hair i really wanted to um, take out and just kind of thin, the very front out um. Of course you don't want to when it whenever you're plucking, you don't want to stay in. One section too long because you don't want to you, know, raise the hole. You don't want to go ahead and like make a specific spot, look bald. You know. So it's good to kind of like keep on moving your tweezer around like the hairline. So you don't end up, you know, damaging the lace or making a area look bald, so yeah after i was done with that, and i had to do this right across the hairline because yeah i felt like i wanted more graduation right across so for my installation. Today i actually use glue because i wanted my install to be snatched and glue is just it for me right now. I you guys know i've been loving my glue installs and it just works out so amazing for me, like especially when it comes down to my edges like as you can see, i never ever ever apply the glue on top of my edges. It'S so amazing, because once i go ahead and remove my wigs, this does not affect my edges at all. You know versus like when i usually would use, got to be super consistently um that can end up drying all your edges, and you know it's just a lot more pressure on my edges directly when i would usually use the gut to be, but with the glue. It'S a little bit more friendly when it comes on to that. As long as you never apply the glue on top of your edges, you will preserve it well, so yeah. So i did three layers. I don't think i got all layers on camera while i was doing it and i like to seal in the glue with a little bit of got to be sometimes not all the time, and i chose to do that today because, as i just said, you know, I i just ease up off using a lot. I'Ve got to be. I do you, you guys still see me use mom the guy to be to do insults but like very short term, and i try to mix it up more with the glue install so yeah. So, as you can see right after i was finished, laying the hairline, i started to form my edges and when i was doing my soups and stuff, i said that you know i wanted to take out a little bit more um from that area. So i'm just plucking away plucking away, thinning it out a little bit more um and listen. If you want to go in and thin it out, even more to your liking, definitely go ahead and do so. You know this whole plucking process is time consuming and you know just make sure you have some time on your hands to do that so yeah. If i could change anything about this wig, i would definitely want them to like um, give it a deeper graduation right over the box. That'S the only thing, but so far, oh my gosh, i must say the texture of this hair is amazing. It feels so good and the curls are so defined. I love it and, despite it being so long like it's, not heavy, you know sometimes the longer the length of the hair or the wig, the heavier it's going to be so yeah. It really was manageable, and so i love that about it. As you can see, i'm just proceeding to forming my soup here and i use eco gel yes, eco gel is what i've always used to form. Well, one time gone, i usually would use my mousse, but it takes a little bit more time with that. I just use my eco gel and it's it's as easy. As that, you know as easy as that. I have no complaints when using my gel. It forms it quite easily and i love it. So that's how that is looking so once i'm done with that, i pretty much get my elastic band and i further just i tied around the um hairline to kind of just melt everything in more, even though it's already so laid. But you know you can never go wrong with going in with your um elastic band, to fertilize everything and because i was going to brush it out as well. I wanted to use the elastic band to just ensure that it stays in place because remember the glue really takes any glue insulation, at least on me, from my experience, takes up to like 24 hours to fully fully fully sealed on properly. So i just put my elastic band over to further melt it away. Oh look at that here gorgeous, so this is actually the next day and the hair feels so good. It looks so good and i decided, as you can see, i just have it pulled back here and obviously i got glammed as you can see, and i decided to do a part because recently i remember i did a whole curly look and i actually did a Pullback look so i said you know, and it was just like last week, so i decided today to just do a center part and i love it. It was so easy to just lay with my hot comb and everything, and i know you can see the wig cap there beneath the lace, but i camouflage it hair with some concealer. You know nothing, you can. I can't you can't fix with some concealer and then i re-wet the hair and go back through with my paddle brush and voila. That'S it guys that is it for this week install it's so gorgeous, giving giving goddess vibes guys, i'm all done with the hair. It looks so good. This is exactly the look i was going for that wet juicy look. It is everything so shout out to tinashe here, as you can see. Initially i did the pull back and then it said, and last week i had a whole pool. That looks as though it let me just the center part this week, but i still wanted that white vibe and i just need my swoops. It looks so good um, so shout out to them. I'M going to be sure sure to drop all the specifications out this week in my description box, as well as the the direct links, if you're interested in getting this for your vacay go ahead and do so or even if it's not for a vacation yeah. You know yeah, it's not heavy despite the length and it looks really good. You don't have to do the whole wet look. If you don't wish, you could go ahead and mark it dry into dry state. The curls are beautiful, as is so yeah. That'S it for today's wig look. Thank you so much for watching and i'll see you guys in my next video


Comments
Geraldine Brown: Looking amazing as always. Dame I want one of these hair for my birthday so. This wig right here "is a vibe" nah lie. Love it Sue
THE BEAUTY GURU: Absolutely gorgeous
Yoshi: Gift from god 🙏🏾: I ordered from them already because of your recommendation. Their hair is nice and I got a pair of lashes and head scarf ☺
Linda McFarland: Hi! The wig and the look are awesome! What did you apply to the wig besides the water?
Vinod Tripathi: you are looking so gorgeous girl
THE BEAUTY GURU: Which glue did you use? If you don't mind me asking
Amoy McCarthy: Wet look gorgeous
Ashauna Mcpherson: Is the blow dryer on hot to melt the glue
Tahjay Reeves: ❤️❤️❤️❤️
Karimah Lawrence: