Very Detailed: Step By Step 13X4 Hd Lace Frontal Wig Application+ Styling| Wiggins Hair
- Posted on 18 September, 2021
- HD Lace Wig
- By Anonymous
════════დ #WigginsHair დ═══════
Get $10 off with coupon code“wiggins”!!
❤Direct Link➤https://bit.ly/3z7MzTD
Hair details:#Kinkystraight lace frontal wig 150% density 24 inches
Hot selling #lacefrontalwig➤https://bit.ly/2UbuVjb
You may also like:
1.Invisible skin melt #hdlacewig➤https://bit.ly/3Bnp2Aa
2.Premade colored wig➤https://bit.ly/3krRP0d
3.Lazy girl approved #headbandwig➤https://bit.ly/3z70FVf
Follow @wigginshair on instagram:https://bit.ly/3knoBQe
Tiktok@wigginshairbest
Facebook @wigginshair:https://bit.ly/3imQIw6
Email: [email protected]
WhatsApp Wholesale: 0086 18339906150
Music:
Music by Felice The Dreamer - Motion - https://thmatc.co/?l=C5FA5BC9
Music by MDMN - Mimosas - https://thmatc.co/?l=E7E61A14
Music by Ryan Little - Lovesick. (Nomad's Heart) - https://thmatc.co/?l=42F9C829
-------------------------------------------------------------------
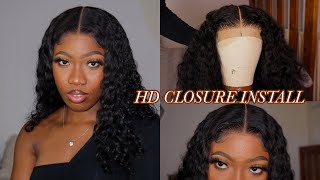
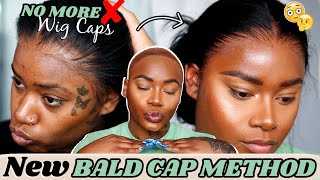
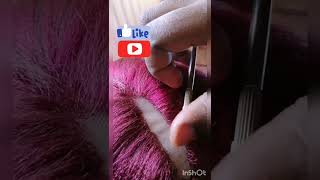
Just say: hey guys, welcome back to another video. Today, i'm going to be showing you how i installed this kinky straight wig from wigan's hair. It is a 13x4 frontal wig, it's 24 inches and 180 density, i'm starting off using some alcohol to get all the excess oil from my scalp so that the glue will stick down when i apply it, so the method that works best for me when doing the Bottle cap method is to just use the wig glue. I don't like using the got to be glue gel or the spray. It gets all over your hair and it sort of defeats the purpose of the bottom cap method to me, because it gets all over your hair and then, when you have to take off the wig that can leave lead to damage with the edges. So it sort of just makes more sense to do it this way, as you can see, i'm applying that glue so far down from my edges. It gets a little bit close on the you know size as you can see, but it's just so much better than you know using gel or the spray because it really gets on your edges. I forgot to do the ear hole, so i'm making sure to do that so that on the edges there, that glue can adhere to your skin on that side. So so, while i waited for the bald cap to dry, i decided to go in and start plucking a little bit of hairs from that frontal, and i did bleach the knots as well. I used 30 volume developer in blue bleach and i left it on there for about 30 to 40 minutes and i did end up over bleaching the knots, but i was easily able to get that covered up. So i really didn't have to do a lot of plucking, because the hairline was just already really really good. And then i sorta had in the back of my mom that i didn't want to do baby hairs and when you don't do baby hairs, it's better to leave the hairline a little bit more full and then, on top of that, i sort of think that i Want to get this professionally installed one time, so i just want to have a good base for that. So i just really was scared to mess anything up, so i just did some very, very light. Plucking after i was done plucking i did take the blow dryer and i just you know smoothed out the hairs on the front and made sure that hairline was dry before i applied the wig. Moving on to my favorite part of the wig process is making sure that top is super flat. This part is just mandatory. Now, like you, cannot apply wig without doing this step, because you'll see how flat that top gets by doing this step. So i'm just applying the wax stick in sections and going in with a hot comb to make sure it's super super flat at the top and it sort of looks like i'm putting the um hot comb directly on my blanket on my bed. I'M not! I actually have one of those like hot tulle like little silicone things that you put your you know hot comb and your curling iron on. So it's not directly on my blanket back there you so now. I'M making sure that the glue is super. Super dry was already pretty much dry, but you don't want it like sliding back when you apply your wig, so it's very important to make sure that it's really really dry brian. So here i'm just sizing everything up to make sure that you know it's going to fit and everything is good before i apply glue after i lined everything up, i did go ahead and apply some foundation on the inside of the lace as well. So the easiest way for me to apply my wigs is to cut it into sections like this. Instead of just you know, doing one line and then having to line everything up, it makes it so much more difficult that way. So this is the easiest way and you want to make sure you spread out the glue and most of that glue is on the wig cap and not my skin. That'S where i apply. Majority of the glue is on that wig cap, hmm. So once it dries clear, that's when i'll go ahead and apply the lace down, and i like to comb it in to make sure it's super melted. So here i kind of messed up. I got impatient and i didn't let the glue dry down all the way. As you can see, it's still white and when i took off my little elastic band, you know to flatten out the frontal you can see in like the next couple of clips that it's super light on the edges. So, that's why it's so important that you wait and be patient and let that glue dry all the way down before you apply your lace. Okay, so here you'll be able to see what i'm talking about, how it's light on the edges. Even though i did put foundation on my wig cap and i put a flat foundation on the wig, it's because i didn't let that glue dry down all the way that is light around those edges. So i was able to go back in and fix it by putting on my contour shade on the lace but ignoring my mistake. The hairline on this wig is just absolutely gorgeous. You can see how nice and plucked it is. I really really love the hairline on this wig. I was playing around to see if i wanted a side part or middle part, but ultimately you see i went with the middle part and there you can see how i over bleach those knots, but i'm going to show you a trick and how to fix that. Then i played around to see if i really wanted edges or not, and i went with no edges which i'm glad i decided to do so here is my trick. I saw some other hairstylists do this. I just take a cut in half hair tie. Put it down the middle with the clip and spray some black hairspray making sure to cover. You know, use my fingers to cover the lace, so none of that black hairspray gets on there and there you go. You can see that middle part is super straight. I didn't forget to put concealer on there, but that's okay. It still looked pretty good and now we're moving on to styling. I want to do some big voluminous curls on here and i'm going to show you guys how i did that with my flat iron foreign. Hmm huh foreign, so now for the takedown, i shouldn't have um combed out the curls. The way that i did lost some of the curl, but it still kept the volume. So it was fine. It still turned out cute and you can see in the front where my part is like it's sort of like white a little bit now. I don't know where that came from, because it was fine. It was fun. I don't know what happened with that, but you can see it got a little bit light over time, but i'm sure it's something i did if you guys know what i did wrong comment down below and tell me how i can fix the hairline. Besides, you know letting the glue settle for a while. Let me know what i'm doing wrong here. You can see how pretty the curls came out and you can see my dumb self just combing them out. Just keep like just stop girl like stop, but it was. It'S okay, it still turned out cute, but that is like pretty much it for this video. I really hope you enjoyed it. I hope you check out this kinky straight wig from wigan's hair. As you can see, it is absolutely gorgeous. So all the information will be down in the description box if you're interested - and i will see you guys in my next video - you
Comments
Mia j: Hope you recorded this makeup look
Ken Million: So beautiful ❤️
Lisa Rogers: Beautiful sis tfs
Grace Rebekah: Fav
Patrick Wentzell: Love her Love her Love her.
Grace Rebekah: FACE IS BEAT OKKKKK