*Detailed* How To Bleach Knots, Pluck, And Tint Lace Frontal | For Dark Skin Baddies Save Them $$
- Posted on 06 July, 2021
- HD Lace Wig
- By Anonymous
hey yall.
so i decided to help out all my ladies who want to save those coins when it comes to getting your hair done! this tutorial is extremely beginner friendly and will help you achieve that "scalp" look.
because i am of a darker complexion, this will also help out those who have trouble with getting the lace to match your skin tone.
HOPE YOU GUYS ENJOY !
13x6 , 24in Frontal: https://www.aliexpress.com/item/400075...
Bundels (26,26,22) : https://www.facebook.com/amber.hadley....
if you guys have any questions, definitely comment below.
sn: lol i am NOT a professional but this is how i achieve the BEST results with the method i use.
sub count: 1,110 #Roadto2K
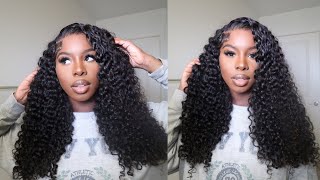
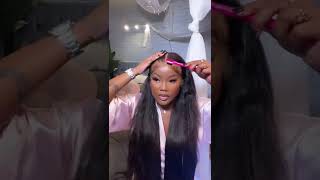
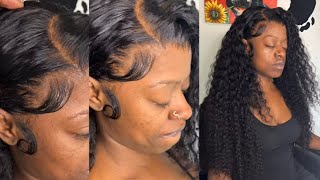
What'S up you guys, it's your girl, tj back with another video and i'm going to show y'all how to bleach and pluck y'all's frontal for the summer. So y'all can be a baddie for the winter whenever y'all may need it. We'Re going to start off with some hair from queen hair company, this company i found on aliexpress, and i got a 13x6 frontal and, as you can see, it's a true 13x6 because it's huge and we're just gon na. You know customize this hair and get into this video. Some of the products that you're going to need is bw2 powder you're going to need a developer. I use 30 cream developer because it works easier for me. You'Re going to need a neutralizing, shampoo, you're, going to need to grab any conditioner or shampoo that you guys have. This is what i had around the house. It worked best and you also underneath that rib dye just forgot to pick it up for whatever you're. Also going to need a plastic fork, butter, knife, ball, plastic. Anything y'all, i didn't have no plastic forks. I had to get a butt knife, but it is what it is. It still works the same. You know i'm saying you do what you got to do to get the job done, boo, so you're, going to take the bw2, y'all and you're going to take about two and a half scoops, depending on how big your frontal is. So because my frontal was really big, i took two and a half scoops, just because i didn't want to run out of product so with this you're gon na make sure you wan na, have gloves on i've done this so much i was like forget them gloves. I was just trying to get it done and then also make sure you are in a ventilated place, because this stuff can be really strong and like affects your eyes and all that. So definitely make sure that y'all not choking on this product so go ahead and grab that developer, and you want to make sure that you start off by gradually adding the liquid. So i usually do cap fill fulls first and instead of just like pouring it in there, because you don't want to mess around and make it too liquidy. So i usually do about three capfuls of liquid first, i stir it up just to make sure to seal it. Yet and then i add from there you rather it be thicker. First then, it'd be liquidy at first, because then you'll have to keep adding powder and powder, and at that point you're just wasting powder. You know what i mean so definitely start off with less liquid first, and i know that, while i'm stirring it look like some milk, like it looked like it's liquid, but it's definitely straight powder. Also, a mistake that i was about to make, as you often see like i was getting impatient, so i just started adding more liquid just because it was still like a whole bunch of powder in there, but you want to make sure you stir it up really. Well, first because the powder clumps together like that right there, but when our reality i just hadn't stirred it enough, like i was about to add some more liquid until i realized wait, it's not mixed all the way and then, as you can tell, it started to Turn into like a paste, which is the paste, the consistency that you want so make sure you stir it very well before you add some more liquid, you know thinking that it's not enough liquid. So this is the consistency that you want. It looks kind of like toothpaste, like it's thick enough, that it's not running, but it's also thick enough that it just sits. It would just sit on the lace. You know what i mean so at this point. You want to take your lace and you want to just push all the hairs back. I notice a lot of people use like got to be to spray on the hairline. I don't do all that y'all, i don't. I'M really quick with it. You know what i'm saying get it up with you know it don't take all that seriously. Just move all the hairs out of the way and just pull up. You see how i'm like sliding up on the paper. Towel pull up and just make sure all the hairs are going. One way now, when you're about to put this paste on the lace, you want to make sure that you're going in the same direction that the hair is going. So, as you can see, i started off doing it the wrong way and doing it. That way makes the hair pull through the lace which you don't want because then you'll start bleaching hair. So, as you can see, the hair started coming through because i went the wrong way initially, so you want to go the same way that the hair is going, which is the direction that i'm going in that way, the hair doesn't pull through and you may still Get like a little hairs come through, but it won't be as much as it would have been if i would have went the wrong way when you're putting this paste on this mixture on, i don't even know, really know what to call it. You want to just glide lightly. I remember when i first did this. I was like it's not going on there like it kind of feels like it's going to like roll off the thing, but if you just repeatedly go over y'all, i promise it's not as tedious as people make it like. You cannot mess this up at all. Only way you can mess, this up is just leaving it on there crazy long. That'S it so do not think that this process is hard. Y'All can do this, y'all can say them. Coins, girls and i promise you yo. Look your stuff is gon na, be looking good. I promise you and, as you can see, by making it as thick as we did, the the stuff did not come through the lace like it's sitting right on top there. You can see the knots as i'm bringing it closer like it's sitting right on top of the lace. It'S not going through. It'S not running through bleaching. The hair on the other side is only bleaching the top of the lace, which is what you want. Those black dots you do not want those black dots at all. You want those black dots to turn brown. That'S the main goal that you're doing when you're bleaching knots. I notice a lot of people say they can't really tell the difference, but y'all can see the difference on this video. I promise you i'm gon na. Have you all right? I promise you so i let it bleach openly for about 10 minutes and i'm checking it currently and, as you can tell to me, it's not really bleached to my liking because i still can see black dots. So i want the crab bleach to perfection. So i'm going to let it go another 10 minutes and if you start to panic like oh snap, i'm over bleaching look as long as you don't see your hair turning gold brownish, then you're fine. So let it sit for another 10 minutes and check it again. So this is after 20 minutes about 20 minutes and i'm checking it and, as you can see guys you can see, the paste is starting to try to come through the lace right here in the front. That is the indication that the hair is bleaching, and it's probably almost done most likely done at this point, because it's rising up the hair, basically like the bleach, is trying to rise up there and, as you see like i'm looking through the hair, just to make Sure, like the back, is bleached and you can see that it's straight white, like you see no black dots like you did at the beginning right. That'S the way that you want it to bleach. You want to be able to see no black dots as as as less black dots as possible. Now you might not get all the black dots. You know what i'm saying, but as less black dots as possible. That crap look like some snow. That'S how you want it, that's how you want it looking that, let you know that you is really bleaching the hair for real but you're not going overboard, because it's still got black roots, just there's, no black dots. That makes sense so now you're going to wash this developer off of the hair. With your neutralizing shampoo, you need to use cold water, so that'll stop the chemicals from processing on the hair. You don't want to use your regular shampoo or your regular conditioner right now, because you still have to tint the lace so basically like you'll be re-washing the hair again. So at this point just use your neutralizing shampoo. Now, when you use this neutralizing shampoo, it's going to turn pink, which lets you know that the chemicals are still in the hair, keep rinsing it until it rinses clear and then you'll know that you've washed all the bleach out of the hair and then you're good. So now we're going to get some hot water, some hot hot water and pour in the red dye this dye i got from walmart. It was really cheap, i'm dark skinned. So this is what i use, which really helps for dark skins. Depending on your shade. You do not have to use a lot y'all. I promise like a little goes. A long way you see how dark this stuff is. I'D highly advise like cutting off a piece of your lace to your hair first and doing a test run with the the pigment of like how dark your lace would come out to be. I'Ve done this for a minute, so i kind of know. But if this is your first time, i definitely will recommend just doing a couple of drops stirring it up and then putting a piece of lace in the water. For about three minutes and seeing where the color comes out to be so once you put your rib dye in there, you want to stir it, and i usually leave my lace in there for literally three or five minutes y'all. I promise it does not take a lot, because what you don't want to happen is you leave it in there too long and the the lace tints, but then it'll turn into this ashy ashy color like so when you take a picture with the flash like it'll. Be flashing back on you, that's what you do not want. So that's why i said: do patch testing first, you want to just sit in there for about three minutes or five minutes. Take it out see where it's at put it up to your skin and then go from there and, as you can see, i only left it in for like three to five minutes and it's almost darker darker than me. So it does not take much at all. Y'All, i promise so at this point. You want to take your regular shampoo and your regular conditioner and just wash the hair like you would regularly once you get it all combed out, you ready to pluck this bad boy. So honestly, y'all this right here is my favorite part of doing my hair and doing wigs is plucking. Like i love making, this hairline look realistic. I promise you first of all get into these knots again. Y'All. Look at this gap. Bro bleaching. Your knots perfectly is like 85 and what makes your frontal look good if i'm capping put it in the comments that i'm captured, but getting them nice right is what make your hair look good. I promise you you're gon na want to get some tweezers with the little notches on it, so you can like grip that grip that hair, like really really good. First starting off, you see how this hair in the front is like thinned out. You want your frontal to look like that as well like without the harsh line behind it, so i'm going to move the thin out hair that comes with it, and you see how thick this hairline is. You want to thin that out, just like the front of it was so i'm going to just take like little pieces from the front and just pull y'all. I promise you it's literally as easy as it sounds. Take pieces, grip, the hair and just pull backwards. Do not snatch, though, to where you put a hole in your frontal now that it's going to be worse, you do not want to do that. Take those pieces from the front and just pull pull back and just go side to side side to side. Do not stay in one spot, just go side to side like i'm doing and just pull back. I promise you it's as easy as it sounds and it may seem like bro, i'm not getting nowhere, but after a while, once you keep pulling that hair out, it's going to start to thin out. Do y'all see how it's like thin. It'S not as thick as it was at first from the beginning: that's exactly what it takes to get the hairline to look realistic and you just have to go all the way across. So i'm going to move this thin part out again and you see where it's like a thick harsh straight line right there, i'm going to pluck right here again to get it thinned out. When i pull this hair off. Look look at this hairline y'all! Look at it like stop playing, you have to be plucking to the gods. I'M not even playing with y'all now do y'all see the difference of one side versus the other. Like this side that i haven't touched is straight. Giving me hair store wigs and the other side is giving me straight. Scalp, like i'm, making a whole scalp over here. I'M gon na have y'all making scalps and another tip. Is you want to make sure you're actually pulling from the root and not just breaking the hair off in half, because if you're doing that, then you're still gon na have hair like you're, not really plucking the root? You know you're just breaking hair and you don't want to do that. I decided to make this frontal into a wig. I want to give a shout out to this local hair company from my city, um amber hair company. You guys can look at them. Look them up on facebook. This is some good quality hair y'all. I promise you. You just y'all, see that bounce bounce bounce bounce get into it, not for real, but yeah go check them out on facebook. I'M gon na put the link in the description below, for you guys and y'all i'll, be trying to style these. This hair on this mannequin it'd be so hard for me, but get into this hairline like get into it. Just wait till i put it on my head. Wait till i put it on my head. Y'All y'all gon na see the real in three two one boom. Look at your girl, a bad d about it: okay, y'all! So i'm back after a long day. Taking pictures photo shoots y'all, i got the hair together. Y'All tell me why. Now this is 26 inches of of lusciousness, like look at his hair. Look at his hair, this frontal the curls hold like yeah and then get into it, get get into it. What where's? The lace i'm starting out scalp right now, bro like this is my scalp. I'M trying not to look stupid in this in this camera. Right now like come on, bro stop stop playing with me. So all my dark skinned baddies out there y'all gon na, be right out if y'all follow them stealth. Bruh y'all is gon na, be right. It'S the lace front. I mean it's. This is a scalp for me because that's what it is. It'S the scalp for me like. I cannot wait, wait what what stop playing with me! Huh flipper it up for it. If y'all listen to those steps that i told y'all, you know what i'm saying just take your time doing it y'all can do this stuff. Y'All. Can save some coins? You know what i'm saying and do this stuff yourself, bro y'all got it in y'all. I know i know y'all do anyway, so i'm gon na end this video right here. Thank you all so much for watching and, like i said tune in to the next video subscribe, subscribe, subscribe and i'll see y'all in the next video. Thank you all for watching guys.
Comments
Jonee’ Charnyse: “To all my darkskin baddies out there yall finna be right” okay sis I can’t wait to try ❤️
Tia Turner: Yes ma'am Sis !! Get us right ! I'm ready for the how to apply video now !! ❤️❤️
Chalachocolate: Phenomenal Thank you for this !! I’m so excited to try this myself cuss when before I came here I was contemplating just paying someone to bleach & pluck my wig but now I’m feeling real confident after watching the step by step
Carrie Brown: Gorgeous
Jacelyn Frierson: It’s definitely giving scalp! DPWH!!!
Chioma Okenwa: You did that!
Kristina Lindsay: Did you still add makeup to the lace since you tinted it?
Keish Keish: What color Fabric dye did u use? Also, noticed you used a neutralizer shampoo instead of the shimmer lights purple shampoo…can you use either or for the process
Bria Jae: Is this method permanent ??
Taja Barnes: With a different skin tone will we need to just pick the one that matches us best with the Rit?
Rissa Allison: Ty