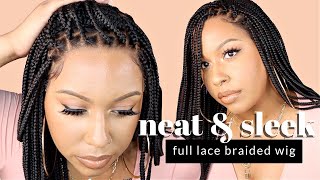
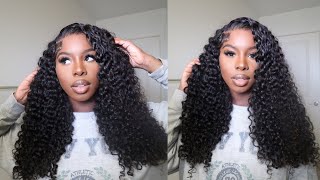
How To - Melted A Lace Frontal Wig On Darkskin ~ Multi Colored Purple Rage
- Posted on 27 November, 2020
- HD Lace Wig
- By Anonymous
Hey barbies it’s ya girl sudani Barbie
I hope my beautiful barbies enjoyed this video on my updated way on how I melt and install my wigs.
My foundation color - Fenty beauty matte foundation 480
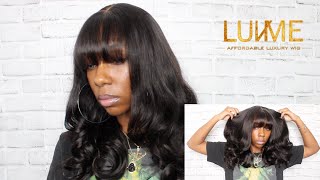
the link to this wig - Ucrown Hair Lace Front Wigs... https://www.amazon.com/dp/B07V4D7WKM?r...
The colors I used to achieve this look
Adore violet gem
Adore purple rage
I bleached it from black using 50v developer and B2 powder
Link to products I used to style my wig
Chi protection spray -
CHI 44 Iron Guard Thermal... https://www.amazon.com/dp/B004452DPM?r...
Frizz serum - John Frieda Frizz Ease Extra... https://www.amazon.com/dp/B000P9DS4Q?r...
Bio silk - Biosilk Silk Therapy Cure, 2.26 oz (Pack of 2) https://www.amazon.com/dp/B002CMLRQA/r...
Flat iron - Hair Straightener and Curling Iron 2 in 1 for Hair Styling, Tourmaline Ceramic Flat Iron for All Hair Types Real-Time Temperature Display 2020 Latest Professional Version (Gray) https://www.amazon.com/dp/B07YDBM545/r...
Wig glue -Bold Hold Active Lace Wig Adhesive https://www.amazon.com/dp/B07VPT9C9X/r...
Back ground music - lakey inspired city of angels -
LAKEY INSPIRED - City of Angels2:47 · YouTube
Connect with me on social media
Instagram - lodia.y
Snapchat - queen_lodia
Link to another wig install I slayeddd - https://youtu.be/yFkunnnxvDg
Link to my weight loss video - https://youtu.be/Xbm31ZZqjT4
Hey barbies, it's your girls and i need barbie and i'm super excited to show you guys. This look stay tuned. So basically, the first thing i do is slick my edges back because you know you don't want any hair in the way or any glue to get on your edges. So you just want to make it very flat and just slick everything back. So when you put the wig cap down, but they got to be sprayed through the whole, get down with the get down, you don't have no issues with the hair being in the way. So normally i would use a darker cap for my skin tone or any of my darker tone clients, but i didn't have any so. I went ahead and used this lighter tone cap and i went ahead and just cut the sides out the earlobes. I feel like that works easier with that. So i used to just just put the wig cap on then do the spray process, but this works a lot easier to get a better foundation of how you want your cap to lay, and so it doesn't lift up. So now i'm taking my foundation from fenty beauty. It is the matte foundation um. You can use any foundation of your choice, but i do prefer um matte foundation because it's like less oily, etc. So that's what works best, because regular foundation will like has a lot of oil in it. So now it is time to start the melting process of the bald cap method. I just take my got to be spray and spray it on the cap, where i know my hairline lays this is another reason why this looking your edges back part is easy, so that you can see what's going on. Okay, so once i do that, i go ahead and blow dry, my cap to make it a quicker drying process. So you don't have to blow dry it, but it's just what works best for me and it's easier that way. So now it is time to cut the cap, go ahead and cut the side part where the ear lobes was at and just begin to cut across um i. This is why i like putting the foundation before the cap before the gatsby spray. I mean because literally right after you, when it's time to cut all you have to do is just cut the part that is not colored. So i'm going back in to put some more foundation, so we can actually get the melting process in motion. So once we get done with that, you go ahead and take your got to be spray. A blow dryer in a rat tail comb spray the got to be spray at the beginning of the cap and take the end of your wraps up home and push down the lace. I mean at the lace, push down the wig cap against your skin and take your blow dryer and blow dry. It so continue to do that on all sides, and your wood cap should be melted. As you can see honey. This wig cap is melted into my skin and it's looking very, very natural. So after you do that you're going to have got to be spray all on your forehead, so witch hazel is my go-to cleaning product. So i'm taking my bold hold active and i went ahead and applied four layers on and off camera. So you just apply the layers and you just spread it out with the end of your rat tail comb where you can use a popsicle stick whatever works best for you. It'S all your choice. I personally, like the rat tail comb, so basically just spread it out evenly reason why you want to spread it out evenly is so that the glue is not laid up on top of glue, and it will make it very cakey as soon as you put the Lace down so basically literally you're applying a piece of fabric to glue. So in order for you to have the really good look, you feel me it has to be perfect. Okay, so you hear me so it needs to be evenly spread completely out period and, as you can see i so now i am using my amazo bay lace, tint and i spray it and go ahead and blow dry it. Then i go ahead and take my fancy foundation again, because i'm kind of still confused on the amazing bay lace tint, i'm still getting a better understanding and learning on how to use lace tint. So once i did that your lace should look like this and i cut two slits into the lace to make it easier on the install and i go ahead and pull the wig down. Grab my rat tail comb and push the wig into the lace and you just begin to take the rat taco and brush the lace into the glue. So once you do that, you will begin to get this kind of look. As you can see, i'm currently now cutting up the earlobes for the wig, so it can be a flat, install and fit my head perfectly. So now i'm going to begin to cut the baby hairs out for this install. I feel like this wig, the color, the everything needs, literally baby hairs and also this wig. I literally i dyed this wig from black to blonde from blonde to this color. It was like my first time doing this kind of thing and it was a lot of experimenting, so i'm learning so, as i learned i will be doing color videos on here when i do my installs, so i'm super excited this came out the way i wanted It to be - and it's like, a multicolored purple and it's not just like one different kind of purple. It'S like violet, like a reddish kind of thing, so yeah this wig is a 16 inch wig from a amazon store. I will be putting the link in the description down below this. Wig did not come pre-plugged, i plugged it by myself and i did not bleach the knots the knots bleached once i bleach the hair from black to blonde. So now it is time for the melting process go ahead and take your gatsby spray and spray that lace and take your elastic band and tie it down honey. Like yes, it's going to be tight, it's supposed to be tight, so it can press against and put everything together like a mixture and just hold it down. Okay, i go ahead and blow dry it to give it a quicker dry, and normally you want to leave this on for about 15 to 20 minutes so yeah. So now, for my favorite part, we are going to start the styling process. I already curled the whole back of the head. I just wanted to show you guys the front i'm taking my chi iron heat protection spray and my frizz serum i'll link, all the um products down below and i'm taking my bio silk and putting that together with that and rubbing it all in it's going to Give it a sleek look when you take it down, it's going to give you that polished, look and also i'm taking my polishing spray that you'll see in a minute spray that make it all shiny and soft, and no, it doesn't make your hair stiff like it's. These products, like they make my hair very lightweight. It'S not like one of those products where you add all that in your hair is going to be like full of product. It'S going to be super stiff when you brush it move anything like it's like day. Five and i haven't re-curled my hair or anything, but my hair is still smooth and has a lot of body i'm taking my. She is bomb wax thick and applying that to the front of my hair and taking my hot comb to lay it flat, and this is how you get a flat install. You need to use a hot comb and if it's a lot more thicker hair, because this funnel is thin because i plucked it to my liking. If that is what you want, then you need to take it section by section when hot combing foreign foreign foreign, i'm just layering the wig for the curls to fall in a specific way. So i'll. Take that with my eyebrow razor and go ahead and layer that, before i continue to curl the other sections, okay, barbies tap in tap and tap in it's going to be a quick tutorial on how i curl my hair. I literally take my flat iron, as you can see, i'm literally pulling clamping and turning pulling clamping and turning like literally, i love this flat iron because it's like one of those rotating flat irons. So you just do what you got to do so, as you can see, i took that bad boy off and, as you can see, it is laid and pushed down and melted into my skin, taking my eyebrow razor to cut the lace into a jagged motion. As you can see my hand is going up and down just to give it a more natural look, because the straight across that will give you the wig look like you can tell okay. So that is the goal and that's his own period. Now it's time to cut the baby, hairs went ahead and cut them with my eyebrow razor, also, and i'm taking my god to be gel and i'm using my. I will edge brush to go ahead and slick those down, i'm leaving the sides out so that it can be like one of those sideburn looks. I don't really want those to be baby hairs, baby hairs so yeah. So now i'm doing my last finishing touches. I'M going to take my got to be spray again to give it that last melted look okay, so i go ahead and do that and right after i do that, i am going to blow dry that and give it that press down with a rat tail comb On the ends just to press it down and give it that natural look once again, okay, i went ahead and applied witch hazel to a rag and cleaned the rest of my forehead off to remove all the excess product, glue makeup and everything else. You feel me that is the finishing look barbies. I hope you guys enjoyed stay tuned for more bye, barbies
Comments
Alexaundria Perdue: This is cute... Love love love
Olivia Renee:
FullMoon Libra: No end results?
Leya Toussaint: hair coloring tutorial?, u bodiedddd?
XR: Denka?