Client Series: In Depth Flawless 5X5 Hd Lace Wig Closure Install | Divaswigs
- Posted on 13 April, 2021
- HD Lace Wig
- By Anonymous
♥♥♥♥♥♥♥♥♥♥ DIVASWIGS HAIR INFORMATION ♥♥♥♥♥♥♥♥♥♥
Use Code :YTMANI to save extra $60 ONLY FOR HD WIG(LIMITED TIME)
The wig I'm wearing in this video is from DIVASWIGS
Direct Item Link :
https://www.divaswigs.com/2886-new-upg...
Hair Code :SHD008
Hair Length : 20 inches
Hair Density : 150%
Hair Color : Available in Natural Black
Bleached Knots: Kamo Knots
Hairline : Upgraded Realistic Hairline
Lace Type : Super Fine Invisible Swiss Lace
Lace Color : Transparent Lace Suitable for All Skin Tones
information:
https://instagram.com/divaswigs/
https://www.facebook.com/divaswigs
https://www.pinterest.com/divaswigsins...
My Socials let’s be friends! (literally) :)
IG: @kamanijeann
Twitter: @kamanijeann
TikTok: @kamanijeann
Snap: @manijean
Email me for business inquiries only @[email protected]
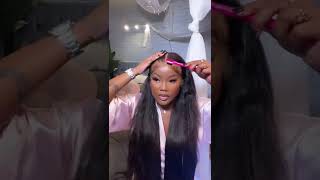
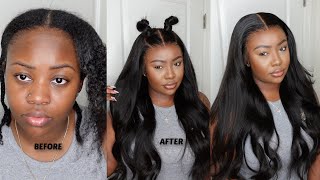
Hey guys welcome to my channel and welcome back for your returning viewers. So today i have something different for you guys. I installed a wig on my friend, so if you guys want to see how i achieved this, look in this flawless closure install keep on watching. So this voiceover already exciting is the limit. So i'm gon na tell you guys what i'm doing already i'm using my got to be glued spray, as you can see for the bald cap, but i'm only doing it in the area for the bald cap. You feel me because this is a closure, so we do not need all of the cap. Hmm. So now i'm doing a second layer of the got to be glued spray after this i'll be cutting the excess cap off and then applying my ghostbond classic glue over just slightly over the rest of the cap to make it more seamless and flat. Hmm. So now for the cap, i'm going to be applying ruby, kisses cream foundation. Just patting that in to the cap to create the illusion of a bald cap like her skin, okay, nice and seamless, nice and melted, nice and flat to clean up any excess oil or makeup left on her skin. I'M using 70 alcohol in a cotton ball to clean that up, because the glue will not stick if this is any way shape or form oily or any leftover residue. Here, i'm smoothing out the hairline with my hot comb. This is a annie hot comb. I got it from my local beauty supply store. Nevertheless, i'm using this to smooth out the hair now that it is on the bald cap just so, i can see what it will look like melted and to give it that melted kind of illusion. Already this step is all about preference. I prefer to cut two sections or three cut two parts into three sections: to lay down the lace. Only because i feel like it gives me more control and i can really focus on each section equally. But if you want to do it all at once, that's all up to you, i'm using 70 alcohol again this time i showed you guys just because now i'm really about to install this wig and i just want to make sure it's the hairline and her skin Is super clean for this okay because i do not have time for this not to be sticking. We do not want that those complications, so the glue that i am using is the ghost bond classic. I used five or six layers. Okay, because this glue is the classic version of the glue. This is like the first version, so it's not as strong if you're, using a stronger glue by all means you do not have to use as many layers as i did, but for extra security. I use like five to six, but i'm using the back of this razor to apply the glue and to smooth it out, as you can see, i'm using a small amount of glue each time because yeah you do not need a lot of this okay, because then It gets messy, it gets ashy. You know just gets a little too much so i like to use thin layers each time and i'm blow drying it to make sure it's clear each time and then yeah once we get done with this step, we're going to melt this into her skin you now For the melt, as you can see, i will be pressing down where i am pressing down this lace into her skin kind of just smoothing. It out make sure each part of that glue. Okay is sticking to that lace where we need it, and then i'm also taking my comb to make sure that it's pressed in as well now i'll be repeating the same steps to the other half and as well as the other side too. Okay, so guys just to watch, as i have anything to say because we're doing the same steps but um yeah the same process. Okay blow drying in between using a thin layer of glue and smoothing it out with a smooth surface, which will be the back of my razor okay, hmm, hmm uh you for extra security, i'm using got to be glued spray and i'm using just a tad bit And i'm smoothing that out with my finger on the lace. Okay, then, after i get done with that, i'm going to blow dry both sections, because i did it separately because you know it's wet. I didn't want the lace to lift at all. So i did this section first and then i did the next section. Now, i'm taking my mizani smooth guard oil, i'm using that and rubbing that into my hands and applying that onto the top of her hair, and i'm also using that on the hairline as well. Then i'm going to be taking my hot comb and smoothing that in to the hair, really getting that pressed out, so this way can lay flat okay and i'm going to repeat this step as well. Hmm, i'm also smoothing out a section in the back, and this really helped with the wig looks super natural and also helped with the flatness of the wig. Okay. I didn't just focus on the front. I focused on the back as well and that really helped with having this wig look super flat and good, so highly recommend do not skip this step. Now i'm taking my lusters as you can see, i don't have to say what it is, but it is my wax stick and i'm using that to further smooth out this hair. Okay, because this is curly, even if it wasn't curly, but i like to really make sure i have curly hair flat, especially a closure, as you can see, there's slightly over bleaching. So what i'm going to use is my edge brush in my hand, and i'm going to already applied the hair dye to the edge brush and i used a small amount. This is a natural black dye um and i'm just smoothing that, on the part to make it more precise, okay and it easily disappears, like y'all, see how it's just going away, as i'm doing it now to cut off the lace i'm using this razor. That is a very sharp okay, so, as you can see, i'm moving kind of precisely because i do not want to nick her okay that'll be bad that'd, be bad, so um yeah i'm using this slowly and kind of in a jagged motion to get that. You know we don't want to cut it straight across because then that looks wiggy as we all know so. Yeah zigzag motion and carefully cutting this off. I'M going to repeat that step all the way around, as you can see girl that is melted. It'S melted but okay, next step now for the baby hairs, i'm going to be taking my fine-tooth comb and using the back of that, i don't know what that part is called, but y'all know that it really helps get the baby hairs mapped out. I will say that so i'm using that to do that and i'm going to do that on both sides and after that i'll be cutting the baby hairs. With the same razor, i used to cut off the lace with baby hairs. I always cut as i go, because i don't want to cut too much also. I always start off with cutting like in having the baby hairs being an inch long, but then i always go back in for more as you can see, i'm kind of like cutting each section differently, because you know with baby hairs. It'S not all straight across. I wanted to make sure it was jagged and look natural as possible, but now, as you can see, i'm using my got to be glued gel in black and using my edge brush to smooth out the baby hairs. So with this yeah, it was really trial in the air i like to use the brush part to get it kind of smoothed out to see what i want, and then i use the other side which is like the comb part to get it defined. I didn't want the baby hairs to look that laid well laid, but not like uniform. If you know what i'm saying so, i'm using the same uh technique technique combing out the baby hair, so they can look more fluffy because i wanted a really natural look with this. As you can see very natural, so we're repeating the same spots. I mean the same steps omg on the other side, like i said before, i cut as i go, and i really try to get both sides to be very, even okay, really precise. When doing the baby hairs, i like to use got to be glute, gel and black as well as foam. This is just a curling foam. Okay, i don't know what it's by, but it's just a curling foam like it's, not even nothing special to get okay, but i realized that i like to use the got to be glue gel to kind of get it molded and to get it just to play With it in a sense to get it really nice and molded, but the foam is used to get that shape late, okay, let's get into the specs of this hair, because i actually am really in love. This state of hair that it's already in is its natural state, okay, but now we're getting into wetting it. I did custom color, okay using bw2 bleach and 40 volume developer. It came naturally black, but this hair is from divas wigs. It is a 5x5 transparent, suitable for all skin types, closure wig, and this lace is also a undetectable swiss lace. It really looked hd, like you know how hd lace has like that kind of rigid. Look to it, that's what it gave, but it wasn't hd y'all. It wasn't hd and it melted really well whole time. I'M thinking this is hd lace, but never the less. This is 150 density in 20, inches um. What else? What else? What else? I think? That'S it about this hair 150 density 20 inch, transparent lace, swiss lace and the texture is, and the type of hair it is is wet and curly. That is what the wig is called, but to get into styling this hair, i'm using auntie jackie's in control, curling styling cream, whatever it was, i'm using that to smooth out the hair and then i'm using a brush like a powder brush a wig brush to get Those curls popping, as you can see, but yeah after this we're really kind of done, we're going to do a few last touch-ups, but that is it on styling. This hair, as well as the specs on this hair, make sure to check the description box for more information on this hair, as well as a coupon code from yours, truly that you can use for hd wigs. Only okay. Now i'm taking some more of that mizani smooth guard oil and i'm applying that to the hair to just to add some shine, because this hair was bleached, it was tampered with, but it still looks really good and then i'm also using some pink oil sheen. You know i got ta, throw back use the old school stuff, it works just as good. It'S a little sub, don't play, but um yeah. This is the finished. Look. Thank you guys so much for watching. If you want to see more videos like this for me, leave a comment down below as well as thumbs. This video up and i'll see you guys in my next one

Comments
SJ: Beautiful! I wish you could do mine!!!
Rosie: girl pass me over a wig u be slayin tf outta these wigs
Sammie: The hair install
mooodybrattt: perfectionnn
TyDoll:
Corey J:
It’s_Naimah Stackhouse: ❤️❤️
SJ: IF you sale this wig, please please let me know!!!!! Or if you can get me the same wig, dye it the same exact color...I will pay you. You have a great gift!!!!
It’s_Naimah Stackhouse: Early ❤️
charnita ♡: yes maammmm!