How To Transform: Headband Wig Into Half Wig (For Fulani Tribal Braids W/ Curly Sew-In) #Stepbystep
- Posted on 12 August, 2021
- Headband Wig
- By Anonymous
My Transform Headband Wig into Half Wig to create BEAUTIFUL Fulani Tribal Braids operation WAS SUCCESSFUL‼️ You guys... I am *IN LOVE* with this protective style. And, I didn't have to leave ANY hair out!!
#roadto1k #LIKEthisVIDEO #MissDreeks #naturalhair #4bnaturalhair #type4hair #naturalhairtutorial #fulanibraids #tribalbraids #feedinbraids #protectivestyle #halffeedinhalfcurly #fulaniinspiredhair #protectivestyle
⚡️ Sub count: 175
• T I M E S T A M P S •
0:00 - Intro: Transform a Headband Wig into HALF WIG (with Tribal Braids)
PART #1: PLAN (What You'll Need!)
1:09 - The Headband Wig I Bought from Amazon
1:48 - The Pre-stretched Hair (and Hair Braiding Jam) I'm using
2:13 - The Hair Braiding Rack I'm using
PART #2: PREPARE (What You Have!)
2:39 - Transform Headband Wig to Half Wig (with Seam Ripper Tool)
5:55 - Setting Hair Braiding Rack up (for Braiding Hair)
6:57 - Separating Hair (for Feed-in Braids): 1.5 Packs = 8 Cornrows per pack = 10 pieces per cornrow = 12 braids
PART #3: EXECUTE (Your DIY Style!)
9:41 - Braiding Pattern (for Half Up, Half Down Sew-in)
14:18 - Sewing Half-wig on Head
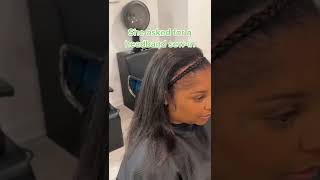
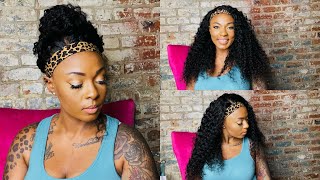
15:08 - What are Fulani Braids?
16:19 - How to Do Fulani/Tribal Braids
22:56 - Rolling Ends & Dipping Hair in Hot Water
PART #4: ASSESS (How We Did!)
25:08 - Finished Look: Fulani/Tribal Braids with Curly Sew-in
I hope you enjoyed my "How to Transform: Headband Wig into HALF WIG (for Fulani TRIBAL Braids w/Curly Sew-in!) #stepbystep” video!
• H A I R • https://www.amazon.com/shop/missdreeks...
+ Headband Wig | https://amzn.to/3lFTu33
+ Pre-stretched Braiding Hair | https://amzn.to/3iwMpzD
+ Hair Braiding Rack | https://amzn.to/3xwyXQJ
+ Seam Ripper Tool (for Quick Weave Take Down) | https://amzn.to/3yxQycr
+ Small Crotchet Hook (for Braiding) | https://amzn.to/2VKInev
+ Hot Pot (for Boiling Water to Seal Ends) | https://amzn.to/3lWtJvk
+ Shampoo | https://amzn.to/3xknaVr
+ Conditioner (Honey) | https://amzn.to/2VdixQf
+ Leave-in Conditioner (Vaseline) | https://amzn.to/3fpG8nl
+ Heat Protectant | https://amzn.to/3jkarx3
+ Blow Dryer Brush (Hot Tools) | https://amzn.to/3xoHncT
+ Hair Jam | https://amzn.to/3fh7Q5U
+ Mousse | https://amzn.to/3C0NDek
+ Edge Control | https://amzn.to/3rKjMlC
• M A K E U P • https://www.amazon.com/shop/missdreeks...
+ Primer | https://amzn.to/3BYFhE3
+ Concealer (Chestnut & Honey) | https://amzn.to/3icq36w
+ Contour (Sable) | https://amzn.to/3fzcg8v
+ Contour Powder (Sand Beige) | https://amzn.to/3lo9u9s
+ Foundation (Maple & Espresso) | https://amzn.to/3C0PZda + https://amzn.to/3lg6Z9t
+ Highlight (Champagne Pop) | https://amzn.to/3j0c96s
+ Blush (Rose D'oro) | https://amzn.to/2WwOD9E
+ Setting Powder (Transparent) | https://amzn.to/3rSllOA
+ Setting Spray | https://amzn.to/3zVC8Tz
+ Eyebrow Pomade (Dark Brown) | https://amzn.to/3jaVtJw
+ Eyebrow Pencil (Dark Brown) | https://amzn.to/3yffMfu
+ Eyeliner | https://amzn.to/2V6Xdf3
+ Mascara | https://amzn.to/3BYKtI3
+ Lip Pencil (Chestnut) | https://amzn.to/378ShIP
+ Lip Gloss (Blissed Out) | https://amzn.to/3C1LbnF
+ Lashes | https://amzn.to/3ihjYG1
• O U T F I T • https://www.amazon.com/shop/missdreeks...
+ Perfume | https://amzn.to/3ygcuIX
+ Sweet Sweat Gel | https://amzn.to/3ykaboe
+ Waist Trimmer | https://amzn.to/3lcr801
• H EL P F U L - L I N K S •
American Express Referral | http://refer.amex.us/EARLeTiDao?xl=cp0...
❤️ Merch | https://missdreeks.creator-spring.com/...
Military Lifestyle Channel | https://www.youtube.com/c/MissDreeksAc...
• D O N ’ T - F O R G E T •
“If the opportunity doesn't exist. Create your O-W-N!” (。◕‿◕。)
I should send you a picture of how i look right now, babe the front of my hair ain't, even braided, and i'm about to walk outside. I don't care it kind of looked natural. I could hide it a little bit: hey y'all, i'm streaks your virtual girly glam sis, and today we will be definitely transforming a headband wig into a half band wig with fulani braids or tribal braids or whatever you call them. I'M super super super excited to do this hairstyle because i've literally been seeing it everywhere. So that's what we're going to be tackling today, boo and i want the vibe to be a full tutorial, because when i'm doing my hair, like i like that girly glam sis time like i want you to talk to me boo, i want you to spend time With me, because i want to spend time with you like, okay y'all, so look if you're like me and you feeling in stock baby. I just need you to like this video and keep watching, because i'm going to show you step by step baby, how i turn this answer: okay, fyi boost, so all of the products and the time stamps are definitely listed in the description, but i definitely asked my Military community, what hairstyle? I should pick and most of them said b, because i am in the military. You know, but i like to keep things spicy and i'm going for c today. No it's giving so you know i was doing some research and i was like okay. Well, what do we need, so everything that i'm gon na be using today can definitely be found in my amazon store. You guys can shop support your girl? Okay, let me get my coin and if you click the links in the description, everything will be there. It'Ll take you directly to my store, so this is actually the headband wig that we're going to be transforming today, as you can see, it's really really cheap. On 44 dollars, you definitely cannot beat that, and then i did order some pre-stretch braiding hair. As you can see, we got six different, but not different, but we got six bundles for 23 dollars, pre-stretched ready to go boo like so. This is a gem that we're going to be using you guys, like i'm, not going to lie to you. This is the best hair gem that i have found on the market simply because it is for hair braiding. Now trust me. It'S going to slick down that type 4 hair. It got you baby and then y'all, i'm so excited to unbox. This hair braiding rack, because it'll be my first time using one and as you can see, it was really really really cheap dollars. Boo like what's up like just for easy, quick and go quick and grab like too easy, and then lastly, i am going to be using a seam ripper tool today and you're definitely going to see why five dollars less than five dollars to get your whole life Boom trust me: okay, y'all, so now we're gon na go into preparing what we have now we have our headband wig and we're gon na transform this into a half wig, really really really easily. With this seam ripper tool, yo. Okay, here we go with the seam ripper tool. Y'All, this thing is so convenient. I literally use this to take down weave wigs anything like with thread. It is super super super freaking, easy to just cut through the seams, but i will definitely say that you have to be careful not to cut your hair off okay. Now i mean we could definitely leave this headband on, but i don't want to because i'm in the military and you'll be running and stuff working out and i refuse okay i'll be damned if i let a headband wig slip off my head during a workout or At work or anything crazy like that, so we're just going to go ahead and take it off it's already washed and clean, and the reason why i wanted to use a headband wig is because y'all half wigs are really really really expensive. So since you didn't already did the work for me, boo, uh i'ma just run with it, so we got to be careful not to cut the seams of you know the hair itself. So if you can see what i'm doing, i'm literally just going through and i'm finding the seam of okay, this, this is easier. We'Re just going to cut the seam right here. So when we sew this onto our heads, it won't show. So once we cut a couple seams y'all, it's going to be super super super easy to just take this whole headband wig off, not the headband wig, but the headband part. Okay. So it should come yep. It should just come straight off once you've ripped a couple seams, but i want to be gentle with it, because i don't want to completely ruin the headband part. We might need that, for you know something else, give you a closer look of what i'm doing as you can see, i'm just cutting and pulling that's it being really really really careful to one not cut myself and not disrupt the thread on the actual headband wig And y'all, i must say to say that this wig was so inexpensive. The hair is really really soft and look at how nicely like the wig is constructed, y'all, really really nice, and once we get done we're going to go back through and pull off those remaining threads, all right, y'all. So we're almost done. This is so freaking simple. This took like less than two minutes, and i was talking the whole time so now we have our little headband that we can use, for you know another wig or we could sew it on to something else. So i'll just put this to the side. For now and then i'm just gon na go ahead and just pull off the excess thread from the wig. Oh y'all, i didn't even realize that the combs are still in here. So, even if you're in a rush and you've taken off the headband part, you still could just attach this to your head. You know, maybe one day you want curly hair, maybe the next day you want straight hair. I didn't even realize that okay y'all, so this looks really really good. So now we're gon na put this aside and set up our hair braiding rack, okay, y'all! So sorry, the audio is a little bad, but i'm kind of away from the camera, not the camera girl, the mic, oh so cute, i'm so excited to use this. Make sure that you close this y'all. This thing is so freaking sharp. This thing will like legit, cut you okay, so it looks like it came with some extra little pegs and let's see how this works. Oh, it has little individual kickstands, that's really cute and convenient. Oh, i love it. Damn zaddy, okay, y'all! So now that we have our hair braiding rack set up, we need to go ahead and set up our braided hair, which y'all this is about to be so freaking easy, i'm just looking at these racks and i'm just like okay. I know i want 12 braids. It has six rows on each rack, so that's legit, my 12 braids, that's gon na be perfect. Okay, so this is how you separate braiding hair evenly for feeding braids. Okay. So you take your hair and this hair comes pre-stretched, as you can see, i'm just gon na take it in a half okay. So i'm gon na put this aside and then i'm gon na take this hair and i'm gon na just keep separating it evenly like it's really really simple: it's not hard, so i know some people like to just like grab and go. I don't like that because then your braids come out being different sizes and that's definitely not cute, so we're just going to take our time we're going to separate the hair boo, it's so easy. Okay, okay, like one pack of hair, is going to be eight braids. That'S how i look at it, which is perfect and if we need more hair, we'll just open another pack of hair, let's go ahead and lay these on the right. Okay, so i'm gon na show you what i'm doing so. I'M gon na actually start at the bottom of the rack, so i'm separating it into a half first, all right and then the half is gon na, be four braids. So now do two and then two and you're, just gon na lay it it's all math you're gon na take this other half you're gon na split this one in half and then this half of that will be two and then this one will be four. So you want your last two to be really really really small, because that would be your starting stitches, all right, cool, okay y'all. So i just finished laying the eight braids that you see here so currently we are planning to use a pack and a half of hair for 12 braids. Eight braids are in each bundle of hair pre-stretched hair and we have 10 pieces okay, if that makes any sense, okay, and that is one way to guarantee that all of your braids will be evenly distributed. They'Ll be nice, you know like they're, going to be giving professionals so, okay, so we're gon na set this to the side, because i'm definitely gon na need that we're not using all of this hair. I'M just gon na divide this into half baby and we're gon na put the rest up. All we need is four braids we're gon na wrap this up for another day and i'm actually gon na label it half pack and i'm gon na just put it on there. Just like that ain't. Nobody in my hair braiding studio, but me boo, all right and we good - and i just wanted to say if you're hair, braiding stylist watching this or soon to be hair, braiding stylist, teenager diy or whatever you guys can prep the hair before your client comes to Your house, so if you are wanting to start a business or going to business for yourself, listen buy the hair tack on an extra two to three dollars. Boo set it up and just like that, you good okay, y'all. So now we're on to part three doing the actual style. Okay, so i got a camera in the back, so hopefully you guys can see y'all. This really shouldn't even take like that long, because my hair is pretty pretty stretched. Thank god. I just put it in six braids last night and i woke up picked it out and it was like it looked like it was blown out so, okay, i got a couple mirrors in here and i'm actually gon na turn this back light off y'all. This light is blinding me: okay, boom. That'S so much better, all right! So you already know hair braiding jam. Definitely using that - and i have some clips here - a very pointy rat tail comb and then some rubber bands. If the clips aren't working okay, so i have a natural middle part, because i'm always wearing middle parts, but i'm gon na try to make this as quick as possible. If you already have a hair braiding pattern, boo just skip ahead to the next part of the video okay. So i'm just put some jam to separate my parts and make sure that they stay clean again we're doing 12 braids, so we're gon na do six and six. So i definitely don't just want to part my hair, any kind of way to get started. I'M gon na part it as if i'm about to braid the front, but we're actually gon na. Do the headband wig part first girl. Am i crazy? Okay, that's better! I was about to have a nervous breakdown, all right y'all. So now that that's done now, we can speed through the rest and do this sewing pattern. So i know i want a whole perimeter braid to go around the crown of my head and then we're just going to do some straight backs all right and then for those of you who can't yeah, braid literally just ordered a mannequin last night. It should be here sometime this week like earlier this week. Oh if y'all can't braid or y'all have kids um for the biracial moms out there or for the moms, with biracial children and you're, struggling with trying to figure out how to style your baby's hair. I got y'all okay, so y'all. Look when you get to the nape of your neck, don't pull the hair tight! I like to sit up straight, so i can feel the tension that could possibly be there, but as long as you're, like bent over like this you're, always going to braid your hair too tight. So, and i like to tug too, like push that hair down. Oh girl, wait. We looking fit and i don't braid all the way down. It'S just a waste of time, i'm just going to twist it and then i'm going to start these next two braids. So i literally did two fishbone braids into one super. Easy super simple. Braiding pattern just separate it right here, because this is going to be at the back. The hair is curly, so it doesn't need to be like super super duper flat, and once we get down a little bit we're going to bring this last braid over. So i've seen a lot of females like just braid their hair, especially females with long hair. I'Ve seen females just braid their hair in individual um braids and just like, pin them up or um. You know have a big knot at the back of their head. Look how flat my braiding pattern is. This goes in the front, but look how flat it is. No, the parts aren't perfect, but it's flat. So, regardless of how long your hair is, you can definitely have a very solid foundation. That'S how you're gon na get flat realistic looking sewing, so i didn't show you guys this in my amazon store. But if you have a crochet hook, i keep them around the house. I got like five of them or you can take a bobby pin. Take your crochet hook and we're legit gon na feed the hair through another braid, and it doesn't even have to like stay. I just didn't want it poking out. So when i go to cut out that half wig, i don't want to cut my hair y'all. Our braiding pattern is done honestly, like your braiding pattern. Shouldn'T take no longer than 30 minutes seriously. If you can braid boo - and you know your head, you know your client's head. Just look fish bone like make a part down the middle, make a part on the sides right fish bone, two braids connected boom. You done have your little perimeter, braid and you're done and honestly. Look how easy this is about to be all i'm gon na do is take this headband wig, okay, cause the headband gone. The combs is already in there. Look how easy this hairstyle is about to be so y'all. Oh, my god, this hair is so freaking pretty. It smells amazing because i washed it, but it looks like hair. It doesn't look like plastic, my bad! You look young. You aren't trying to see miss drinks, y'all, not y'all, not trying to see me y'all. Look how pretty. This is really, though, like yeah, i'm on the phone, my baby, but i'm about to sew the perimeter of this real, quick. It'S gon na be real, quick, real, quick. I definitely do yeah okay y'all, so we back so now we're about to get down to the nitty nitty-gritty baby and we are about to do these fulani tribal braids y'all that has just taken the whole world by storm. Okay, yeah hold on y'all look. I was, i was doing some research and it turns out that it says fulani braids made popular by the fulani people of africa is a style that usually incorporates the following elements: a cornrow braided down the center of the head, one or a few cornrows braided in The opposite direction toward your face near the temple so meaning like one center braid and then the braids going down like this. I was like, oh, very, very, very nice. Oh that's so pretty too! Okay gabby! I was like uh i'm about to look like my people. Okay, yeah, i really i don't know if y'all have ever like wondered where you really come from, but i times wonder like girl. I know i'm from louisiana. I know i'm creole but girl who? What, when, where how i don't know my lineage to say that i am anything like i don't know where i'm from, but maybe i'll do a genealogy test. Sometimes people saying that it's inaccurate, but i don't know, maybe i'll do one just to see. I just want to know okay y'all, so look. We got it's not a serious problem, but our sewing is looking real well correction. Our headband wig turned into a half wig, it's looking real real, real good, real, real, real secure, but this weft right here - i don't want it to show. So we have enough pieces of hair to make the braids thick enough to not show the weft. But if they're too long, we're probably going to have to curl the ends, but let's just get started baboose. So this is just me of course. I like to start on fully detangled hair, but i'm gon na part it right here because we're only doing six and six braids okay, so i have natural parts all around my head because i just know how my head shape is. Okay, so look we're gon na part. Our hair put some jam and re-part baby part jam, re-part, okay, so i'm gon na work, smart and not hard, and i'm gon na make my parts for each braid and i'm gon na just tie him off with a rubber band so that i can go ahead And get this style, i will wait because your girl actually has to edit a video for her military channel tonight. Y'All. I ain't done nothing for the video okay. I ain't got a thumbnail. I ain't got anything okay, let's get it all right! Y'All! I'M on my last little section of hell, so we got our 12 braids divided six on the left side. Six on the right side probably should do my baby hair now, but i'm probably not y'all. Look at my hair yeah, all right, y'all make sure your hair is detangled. Your client's hair is detangled all right. Our little jam look like it dried up. I'M gon na put some on both sides. Okay, now we got 10 pieces as y'all can see y'all. It'S not it's not that much hair to stitch like the braids aren't going to be long across the cornrow, but i'm going to stitch really really really close together, because one i don't want the braids too long, but even if the braids are too long, we could Always curl the ends: okay, okay, so we're gon na work top down, and hopefully you know things gone okay, hopefully prayerfully girl, yes, okay, we're gon na start our feeding method, we're not gon na have a knot at the top all right. So we have our first piece, of course divide that baby into threes baby and then we gon na braid. So one stitch two stitch three stitch on our third stitch well alive. Fourth, because we got to bring it under there on our fourth stitch, we're going to grab our hair feed it under grab the fourth stitch braid again, okay, feed that under grab another piece of hair feed it under okay stitch one stitch, two feed it under and Grab so i know sometimes people like to stitch grab, hair, um, braid, braid, braid braid then stitch. I don't do it like that. I stitch so that less of my hair will be exposed. So every time i braid a piece of braided hair is with my hair. All right we're doing good and keep your hands as flat to your head as you possibly can alright. So we're going to stitch right now. I can try to detangle. With my dominant hand, this happens it's so normal because you're literally braiding this way, but your hair is being braided the other way. When you put the hair underground more hair, we just ran out of freaking head space y'all. We got three more stitches to do so. Now, i'm just gon na fold the braiding hair over to hide my hair and i'm gon na give y'all a better angle. If you don't tuck your hair in the braids and your hair is like really really really naturally curly. It'S going to come up out of these braids trust me the moment you sweat work out you be outside for too. By long way, your hair is going to come up out of these braids. Okay, you want to be in a next week's video y'all. I'M talking to aunt, i ain't even wait for you to answer, but y'all i'm talking to angel. While i wrap up my braids, i'm almost there girl look at the difference, but yeah i'm a time lapse it anyway. No you don't because you'll be like oh babe. I learned this so i'm going to use it: okay, y'all, so i'm done braiding my hair and it's so freaking pretty so now i'm gon na trim these ends not too much because i don't want them to be blunt. Okay, so one thing that i hate about cornrows is when they're uneven on the side. So now i'm gon na make sure that my hair is even i know i look weird, let's foam it up. All we got is 12 braids. Okay, we ain't gon na put that much y'all, sometimes i'll, be thinking. This foam is gon na itch my scalp. Now that this is done. Oh we ain't getting in on that lila braid, i don't know. Y'All braids came out so freaking nice, oh, my god, i'm gon na roll the ends and dip them in my little hot pot. Why am i so far away from the mic? Okay, so look y'all! I can't find my blue rollers that i love. I. I only got these jerry curl rollers so because they so small i'ma just put three hold on. Let me put my hair down, so i can see how long i need the curls to be all right, so look and i'm twisting it look instead of just rolling it, i'm twisting it okay y'all, so this water is actually boiling. You have to be very careful. Okay hold on. Let me set this down this hot pot. Okay, there we go so half the water already boiled out. Okay, so i'ma actually turn this off, unplug it and then we're gon na pour our hot water. Okay! Thankfully, we don't need that much water, okay y'all. So this is just me right. Whenever i'm working with hot water, i'm gon na always protect myself or my client okay, so we got our hot towel around our necks. It'S not even that much hair! Okay. So i do it this way. So as soon as i take it out, i can just grab it and dip it. So i'm gon na let it sit in there for a couple seconds y'all. Hopefully, my doggone air pod doesn't fall in the water and i tried to get as much of the braid as i can in the water, so the braid won't be so stiff but of course protect your face. Blue all right. So move this hair out the way and we're about to grab it really simple process, really really simple. Now y'all see what i'm saying like this hair is way more stiff over here then this hair. Oh, i look so pretty hey thumbnail hold on okay cool. Let'S take our curls down, oh my god, it's so pretty, and it's the perfect length that i wanted it to be. Oh, my goodness! It'S so pretty! I look like a goddess. Oh my god. It'S so pretty! Oh, my goodness! Oh, i don't even have like beads or anything in it yet, but it's so freaking pretty i mean a headband wig turned into a half wig with tribal braids, beading cornrows or whatever you want to call them at the top, really really simple, inexpensive hairstyle. Oh, my god, okay, okay, i mean it's beautiful, it's beautiful! I could not have x, but more so tomorrow. When i go to work. Of course, i'm gon na have to take out my little beads, but you guys tribal braids. I feel like it brings out the goddess in you. Like, hey y'all. Let me show you a trick. So look at the top of my head. You can see this wolf right. All i'm gon na do cause. I'M not gon na keep this style in. For a long time, i just took a piece of hair from the side of my head. Look at this now had i thought about this sooner. I could have braided this hair in with this braid and it wouldn't have gone anywhere, but now it's hidden what a whiffed, what a worth that baby and on the weekends. I could put me some little beads in here. Wait. I'Ve been filming all day trying to make sure that i gave you guys as much information as you need to do this style and be successful right. But you guys it's so beautiful and it was so worth the time, the energy and the effort and every dime that i spent y'all that braiding rack, okay, baby, get you order! You a braiding rack, baby, okay order, you a headband, wig, baby, okay, y'all, very, very, very inexpensive, definitely not five hundred dollars, six hundred dollars, seven hundred dollars for a custom-made, wig, no, no ma'am, no sir! Look how beautiful, okay so look see hold on. I want my hair back like this down like this, which i think comment down below what you think, one to the back, both to the back or one to the side. I feel more comfortable like this. This is my glam. You

Comments
Nu_Soil: Just get some Murray’s and a brush and y’all good
Vanessa jay: It’s the fact that I was thinking about doing this and this popped up great minds think alike
Kelly Molette: I just subscribed. I absolutely love you!!! Your personality is so comfortable like an old friend. You look gorgeous!
J Hearts J: This was such a well made video! Bout to do this style. Subscribed.
kemoy johnson: Absolutely beautiful
asian_yumyum: This was a great idea and easy to take out when needed
Royalty Roots: Yessss been waiting on this
Crio'Las: Gurl this loooks sooo BOMB LIKE OMG and ur makeup is on point
lena Armelle: OMGGGG I LOVE ITTTTT
Keketso Setai: I love it !!
Monet Dowers: I didn’t know you did your own hair !!! Wow !!!
Joana Copeland: ❤❤❤
IAmKandy Koated: I got a 22 in old headband wig ima try this style with
Cat Nailz: Hi love your video . I wish I saw this video b4 I purchased Luvme Hair cause it matted and tangeled everyday on me. Did your tangle and require combing everyday"?
talia bull: How can you hide it if you don’t cut off the headband?
Jessica Rackzz: Yess cute asff
MissDreeks: Active Duty Diaries: Looka my girl
Sweet As Coco: Like the vibe
Sekeithia Brooks: love love love sis