Diy Headband Wig Cap | Dilias Empire.
- Posted on 12 November, 2020
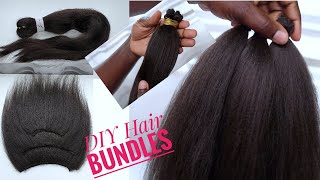
- Headband Wig
- By Anonymous
#diyheadbandwigcap #headbandwig #diliasempire
Hello beautiful, welcome back.
Please subscribe: https://www.youtube.com/c/Diliamakeove...
Get the headband here:
Check out Dilias Empire Lashes: https://www.instagram.com/diliasbrand
Subscribe to my vlog channel:
Set of comb:
Contact me on:
Email: [email protected]
Instagram: https://www.instagram.com/diliasempire...
Dilias Lashes: https://www.instagram.com/glambydilia
For contact Lenses: https://www.colorcl.com
Discount code: dilias10
For special contact lens deal, use the link below
Get your face steamer here: https://amzn.to/2wyZrYm
Coca-Cola Lip Smacker: https://amzn.to/3bXef2b
Please do let me know what you think about this video. Until next time, stay beautiful and be blessed
Hey beauties, welcome back. How are you guys doing hope you guys are well all right guys, so in today's video i'm going to do the headband wig all right so um right here i have my my cap and i have the headband right here. So this one, i actually got it from amazon, so this is how it looks all right, it's sweet. Actually it comes with these um attachable and detachable thing right here, all right, which i really like and it does it's affordable. It came in two actually brown and these um black color. So this is what i'm going to use to achieve this headband. Okay. So now i'm going to place it on where i want my um band to be you know, so it's going to be right. On top of the elastic band that came with the head cut with a cap: sorry, because i'm going to cut off this elastic band once i'm done so i'm going to secure it with a pin just so it doesn't move and i'm making sure i don't drag It so much just in case when i'm done i'll have enough space in case it's too small or something all right. So what i did here here is to pin it down at the back of the of the ear. I don't know if you guys can tell because when i'm cutting off this elastic, but i'm going to cut from the ear right here to the other ear you understand, so i'm going to start the stitching or the sewing from the middle. So i'm going to sew. First of all to the right and then sew to the left, it doesn't matter where it starts from okay, so this is just like when you're sewing in your frontal is basically the same method. So my sewing method is when i take the needle through the cap and the hairband and drag it out. As you can tell, then i create a loop or like a knot like two to three times and drag it out and that would just secure it in place or two times is okay settle down, but until then so all right guys. So i'm done stitching this side of the cap. You can hardly turn right. I know. That'S it. Nice finish dunker. Now i'm going to do no habit, i'm not done please. Now i'm going to sew the other side down to where or close to where the pin is all right. Moving like a hurricane, there will come a time for when we can wash away our sins settle down, but until [ Applause ] then so this is all right. So this is where the trick comes in. So now i'm going to cut off the excess lace on the areas i sold the banned dog, the headband, all a right. Let it be love me like a [ Applause, ] stranger do maybe you're a bird singing for believers. A song meant to be heard, but never meant for preaching me day.


Comments
Odette Young: This is an amazing idea. Your edges are protected and the cap all in one. You have the most brilliant ideas. Love this.
simplydemi: You did an amazing job, very neat and perfect , looking forward to the proper wig , I hope you are going to do it will love to see it please ❤️❤️❤️
Brittany J.: This video is very informative and a great guide. Well done, sis!
OkikiWigs: Beautifully and neatly done. Love your work sis
Favour: I enjoyed watching this video,step by step tutorial and the hair band cap is beautiful well done sis!
Kenna Treola: I love these head band wigs!! A great invention. I just uploaded a D.I.Y head band wig tutorial on my channel as well for those who don't want to spend on a wholeee new wig. Thanks for the tutorial!!!!!
Queen🦋Supreme: You're so talented and creative.
Fanm Nwa Aries: Love the way you did it
Annie Itugbu: This is very nice sis,waiting on d wig video
simplydemi: Awww, kids will be asking if you are done as if they have an important meeting to attend my youngest does that too
itz Jayne: So so beautiful
Queen Bluntress: I hope you patented this because they are now selling them on Amazon. Exactly like this
Matinda Thing: Thanks for sharing sisthat look Nice.
Gracefully EUT: Well detailed
Kenja 'BlackButterfly' Brown: Awesome video. Thank you
JaACQUELINE ferron: amazing saves money doing it yourself thank you
Moments with Adwoa: Newest Subie here from Ghana love your video
Pretty Queen: So we All have to wait for the thing sewing of the Wig? And then another video for the installation.
nmesomachi benita israel: Please sorry to ask,I want to know if there's still need for closure after securing the hair band
Ann M: Can't wait to see you make the wig!
Jenny O: Great video. Is there a reason why the band on the wig had to be cut or is that just preference?
Joslyn Charles: Can I use a sewing machine to sew on the band
oluwakemi adelagun: I like it
Edvanault BUSSAMB: Sorry why did you use to say As you can tell instead of as you can see! Coz I'm a bit lost as I speak French it can't be heard like that. Did you get me?
R5NDOM5: I'm doing this