How To Make A Headband Wig (Very Detailed Tutorial)
- Posted on 22 November, 2020
- Headband Wig
- By Anonymous
Hello Beauties,
In today's video, i will be showing you how to make a flawless, super neat headband wig from start to finish. With this tutorial, you can start a headband wig business that is guaranteed to make you a lot of money. This hairstyle is super trendy and it is an awesome protective hairstyle for your 4c natural hair and really any hair type or texture in general. I provided a lot of useful information that will help you while making your own wig, however, feel free to leave me comments with your questions about how to make this beautiful head band wig.
Make sure you watch the entire video, so you don't miss any important information, also, please share with your friends and family. Thank you!
DON'T FORGET TO LIKE , COMMENT AND SUBSCRIBE {https://www.youtube.com/channel/UCHMPZ...} for more Videos
Love you guys, See you soon in another video
***************************************************************************************
WHEN I AM NOT HERE, I AM HERE
----- (●'◡'●) ----- Connect with me -----
* My Instagram ▶ https://instagram.com/funmibiolawore/
* My Facebook ▶ http://facebook.com/funmibiolawore
*My Facebook Page ▶ https://web.facebook.com/FunmibiOlawor...
* My Email ▶ [email protected]
▬ CHECK OUT MY OTHER VIDEOS ▬ :
HOW TO REGROW YOUR EDGES/HAIRLINE BACK FAST | 3 PRODUCTS YOU NEED + BEFORE AND AFTER PICS
NO MORE DRY HAIR: HOW TO MOISTURIZE DRY HAIR | USING JUST 3 ITEMS | 4C NATURAL HAIR
HOW TO PACK YOUR 4C HAIR INTO A LOW SLEEK PUFF USING JUST 3 PRODUCTS
HOW TO: TWO STRAND TWISTS ON 4C NATURAL HAIR || STYLE FOR MASSIVE HAIR GROWTH AND LENGTH RETENTION
HOMEMADE PROTEIN TREATMENT FOR HAIR GROWTH AND STRENGTH USING ONLY 3 INGREDIENTS || FT. MY 4C HAIR
WASH YOUR HAIR LIKE THIS TO REDUCE BREAKAGE / HAIR LOSS ||WASH DAY ROUTINE FOR 4C NATURAL HAIR
NATURAL HAIR PRODUCTS HAUL 2020 | THESE PRODUCTS ARE SAID TO BE GAME CHANGERS
HOW TO APPLY FOUNDATION ( UPDATED SKINWORK ROUTINE) - FOR BEGINNERS
GET TO KNOW ME | THE NEWEST UPCOMING YOUTUBER IN PORT HARCOURT
FAVOURITE SKINCARE PRODUCTS FOR BROWN SKIN| MELANIN FRIENDLY PRODUCTS
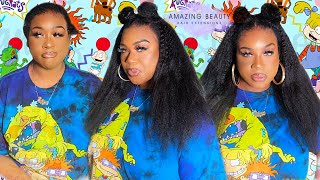
Hello, my beauties welcome back to my channel in today's video i'm going to be showing you all how to achieve this beautiful hairstyle. Do you guys like what you see already this hairstyle is super affordable, extremely beautiful and so classy? It'S something that you can easily wear this christmas for that christmas party for that new year party. I told you guys earlier on in the previous video that i'm going to be providing you guys with a lot of choices when it comes to hairstyles that you can make for yourselves this festive season and yeah i'm coming through with my promise. I won't promise you i'll fail you so yeah, if you're interested in knowing how to get your hair game on flick without breaking the bank. If you want to get your hair game, looking super juicy like what you can see, then you definitely definitely want to keep watching okay guys. So it's time to get started with making this hairstyle. This is the hair we'll be using for this particular hairstyle. The hairstyle is a headband wig made with this darling, mongolian kimki. This is what the texture of the hair looks like, and it's extremely soft for a synthetic hair guys. This hair feels awesome. I'Ve been telling you guys about how darling nigeria has just been coming out with awesome, awesome, hairs and yeah. I can't have enough of them anyway. This is what we'll be using for making our headband wig. You need your thread, you need your wig cap. You need your tippings, your curved needle and all that good stuff. I'Ve done a couple of week, tutorials on here, for you guys, so i'm sure a lot of you guys know the drill. So this is what i'll be using for my headband. I constructed a headband using a lycra fabric that i had in the house feel free to use your old headband, like i did in my last head bandwidth tutorial, so you don't have to go ahead and start constructing for yourself, but if you can, please feel free To do that using a stretchy fabric, this is my needle i'll show you guys my tippings as well just the basic things. You guys know the drill when it comes to making headband, wigs and wigs in general. So for this particular tutorial, i picked a lot of mistakes that i made with my last tutorial on how to make a headband wig. So this time, instead of attaching my headband at the end of making my wig this time, i'm going to be attaching my headband right from the start. So i'm going to first of all sew this very first row right, secure the hair on the wig cap and everything and then sew it through and take it straight to my machine to sew it on that way. Attaching the headband is very very easy, unlike the last time where it was just a struggle to attach the headband, because i was attaching it when i'd already completed my wig also, i won't be cutting anything out of the front of my wig cap. The last video i made, i cut out two inches ball. I saw that i didn't really like the fit of that particular headband. So this time i'm not cutting out anything. All i did was. I got a size smaller, so instead of the regular wig cap that i would use, i got a size smaller of that particular size of wig cap. I hope you guys understand what i'm saying so yeah. This is me now i'm going to take this now and i just sew it on half inch all the way through the front front, um perimeter of my wig cap. So i'm just going to do that now and then i'll come back to show you guys what it looks like. Can you see how neat the headband, the headband now sorry how it's attached to the hair nicely without leaving any you know aesthetically unpleasing weirdness, going on in front everything just looks nice. This is what this stitch looks like underneath, but the outer part of the headband wig looks super department and just beautiful so once this is done, i'm just going to attach this my wig cap back to the mannequin here. This is my sister here and i'm just going to continue stitching my hair onto the wig cap. I hope you guys understand what i'm saying. If you have questions, you guys know, as usual, feel free to drop your questions in the comment section i'll be more than happy to help you out, but the point is fixing those mistakes that i made with the last headband week really really helped with the outcome Of this particular headband with you guys saw the beginning of the video you saw how beautiful the headband wig looks. It looks so professionally made, if i do say so myself and it's very, very easy - i'm here to just help you shutting your learning curve. All those mistakes that i made you don't have to make them i'm here to just give you the tea on how to just make beautiful things for yourself without making other small mistakes that you would have to make to learn from right. You don't have to make those mistakes. I have tutorials that just help you fix those mistakes and yeah just get your hair game on flick. So all i'm doing now is i'm just sewing my hair onto my wig cap. You guys know the drill, i'm going to link a playlist on here, where you'll find a lot of wig tutorials that are very, very awesome. My channel is here to make you level up this thing now that i'm teaching you guys feel free to turn it into a business, make weeks for people and get paid for it like i'm here, to really really help you out, and i hope you guys find All these tutorials i'm giving you all very, very useful. What i'm doing now is i'm just stitching my hair, like i said earlier, i'm going to keep stitching this way. So it's like a half circle. Now i'm just going to keep stitching this way and then it starts to get complicated as you get towards the front and don't worry, this video is very detailed, so make sure you don't skip the video make sure you watch it to the end. So you don't miss out any important information that i'll be sharing with you all on how to make this headband make sure you watch the video to the end, so yeah i'm going to keep sewing and all that stuff, and i zoomed in very well. So you guys get a very, very good visual on everything i'm doing so yeah, i'm going to keep quiet for a while now just to allow you pay attention. If there's anything, i need to really really point out. I'M going to talk to you guys soon, so you guys should just watch enjoy also don't forget to give the video a thumbs up if you found it useful at the end, or even right now smash the subscribe button right now, if you've been enjoying this video. So far, if you're watching this video - currently i am not subscribed to my channel. I don't know what you're doing you're watching my video have. I just joined the family. I want to be your friend. I want to be your sister on youtube, so please smash the subscribe button and be one of us on here. We are lovely people on this channel, so yeah i'm going to be right back enjoy this tutorial, see you soon all right guys. So it's getting kind of complicated now, so what i'm doing now is i'm just sewing on a straight row. Just as you can see, you see that i'm not going around anymore, because if i keep going around it's going to get messy right, it's not going to make sense. So what you want to do now is keep sewing on a straight row, so you cover every part of this. Your wig, you don't want to keep going around in half circles anymore, keep going straight straight straight straight straight, so you get to the front. I hope you understand what i'm saying anyway. The video is here for you guys just keep watching and following the steps, feel free to repeat and repeat, i repeat, watching the video until you get the hang of your headband wigs. If you go ahead and make a headband video for yourself using this, my tutorial, please don't forget to tag me in your beautiful pictures that you take while rocking your hair, i'm going to leave my instagram handle and my twitter handle as well on here. I'M also very active on tiktok so feel free to go ahead and follow me on there. I usually drop tutorials, some tutorials. I don't make it on here or youtube they're usually available on my tiktok, instagram and twitter, so make sure you go ahead to follow me on this. So yeah that's pretty much it i'm going to keep quiet now and i'll talk to you guys again when it's time to style the wig on myself so yeah, don't click out of the video keep watching and make sure that you're not missing out any important parts. Okay, all right talk to you soon, us friends, calling us friends, calling us friends, calling us friends, calling us friends calling us friends, i'm calling these us all right guys, so we are approaching the end of this particular tutorial. This is what the headband week looks like. I'M done covering all the open parts of this wig, and this is it right here. It looks very rough, so i'm going to go ahead and brush it now and yeah voila. This is what the wig looks like as usual. I like to style any hairstyle. I show you guys on here so yeah. We are just going to move on ahead now and watch me style this hair on myself right now, but before we get to that, just look at how beautiful the wig looks it looks so gorgeous. I can't even wait to rock it on myself. So yeah, let's go, let's go, let's go okay guys. So this is me looking delicious, if i do say so myself. I already slipped my natural head backwards, just to give me that yum yum look at the beginning of my head at the front parameter of my hair and my edges are looking beautiful. If you want to know how to grow your edges too, i have a video. I'M going to link that on this page right here, so you can go ahead and go check that out what i'm going to do now is i'm going to wear my headband wig, starting from the point where i list my hair out. I don't think you understand. So my hair is going to be in front and my headband wig will just start from towards the back of my head. You guys will see how i'm going to rock it, because my hair, i didn't put my hair in cornrows wearing this wig - was kind of a struggle. So i had to stand up and then go ahead to look at a mirror to know how to place it. On my head so yeah this is me now i finally found a way to just the hair underneath this wig. I don't know why i'm always so tired when it comes to making cornrows or flat twists for myself for yeah. This is me now. I'Ve eventually succeeded in wearing my wig, despite the situation shape going on underneath the wig and all i'm going to do now. Is i'm just going to brush through the hair just to make it look beautiful? Okay, i kind of carrying hair looking all scattered and stuff. Now so this is me just using my denman brush to just brush through the hair, to make it look very neat and presentable. You guys should just ignore my uninterested facial expression. I was so tired this particular day but yeah. This is it what you guys think look at your girl anyway. This is the final look. This is what the hair looks like feel free to recreate this look. This will look is going to be perfect for that christmas party that outing with bay that outing with the fan this hair right here is going to come through for you, the weave itself and making everything about this heading cost me up to 5 000 naira, guys Very very, very, very affordable 5000 naira is about maybe fifteen dollars, they're about or less or twelve dollars and yeah. Look at me looking like a bag of money. Just shaking me money very cheap, very easy. If you go ahead to make this hairstyle, don't forget to tag me, your lovely pictures, if you're still watching and you've, not liked this video, please, as i'm talking now, because go ahead and hit that like button, you know you love this video, also, if you're watching And you're here to subscribe to my channel, please go ahead to subscribe and yeah. I can't wait to see you guys in my next video. Thank you guys so much for watching. I appreciate you all and yeah before you go before you go, go ahead to watch something else, i'm going to link a playlist as well as the most recent upload somewhere on this screen for you guys to enjoy. While we wait for my next video love, you guys so much, and i can't wait to see you in another one. Bye,


Comments
Funmibi Olawore: #Roadto2000subscribers Thank you so much my dear Family for watching this video, I love and appreciate you all ❤. Please don't forget to SUBSCRIBE, LIKE, SHARE AND LEAVE ME YOUR FEEDBACK in the comment section.
Dorcas Eyefia: This is beautiful ❤️ l love it. ❤️❤️
Miss Mary Mak: 200+ subscriber gang, well done boo. Keep bringing us the great content
Damilola Ogungbemi: This is so pretty ❤️. But since this darling hair is synthetic ... how long did it last ?
uweswitgal: Beautiful!!!
Mary Ngodo: Amazing!!! That one person that disliked this video, what have you gained?
Ayonnaz Glam: ❤️
Nma Maryann: Where can I get the band?
Gbemisola Oluwagbemi: Pls show when you sew the head band with machine, where did get head band in Nigeria
Joy Ogechi: Please how much did you buy this too?