Crochet Headband Wig Diy (& Braid Out!)
- Posted on 21 November, 2020
- Headband Wig
- By Anonymous
Hey Guys! In today's video I'm going to show you how I create my version of a crochet headband wig. Thus headband wig tutorial is perfect for beginners and is a cost effective option! I also tried a braid out on crochet braids for the first time. This is a perfect protective style if you are natural.
Products used
Cuban Twist Hair: https://amzn.to/2H9qNcK
Wig tripod stand: https://amzn.to/3pDBCVT
Mannequin head: https://amzn.to/2UEkYHx
Crochet cap: https://amzn.to/3pGhum3
Wig combs: https://amzn.to/3nFLKLV
Follow me on Instagram!
https://instagram.com/kearra_nicole
What to Watch Next:
Crochet Headband Wig Styles: https://youtu.be/PZkMUK9DFag
Straight Crochet Braids Playlist: https://www.youtube.com/playlist?list=...
DISCLAIMER: Links in this description may contain affiliate links. As an Amazon Associate I earn from qualifying purchases.
#headbandwig #crochetheadbandwig
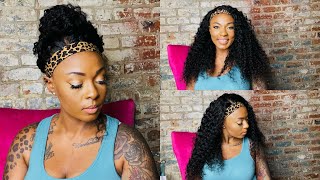
Hey guys welcome back to my channel, my name is kiara nicole and today i am back with another headband wig video um. If you haven't seen my last video, i showed you guys a few different styles um that i created with the headband wig using crochet braids. A few of you guys have asked me to do a video showing exactly how i created my crochet headband wig um. So in today's video i'm going to be showing you step by step, how i created these crochet hip and wigs all the products that i use to do. This tutorial will be linked in the description box, so for this crochet style, i'm going to be using two packs of the cuban twist hair um. This is the wig cap that i'll be using. It doesn't come with any combs attached, but i'll show you guys how i attached that later to make this process go by much faster. I would suggest that you pre-separate the hair in the beginning prior to crocheting the hair, so here i'm just showing you guys how i separate the hair, i'm separating each strand that comes in the pack into two sections, so you just want to start crocheting the hair Starting from the back um for this, i'm only pulling the strands through one hole on the wig cap. This helps to prevent the cap from bunching up too much. If you were to pull the crochet hook through more than one hole, i'm also crocheting the hair, as if i was doing an invisible part method, i'm only pulling one strand through when i'm tying the knot. This helps the knots to lay a little bit flatter on your crochet wig, as you can see guys, i'm not really putting the hair super close together, um. I wanted to show you guys this part, because i know some people think that you have to crochet through almost every hole in the wig cap um, but you should really space it out. Um, the hair is pretty thick and pretty full, so it'll actually fill in pretty quickly without covering every single section. So this is what i have in the back so far, um as you can see, they're not super close um. I try to be a little conservative when i'm doing the back um and not add as much, but if i feel i need to add more later, then i will do that, but this is about the spacing that i use when i'm installing the hair. So here i'm just going to show you more footage of me installing the hair um honestly, this didn't take any time at all. I was surprised at how fast i was able to install the hair, especially when you have all of the hair pre-separated beforehand, um and also, if you have a wig stand. Um for this it'll make it so much easier to style the hair as well so yeah. I think i was able to do most of this wig in about an hour, so it was a pretty quick process for me. So this is what the wig is looking like so far as you can see, although i spaced it out a lot in the back, you can't really tell, as you begin to add, more hair. So if you're going for more of a natural density, don't worry about covering every single hole. So once you get to the front of the wig cap um, you want to use smaller sections in the beginning. I told you guys that i separated the hair into two sections for the front. I am using four sections, so i'm separating those two sections into another. Two, so this is going to help the front of the wig lay as flat as possible, again you're, going to just crochet the hair through one hole in the wig cap and you're only going to pull one strand of the hair through. As you can see, the knots in the front of this wig are much smaller than the ones in the back, so you basically want to cover the entire front perimeter using these smaller sections of hair. Here i installed the crochet hair through each hole along the front. So you just want to repeat this process all the way across until you have the hair covering around the entire perimeter. So this is what the wig will start to look like, as you continue to install the hair um. So then, you would just go back and start to fill in these sections. I continue to use small pieces of hair in the front just so that it doesn't become too bulky. So this is what the wig will look like, as you continue to fill it in um. There'S really no need to cover every single hole um, but make sure there are no really big gaps. So here i'm showing you what the wig looks like on me up close as you can see, it's pretty seamless and the hair in this natural state matches my texture pretty well. Also, it didn't really matter that i didn't crochet the hair through each hole in the wig cap. It still filled out nicely, so i told you guys earlier um this wig cap didn't come with any comb attachments, so here i'm just showing you guys how i sew a wig comb onto the front of the cap. I'M sewing it in the front center um because it just helps to maintain more control of the wig and the placement. You don't have to worry about this. Being super perfect, just get it on there. The best way you can so here is what the wig looks. Like with the comb attached, i did sew the comb a little too close to the edge um, so i would suggest for you guys to bring it back a little bit, but, as you can see, once you put the headband on, it really doesn't make a difference. Um, but that would be my suggestion to you guys, so i decided to style my hair this time in a braid out. This is actually my first time attempting a braid out on crochet braids, so i really wasn't sure how it was going to come out. So basically, what i did was just took small sections of the hair and braided it down, and then i took a small flexi rod and just wrought it the last couple of inches of the hair um. Just so it wouldn't be so raggedy at the ends um. So then, after that i just dip the braid into boiling water, and then i let the hair dry overnight, and then i took the braids out the next day. So these are the results of the hair. I cut it a little bit because the hair was super long, i'm probably going to end up cutting it a little bit more to about here um, but i definitely like the way that the hair came out. I think it looks pretty natural so guys. This is what the hair looks like up close. Let me know down in the comments if this is a style that you would try, don't forget to like this video and subscribe to my channel for more content and i'll see you next time you


Comments
Kiapatra: This is my favorite headband wig texture of all the one's I've seen. This is bomb
R.A. JOHN: I freaking love it. I want hair that sits naturally on my head. All the wigs are soooo expensive and I just cant be bothered. I have everything I need and I'm ready. Thanks
Mel: Amazing! When you braided the crochet hair, did you add any hair product in it or no? Also, have you been experiencing tangling or shedding - if so, how do you deal with it? And how long would you say this lasts? I'd love to know Once again, great video!
Shamika Williams: I love how this braid out came out for you!!! I tried it last night and mine definitely does not look like this. Any suggestions?
June Twenty: Looks so natural! Thanks for posting a very detailed tutorial for the wig and braid out.
Kay Bee: Hi Kearra. I recently found your channel and had to subscribe! Your ingenuity is remarkable girl! Thank you for being so kind and sharing your ideas with us. I've been watching ALL your videos lol. Keep safe my dear.
Dawn Ins: You have a good way of making these units look very natural. I’m going to try this and hope it comes out like yours. Would you be able to make a tutorial showing a regular crochet wig with no leave out? Maybe with a middle part.
NO FREE CATNIP: I wish I could make this without using a wig head thingy. It looks great on you btw!!
Steph TheOriginal: I loooove this! I forgot if you said how much packs of hair you used
Brittany Marks: Your video's are great. Straight to the point and easy to follow. I think I am going to make my first crochet wig this weekend! Thanks
Nonhlanhla Ndlovu: Great content. This is the most simple and affordable diy headband wig, yet.
youknowwhatflav: Wow girl this is pretty I'm definitely going to try this ❤❤
Mo: You did a great job
Swag Addict: Girl, you killed this!! I watched 2 of your videos and Subscribed lol. Keep up the good work!!
Candi: I’m digging all your content, thanks!
Stillgotit70: You're such a cutie! Awesome job!
Shaniya C: OMGGGGF! IM IN LOVE!!!! Okay now back to watching the video!!!
veronica: Love it...looks great on you...☺️
1ycj: I'm glad to see this video bc you are a beautiful woman without all that heavy clownish make up with those false eye lashes. Also you don't go ham on the baby hairs. This video was very informative and detailed. Bravo to you
June H: Great videos! You really are a chick with brains
hottiemarkable: Awesome girl!
Alex Bee: Omg this is awesome!!
Favour Owoyemi: tHIS LOOKS AMAZING. hOW MANY hair bundles did you use?
Nicole Kemp: Love it.. How many packs of Cuban Twist did you use?
esparra1014: great job!!
Taneisha HN: Super cute. How long does this style last?
Abiibelle: Amazing! You just got yourself a new subscriber
R.A. JOHN: I used this same cap. I initially used wayyyyy to much hair and lawd I was on my dianna ross. I pretty much took out an entire pack of hair. And it looks way better. Around the perimeter I crocheted a few pieces through the cap for a more seamless look.
Danielle Luma: You are saving people!!!!
Crystal Bush: Good Job! Very natural looking
Tiffany Promise Inspiration: ❤❤❤
Aretha P: Beautiful sis ❤
kinkyhaircollection: GREAT JOB!!!
love peace: Very nice I will definitely be trying
love peace: You helped me thank you
R.A. JOHN: Can you show your wigs on your head and shake the head so we can see how natural it looks applied Thanks