Straightening Headband Wig! *Curly To Straight* (How To Revert Back!)
- Posted on 25 December, 2020
- Headband Wig
- By Anonymous
***Welcome Back***
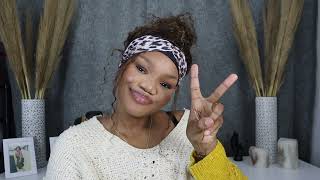
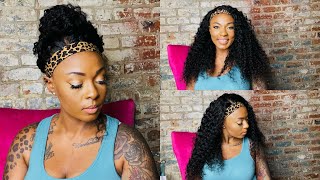
In this video I'll be showing how I straighten this curly headband wig, and reverting back! This is a great way to change your look without buying another wig! Let me know if you try this out, and how it works for you!
MERRY CHRISTMAS & HAPPY HOLIDAYS!!!❤️
Like Comment, and Subscribe for more videos from me!
LINK TO WIG- https://www.amazon.com/Headband-Gluele...
Wanna See How I Installed this Wig?- https://www.youtube.com/watch?v=42Q47n...
Headband Wig Hairstyles- https://www.youtube.com/watch?v=oDHlqR...
SUBSCRIBE SUBSCRIBE SUBSCRIBE!!!
#headbandwig #straightheadbandwig
Social Media-
IG@goldendia_
Tiktok:@aadiaa_
Snapchat:@CourtAdia
Twitter:@Courtney_adia
Hi welcome or welcome back to my channel so for this video, as you can see by the title today, i'm going to be straightening, this curly headband wig. So this is how the wig is looking before and how the curl pattern is and i'm starting off by just making a side or middle part, and i'm tying one side up. I'M working one side at a time and i first started off with brushing the hair out and trying to get the curls out as much as i could, with just brushing before i pulled out my blow dryer. So i'm using my um one brush my special brush or whatever, and i started brushing the curls out and then i'm using a blow dryer and then, like the attachment part too, to get it a little bit more um straighter to get the curl pattern out. A little bit more now, i'm not like the best of this, because i don't straighten my own hair. I don't straighten anybody else's hair. I don't use a straightener, so it's not going to be like 100 correct, probably when i'm doing the whole process but yeah, but this is how the hair looks when i got done um as you can see, it still has some curl pattern in there, but that Was like the best i could do so yeah, that's how it's looking um. It actually looks really nice. I would wear the wig like that. Probably, but i went ahead and just fluffing it out and i tied up the other side again. So i can work one side at a time and yeah and from there i'm going to go ahead and make another part on that section and i'm trying to get really small sections now. This is not super small, because i was tired at this point and i really wanted to just hurry up and do the hair, so i would say to do really small sections when you're straightening it but yeah, i'm using my flat iron and i'm using my denman Brush and i'm just like using that, i didn't use a comb actually because i just didn't feel like using a comb. I don't know i feel like using the brush kind of helped a little bit more. But if you want to use a comb music home but yeah, i'm going to go ahead and use that and i'm using it and i'm doing the tracing method as i'm going along the section which is basically trying to get all the tangles out, keep the tangles Out and yeah, so that's how that part looked, and this is how this section looked when i was done: um and yeah, so that's kind of the difference between them um, and this is the next day, so the hair didn't flat iron like bone straight, like how I thought it was gon na be, but it does look good still. The next day i still had to go over it with a little bit more heat and detangle it a little bit more um and yeah. So this is how it's looking it's not bone straight like i said, but it actually looks fine. It looks cute still, and so you guys can just watch me finish up straightening the hair, alright. So once i got done using the heat i'm just going in and i'm brushing out throughout the hair - and this is how it looks i feel like i could have done better with it with the blow drying part i feel like. During that part, i could have made it a little bit more straighter and it could have been more flat but, like i said, this is still cute. It'S kind of like a kinky straight um kind of texture. So that's how it's looking in the back and how it looks on the end and where it falls on me and yeah. So that's how it looks so then, the next day i decided to wet the hair again and get it back into its natural state. I used some water and i'm just drenching that section and i'm using my brush and i'm brushing through also, i wanted to use a little bit of mousse to help the curls kind of form a little bit better. It didn't really have any trouble before, but i just like the way mousse looks so i use that and i'm using my brush again and the curls came back pretty nicely they formed. Like perfectly. I love how it looked and then i also wanted to show the difference of how it looks before and after i revert it back, so i went ahead and did the other side, and this is how the hair is looking and that's all for this video hope. You guys, like the video and everything that i showed and if you did make sure to like comment subscribe for more content and more videos from me and i'll see you guys in my next video bye. You

Comments
Lauren: Love this wig, I just bought it. It sheds like crazy though.
Saniya Jay: so how do you take care of wigs? i’ve never worn one before and i’m thinking about buying it, but what do i to to prevent it from getting bad and shedding?
Riah Lela: So cute! Update I did wind up getting the same wig I actually have it on right now that’s funny I do like the wig except for the shedding but otherwise it’s great ❤️
Esther Patrice: I got this wig on confidence from this video... mine looks nothing like that and i cant even brush it :( any tips to make it wearable?
Jazzy Love Clays: The curls came back cuter than before
A Z: love your content!
Ziyah Ziah: Omg you are a life safer thank you
itslewababy: Super cute
Michelle: Can this work with synthetic water wave hair ???
amani: the wig says 50% kankekalon .. mines is kinda stringy and thin and not as wavy .
admire shania: how many inches is this wig ?