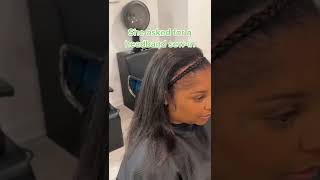
How To Make A Headband Wig. The Easiest Protective Style ! Detailed #Headbandwig #Hairtutorial #Diy
- Posted on 24 October, 2020
- Headband Wig
- By Anonymous
Here is a detailed DIY hair tutorial on How to make a headband wig #grabandgo in the comfort of your home. Sometimes you need a quick change of hair or look for that zoom call or quick errand. This wig is it !! Watch me use pre used wefts from an old U part wig to make a new headband wig. Honey do you see how much they are charging for a human hair headband wig ?? !!!!
Thank you for watching and I look forward to sharing another wig tutorial and hairstyle with you soon !
Don't forget to Like and Subscribe with love from North Carolina.
xoxo- Habiba
JUMBO BOX BRAIDS on Mariam : https://youtu.be/TEPcyp_Hty4
BIG CHOP! CUTTING OFF MY HAIR Sept 2020 :https://youtu.be/jRKvFbSuuUo
THE TIME I RELAXED MY HAIR AFTER GOING NATURAL FOR THREE YEARS : https://youtu.be/UWbka6B4CZc
Please FOLLOW ME on my other social media sites :
BLOG : http://www.habibatunaumd.com/ for RECIPES
instagram:https://www.instagram.com/habibatunaum...
Facebook page ttps://www.facebook.com/HabibaTunauMD/
BELOW ARE ITEMS YOU MAY WANT :
DISCLAIMER:
Links below are affiliate links. If you purchase a product with the link I provided I may receive a small commission. There is no additional charge to you ! Thank you for Supporting this channel so that I can continue to provide you with free content 2-3 times a week! -Habiba
KITCHEN & HOME:
TEA POT:
1. Tea Bloom microwave & stovetop safe clear glass tea pot with removable loose tea glass infuser. Holds 4-5 cups of tea. $25 https://amzn.to/3bm5Ciu
OR
2. Tea Bloom Celebration TEA SET complete set ( seen in video) includes microwave & stovetop safe clear glass tea pot with glass infuser also includes tea warmer and 4 double walled glass small cups. Also includes canister of hand tied flowering tea blooms $69.99 https://amzn.to/31VmmKg
TEA STRAINERs:
Elegant tea strainer with drip bowels. Silver. 2 pieces $8.49 https://amzn.to/31STdzg
Tea ball / tea infuser 2 pcs stainless steel mesh tea ball $5.98 with chain & hook https://amzn.to/2wfsa4n
Super cute and unique scalloped shape & heart shaped stainless steel tea infuser pack of 3. Great for tea lover $11.99. https://amzn.to/34bB8Ml
RAMEKINS:
12 pack Porcelaine White ramekins. 6 ounce x6 and 8 ounce x6 . Great for baking /desserts/ sauces/dips https://amzn.to/3bm9b8m
PLATE CAKE STAND:
3 Tier Porcelain Embossed cake stand. White. Elegant for dessert, cupcake stand, for dessert, pastry, serving platter, tea party, birthday or any special occasion . $16.99 https://amzn.to/3gYsXYF
Beautiful vintage style light blue and floral 3 Tier ceramic cake stand with free sugar tong. For dessert, pastry, tea party or any celebration https://amzn.to/32Ynqwp comes in gift box.
TEA:
TeaBloom Rose Flowering Tea by Tea bloom ( 12 hand tied Blooming Tea flowers)https://amzn.to/3hYUv1j
Lemon Ginger herbal Tea by STASH 100 count box https://amzn.to/3bsBHVY
Matcha Green Tea Sweet powder https://amzn.to/3hX9f0D
How we HANG our Plants . Great for deck, porch or back yard : YARD BUTLER/ Yard tree hanging garden system. Tall Metal stand: https://amzn.to/2Z3KubY
SPIRALIZER 5 blade Vegetable slicer ! Best Veggie Pasta Spaghetti! Great for making French fries or Zucchini noodles etc ! I have this ! $21https://amzn.to/2AkuXer
Large White Porcelain Serving Bowl great for salads, pasta or any dish ! Comes in set of 2 for $37.99 https://amzn.to/3eSnsdU
Lodge Oyster White enameled 7 quart DUTCH POT. large oval shape .https://amzn.to/2PcC1NK
Lodge Oyster White enameled 3.6 quart DUTCH POT. Casserole Shallow round shape: https://amzn.to/2YkFrSJ
Stainless steel POTS Cuisinart Chefs Classic. 7 piece cookware set for under $100 :::: https://amzn.to/2s2Nuax
WOODEN COOKING UTENSILS- Healthy Natural Uncoated Eco friendly - 6 pieces $12. 99 ( so you don't scratch your pots) : https://amzn.to/2RuBdXr
Natural TEAK Wood Cooking Utensils . Set of 6 pieces $ 31.88 https://amzn.to/2PfRD34
Hi, my name is habiba for those of you that are new here. Last month i cut off all my relaxed hair, and now i have a teeny weeny afro, but guess what? Sometimes you want a little bit of hair. So today, we're gon na be making a headband wig an easy grab and go headband wig. So this is habiba 2.0. She is a u-part wig that i made several years ago. This is in deep hair right now, it's looking very rough, but when i'm done with it, she's gon na look cute. So my whole point is to show you an affordable way to make a wig without having to go and buy new hair. This is old, hair and decare, and this was the relax straight, so this hair blended in really well with my hair. So if i didn't want to comb my hair or i didn't want to put heat to it, i would wear this: u part, wig and have a huge leave out now right now i cut my hair off. I don't have a long enough leave out. My hair is not straight, so i am going to turn this hair into a headband wig. So that's what we're going to do so. The first thing you're going to need is a canvas head like this one. This is a professional canvas head which you can get at any beauty shop, and you see i got the stand with it. Um it secures to any surface. It can secure to a table if you like, so i really like it, prevents the head from wobbling all over the place and gives you a little bit more control. This canvas head, though, is fairly large. I opted for the large one. It'S a lot bigger than my head, which is okay, but what's important is that the circumference is um. You know about the size of your head or a little larger for your wig. You can get one of these, which is a lot cheaper from the beauty shop. Uh very cheap foam, it's a lot smaller, as you can see, although it does have the hole on the bottom, so you can also secure it to a stand so you're going to need a wig cap and there are different types sold at the beauty shop. I just kind of got a couple you're going to need your headband okay, so this is what it looks like. It comes like this super cheap 99 cents from my beauty shop. Why people spending hundreds of dollars on these uh headband wigs when you can make it yourself, nothing major to it. This is a wig band, so you know after you make the wig you want it to secure well to your head. You can either use a wig band or you can use velcro my store or beauty shop that i went to. They didn't have the velcro, so i ended up buying this wig band. Instead, we'll see i may or may not use it. You might also need some wig clips. Some people don't like wig clips um. There are these that snap on um. Sometimes these can pull out to your hair if you're, not careful where you put them, but these are easy to put in these um spring wig. Clips 99 cents you're gon na also need some t-pins to secure your wig cap to your uh, head or dough. Of course you will need a comb and scissors and whatever hair you're using this was the hair that i took out or dismantled from my old wig. My old u-part wig and these are the smaller pieces. I just tried to separate them, so i could see that these were the smaller cut wefts again, keep in mind that this hair is years old, literally years old, but it's really good hair, and so i'm gon na reuse it cap is on now i'm going to Go ahead and push in the t pins to make sure it's on securely to the form and that it's not going to move now, i'm taking the headband, i'm cutting it in the middle and i fold it in half to show me the halfway point and then I secure it to the wig cap, make sure the seams on the headband that you're attaching is facing upward. That way, when you fold it over you're, not gon na see that seam it will make sense, you'll see and then also you see where i am putting the headband. It'S not going to be sewn directly on the wig caps headband. It'S going to be sewn along the border of the previous headband just follow along and you'll see, it will make sense, go ahead and secure the band with the t-pins. As you see and again, you can see the seam is facing outward. I leave two ends at the back, so that i can close it when we're done so you're putting it on making sure that you're not going to sew the entire headband in the back. This is the front of the wig. I'M just sewing it down using this curved needle, and i have double thread. If you prefer a straight needle, you can do that, but i think it's easier to work with a curved needle, just like you would as with a sew in or if you were making a lace front. Wig so try to keep your stitches close together, because you want this headband to be secure and not to you know not to rip later all right. I just wanted to show you the back, even though this is a fuzzy clip that you can see where i stopped. You know in terms of sewing. So again that's the front, and this is the back. We'Re gon na go ahead and add our first track. Make sure you secure it properly with the t-pins, where you want it before you start sewing, it just makes it so much easier and again these wefts are previously cut, because this is hair. That'S been used before. If you were using a brand new, you know brand new hair. You probably may not choose to cut the wefts. I'M also here trying to make sure that i secure the hair tightly by making sure i put several knots in it, and sometimes the hair will get tangled as you go and you just take your hands or take a fine comb and comb it through and just Keep going so i'm just speeding it up here, because that's what we're going to keep doing just sewing what feels like a gazillion tracks, but i actually wanted a normal looking density. So here is the first track on and it looks pretty secure you can see. I'M going to tug on it and it's not going anywhere. You could do this whole wig a lot faster if you glued it in you know if you were using cheap hair or if you using beauty shop, hair and you didn't care, you could definitely just use glue instead of sewing it in, but i prefer the sewing It in because it also lasts longer, you can wash this hair, you treat it just like you, would your own hair and it's not going to get destroyed, whereas you can't really wash properly a wig that you have glued tracks to okay. So i continue to sew around the head making sure to secure the stitches. As you can see, it starts to form a u-shape as you work your way up the top of the head. I am not doubling up the wefts, because i wanted a very natural density to this wig. I want it to look believable like it is my hair because, as you can see, the texture really mimics relaxed hair as we get to the top. It forms a smaller. U shape and again i just keep adding more wefts and the smaller pieces of wefts that i had previously cut work really well on the top. So here you can see it looks more like a v than it does a u-shape, but it's looking pretty flat. I'M almost done here. This is actually the following day, because i took a break. I kind of worked two hours at a time and then i started the next evening. So we got the last little piece being sewn on to cover our little hole here and it's all going to come together. You will see. I can't wait to show you some other wigs. I will make later using crochet hair and also using uh beauty shop hair, but anyway this is looking good so far and i'm just gon na go ahead and trim some of the edges or trim some of the ends. Sorry, this hair was previously cut, so it already has a layered look, because this is, you know previously used wefts, but i'm just getting rid of rid of any straggly ends. Okay, we're done, and i was trying to cut off the tight band that is under. You know the um added headband, but it is so much easier to do if you take the wig off the head first. So that's what i'm doing here, removing the t-pins, removing the wig and then just cut off. You know the entire super tight headband that was on there, i'm also gon na, add wig clips and velcro, and we're done so excited to try her on just showing you the inside of the wig. As you can see, i have three uh. You know wig combs in there we have two in the front and one in the back, and you can choose to use this or not, but it's helpful. Sometimes you can also see the headband and i have added the velcro um you know. Ideally, i would use black velcro, even though you're really not going to see it, but again i could not find black velcro in the store, so i used what i had, but it will work. Okay, look at those rough edges, gon na add some edge control and i could have used heat to blend it in more, but i'm trying to avoid heat so just using a little bit of edge control on she goes and, let's see now in the beginning. She might not look that good okay, you're gon na have to finesse this wig you're gon na have to figure out how to make it look. Believable, all right so you're gon na have to tuck your edges in a little bit make sure the comb is on there securely and tuck it in and then put the hair up in a bun. That will help you to put the velcro in the back. Okay, making sure that the comb is in properly and then securing the velcro okay and we're done what a difference. Makeup and hair does right. Just add my little hoop earrings and she is ready. What do you think i was loving it and i think it looked very natural. It looked very similar to what my hair looked like before i cut it, and, what's great about this hair or wig, is that you know you can just grab it and go all right. It is the easiest protective style. You don't even need to show your edges if you don't want to, or if you don't have any alright. So let's try this headband and see how this looks not bad. Of course, it would look even nicer if it were a wider headband like this one, which is a little bit more ornate. So i'm gon na try this and let's see how this looks. Of course they have so many options of headbands nowadays, fabric headbands or you know you could use a head scarf whatever you like, okay, i'm just gon na comb it out and straighten it. So adding some mousse and that's what's great about human hair. You can treat it just like your own, so i'm just straighten it here to see what it looks like bone straight now. What if we curled it? Okay, so let's show you what it looks like curled. I did one side and then i was like. Should i do the second side? Should i bother okay for you? I will we'll do both sides. So here she is, it is done. Let'S add a little bit of lipstick. This is ruby roo by mac. I wanted to darken it a little bit, so i used a little drugstore lipstick, okay, just a little reminder of what i looked like before and now so, let's loosen up the curls, get them looking a little bit more natural and flowy. So i hope you've been inspired and you might consider you know, saving your coins and making your own wig next time if you're into wigs or you just want to switch things up, because sometimes your natural hair needs a break or you just want something different. Okay, so definitely find me on instagram and on my blog, which i listed previously she's, looking cute right, not bad for a 50 year old woman. Can you believe it? Yes, anyway, the top of the wig looks very natural, and i thought you would appreciate me showing you what it looks like outside. So this is what it looks like outside very natural and, as you can see, it's not as dark as it looked inside. It has a lot of brown highlights in it, so love it, and i hope you did too and i look forward to sharing another video with you soon bye. You


Comments
Hazel L: What do I think?!?!?!? I think there is nothing you can't do!!! The wig is perfection! I am 51 and I thought I looked young for my age but you got me beat. Looking all of 30...lol..Thanks for sharing your beautiful spirit with us <3
M W: The women with many talents....Gorgeous Gurl!!!
Kenton & Habiba: Thank you for watching and have a great weekend! P.s Don't forget to "thumbs up" which helps share this tutorial with others!
Chidimma’s Lifestyles: Wow. You’re very talented. I’ll try this out soon. Thanks, Habiba.
Marie Wisa Beauge: I love it. Thank you. You are so beautiful. Inside and out. Thank you for sharing your many talents with us.
Shirley Fretty: I just have to say it again, you are so talented. Thank you so much for sharing!!!! Had to come back and tell you how beautiful it looked!!!!!
1ycj: Beautiful results!
Darlene E.L.: I cut off my relaxed hair, now I have awkward hair length so this is really helpful. I'll try this! Thanks!
Classieandra Elite: You are so talented Habba.. I love the wig it looks so natural.. You looks so pretty too..
henrietta metieh: You are so good with your hands, is there anything you can’t do ? what other surprises do you have for us? Sending ❤️ from
zuena amr: I just love everything you do ... absolutely everything super talented ..♥️♥️♥️
odele white: OMG Well freaking done, I would love to do this for my mom but I'm not really a hair person and dont think I have the skill to attain the end goal; however I would share with my sister she's better with hair.
De Ma: Wow! I was just passing through an checked your video out Sis! you did a fantastic job, an as far as your edges Girl... they are Yours an they look fine! At least you have edges an you can tailor them how U choose. You may want to consider sewing your HB on a sewing machine if you have one. Overall it turned out very nice! Once you cut the band off an after wearing it did the wig fit and stay secure on your head?
Fatima Osman: Thanks for sharing this great talent, beautiful and well done and what a transformation. Thanks again Habiba.
Dolores George: Very nice. Such a talented woman!
Sandra De La Motta: Habits I just love your videos. I am not a wig person but after this tutorial, I could rock this beautiful creation.
Patricia Young: Love it looks so good. Happy Saturday.
Allison Pantin: Looks lovely Lady you are creative, this looks natural like your hair. I'm trying the crochet braids and having fun ❤ Thanks for the encouragement from T&T
The Lit Chronicles: This looked so nice Habiba..well done!!!!!
R Hogan: Hi Habiba greetings from Chicago! I wish I had this much talent with my natural hair
Susan B: Habiba, you are multi talented. The wig looks great! You look stunning too. I’m going to try making a using this method. Great video
Fayemof: The hair looks amazing and you are beautiful, as always.
Yvonne Miller: Our multitalented Habiba, you look amazing and of course your hand made head band wig, is a great protective style idea. Amazing!!!!.
Rena Kalahiki: Wow you're talented... you should start your wig business you're so good
Charisse: one word. you are AMAZING. fabulous!!
Fantabulous Liv: yasssssssssssss i love it you did a great job
Ramona Jackson: You did that Lady. Beautiful
Jean M: Beautiful and simple..love it
Kicky: Habiba, you are just amazing! The hair texture looks just like relaxed hair, and with just the right amount of density and of length, it looks very natural. If I didn't know it was a wig, I would have thought it was growing out of your scalp. I will be daring and try making one by following your instructions. Is the texture Yaki?
Tanya Booker: Awesome job. Beautiful.
cherry bubbla: Very pretty. Great job
jummai etuhu: Beautiful
Mère ORANGE: You look beautiful, love it
shakima wiggins: Great job! I'm inspired
Shonnie08: In your city and state, is the beauty supply inside the beauty shop? You're so creative. The wig turned out nice.
Abiodun Babata: Beautiful that’s what u are Habiba
FlowerLA: I just love you dr. Hababiba you are a jack of all trades. The bible says some have been given 1 talent some several and you embodied the several, you have a awesome husband and kids and have fun in the things you do.. thank you for your videos , keep em coming .. p.s. love your mom too
Kecia Anderson: Gorgeous as always.
Usomex Martin: Beautiful Habiba❤
June Cox: Change is good lovely every style you try looks good I love seeing you all the time
Sharhonda Jones: Wow Habiba your headband wig is the best that I've seen on YouTube seriously
Monica C.: Habiba you're so googd at doing the wig's.
Marva Figaro: Like it, love it, got to have it.
My Bit: Saw this some where the other day!
Nelda Nuñez-Corte: I’m so impressive! Beautiful Habiba.
Caroline Poll: Hey mom your so very smart, and your creative with your hair.
Monica C.: I love you and your husband he's like a west indian guy.
The Lit Chronicles: Yaassss Habiba....come thru with a new Salon Sis...I will be there!!!!!...xoxo
Stephanie Greene: Hello Habiba, you look beautiful with the wig. love from Georgetown Guyana
Georgina Adrakor: It look good
Chat pata Cooking: VERY NICE ❤
Sher Jones: Nice!
Baby Drack: Very nice and economical.
Michelle Player: Nice job
amouna nyale: Talented
Maggie: Habiba you are talanted i like that wig look so good on you beautiful
Denise Mills: Look good wow
Monica C.: Why did you cut your hair it was okay.
Jay Bird: Habiba oh my you make it look so easy...Lol
Roberta Drummond: Hey Queen
Debbie Williams: Wow going try make me one look good