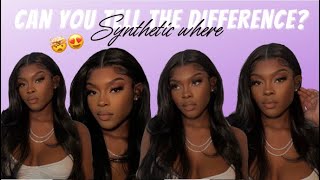
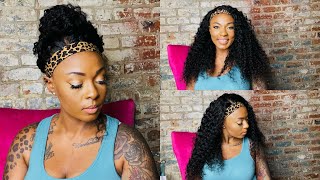
$35 Diy Crochet Headband Wig| Under 30 Min Install
- Posted on 12 February, 2021
- Headband Wig
- By Anonymous
Hello Loves,
In this video I demonstrate, "How to make a crochet headband wig". This wig was completed from start to finish in under 30 minutes. I've made two other DIY wigs on my channel and I'll link them below.
OMG?! NO LACE! DIY Headband Wig - LOOKS SO NATURAL
WOW! I TURNED MY OLD WIG INTO A HEADBAND WIG
Related Video (featuring Headband Wig):
FULL GRWN | NEUTRAL EVERYDAY MAKEUP + HAIR + OUTFIT
ITEMS MENTIONED:
♢ Hair: https://amzn.to/3rNimps -- I used 3 out 6
♢ Style factor edge booster: https://amzn.to/2MxegCm
♢ Band: https: https://amzn.to/3lmunzl
♢ Shine n jam conditioning gel extra hold: https://amzn.to/3j6AKq8
♢ Crochet Cap: https://amzn.to/375gu3m
♢ Wig Combs: https://amzn.to/3pjtCcC
♢ Crochet Needle: https://amzn.to/2LI0QDr
♢ Curved Needle & Thread : https://amzn.to/3ach4OP
_________
Social Media ------- ♡ ** Connect With Me **♡
♢I N S T A G R A M https://www.instagram.com/gabbysqueend...
♢B U S I N E S S:
#crochetheadbandwig #headbandwig #crochetwig
This is a really simple, simple technique to mimic. Don'T take it personal. I ain't lying, i'm hiding up and cranking multiplying. So i'm starting off this do-it-yourself headband wig tutorial with my 22 inch block head here, is more of what you'll need a crochet wig cap, wig combs a crochet needle a threaded needle with black thread and then also some passion twist hair. So this hair, i did purchase off of amazon, i will actually leave the links to all the items i mentioned down below. So here is how the hair looks straight out of the package. It is actually amazing. This is my second purchase from this company and they did not disappoint. Let'S get into the install okay. So in this clip we're going to get into the installation demonstration. So i'm just going to go ahead and put on my crochet cap all right, and this is how it should fit, of course make sure you make some markings. So you know the front from the back now. Here is an individual strand of hair. This is how it looks straight out of the package just to make it a little bit more textured a little bit more thick, i'm going to run my hands down the length of the strand twice. Sometimes i did it about three times. It just depends on how thick and how textured you want your hair to be. You can skip this step if you don't want any added texture to your actual unit, but for me i love texture just so it can blend seamlessly with my natural hair, alright. So for the actual install you want to take up as much space as possible. So here i am pushing the crochet needle through about three or four hoops of the net and i'm actually locking the hair onto the end of the crochet needle before you pull it through. Just make sure you close the crochet needle first and then pull it through now, we've made a loop and then i'm just going to take the crochet needle once again open put the hair on close it and pull the length of the strand through all right, and I'M just going to repeat this process all over until this entire unit is complete and, most importantly, just make sure your spacing is far apart and then plug in pieces where needed later alright. So i'm just going to make my way up straight to the top, and this is how it's looking so we're just going to continue to repeat this process all over all right. So here i'm just speeding up the clip, but this clip is really just put in to show you the placement of the strands, i'm really trying to make sure that my placement is spaced out and that i pretty much fill up the unit first and then i'm Going to try on the units off camera, then i'll figure out what what pieces i actually need to add and plug into some open spaces. All right. You don't want to fill up this unit so much that it's so big and bulky. You want it to look nice and natural and so space out as much as possible. Alright, so here is the completed unit. As you can see, i've got um everything completed. All the way up to the thick band in front. Here is a back view. Now there are a couple of spaces, but i did go ahead and plug in some more pieces once i actually tried this unit on okay. So now it's time for the wig prep process. Here is the sections that i have so i have five sections in front and then i have six jumbo sections and back - and this is just a braid pattern - i use for most of my headband wigs because it's nice and simple and easy to do alright. So for my edges, i like to lay my edges with the shine and gem first and then i apply the edge booster on top of it. Alright, so i just applied a black net on the back to keep all of my hair in place so that i can seamlessly go ahead and just apply this unit and now to further lay down my edges and make sure that they dry i'm going to take This band elastic band and actually just tie it around my edges for about 15 to 20 minutes. So by now you guys should know. I have very kinky hair - and i just like to plug in this step, so you guys can get a really quick hack on how to lay your edges even with a kinky texture, one of the kinkiest okay. So here is the inside cap construction of this unit. As you can see, i've got two combs in front and in this clip i'm actually showing you the two combs and back, but i did go back and add a third comb to the right of your screen. So i've got three combs in total during the try on of this unit. So this is the point where you want to try everything on and figure out how the unit is actually going to fit um and whether you know it's too big, too small, whether you need to plug in some spaces here is the place where you're going to Assess the entire unit, all right, so i'm just going to continue to put this on. I did speed up the clip just a little bit alright, so now that i've got everything nice and secure, i love the way this unit came out and to basically camouflage any spaces. I'M just going to go ahead and pick it out as much as possible. You want to pick it out until it looks very natural. This is going to create some natural frizz and allow the hair to just kind of fall in place without any spaces. In between the next time i go to picking out my unit. I'M definitely going to use a smaller comb because i can cover a lot more area and a little bit of time all right. So at this point i am definitely satisfied with the unit, i'm just kind of trying out a couple of angles just to see how well this unit is sitting and how long it is. My expression is everything. This is a look all right. So at this point i'm satisfied with the fit of the unit and the construction all right, so let's go ahead and apply our actual headband, so i've mentioned in previous tutorials. I had to make my own headband, but here i actually purchased some headbands off of amazon. These are athletic headbands, but they work just fine for this tutorial and i'll actually get some more colorful printed headbands in the future. All right, but, as you can see, those edges are laid, and this headband fits very, very well all right. So this is how it is looking. I love the way this complete unit came together and it's definitely affordable and it comes in handy anytime. You need to switch up your look, really quick, okay, so now that i've tried on the unit - and it was successful - i'm going to go ahead and show you a couple of styles. You can do with this unit. So, basically, here i'm going to go ahead and show you a couple of hairstyles that you can do now. These are just a handful of hairstyles that you can do with this particular unit. This hair is definitely going to last me quite a long time. I feel like with synthetic units i take very good care of them and i store them in a really nice place, so i'm able to continuously live with them for at least a year or more. This is a really simple, simple technique to mimic, and i encourage you guys to try it out on your own if you are looking for, you know, just something, quick and easy to switch it up here and there okay. So in this entire tutorial, i did not show you the back of my head because, honestly, i don't plan on wearing this hair up. If i do wear it up, it's going to be very easy for me to just manipulate the back of my hair to make it a little bit more smooth or kind of go with the flow of my hairstyle. So my hair is pretty kinky. It can match the texture of this hair, but it has to be manipulated just a little bit. So this is what i will be rocking today and then officially, when it's valentine's day on sunday, i will definitely switch it up. So you want to make sure you are following me on instagram at gabby's, queendom and also here go ahead and subscribe. If you haven't already - and i will see you guys in my next one bye guys - you

Comments
Liy ღ: You, this hair, this process; beautiful!! ✨
Mystic Beauty LLC: Didn’t think of doing it the crochet way. Thanks for the vid. It looks so good
NO FREE CATNIP: I really wanna try and make one of these, but with shorter hair. It looks so good on you!
MEMORIA1316: Every style you tried looks beautiful! Great tutorial
osuntress hair: It's perfect!
SupamanAdventures92: Love it sis keep up the fire work
Mamisa Lumiere: Looks beautiful
ifeoluwa ogundipe: This is beautiful
Simple Me: I've been watching different videos and yours is easy. My hair is $6 per pack,head band $1,just have to price the combs. Thanks for sharing..
rudeness366: Thank you ! This gave me an idea ! You look good af too
T'Jae: I love this hair!! Great Job What length did you purchase?
mssb00p: Love the tutorial! But I'm just wondering where you got your earrings? I had some similar YEARS ago & lost them & haven't been able to find them.
Aida Head: subscribed ! I would love to try this but I don’t have a manikin... is that need? What can I use instead?
Star: how do u keep it on
Margaret White: Did you shrink your Cap?
Jose Phine: Please how did you put the comb on