How To Make Headband Wig On Sewing Machine| Diy Headband Wig
- Posted on 18 September, 2020
- Headband Wig
- By Anonymous
#sewingmachinewig #howtomakeheadbandwig
Hey Guys, how are you all doing?
In today video, we are going to be making the new Trendy headband wigs using a sewing machine. seat back and enjoy watching! Don't forget to like, comment and hit that subscribe button for more videos!
If you would like to learn how to make wigs on a sewing machine, click the link below for my online wig course.
https://www.uwazhair.com/collections/o...
If you have got your hair bundles and you would like me to make into headband wig for you, click the link to me website to book the service
https://www.uwazhair.com/products/wig-...
To get same wig, click the link
https://www.uwazhair.com/products/sara...
here is the link to the wig cap,
https://www.uwazhair.com/products/wig-...
To shop this wig and bundles
This headband with is available on my website (www.uwazhair.com) and it called Sarah Unit
C O N N E C T W I T H M E
•| IG @uwazmakeup @ https://www.instagram.com/uwazmakeup
•| IG (Hair Page) @ https://www.instagram.com/uwazhairz
•|FB @ https://www.facebook.com/uwaz hair and makeup
•|Twitter @ https://www.twitter.com/uwazmakeup
•|Tiktik @ https://www.tiktok.com/uwazhairs
B U S I N E S S:
For Business Enquiries / Makeup Bookings
•| Email: [email protected]
•| DM: @uwazmakeup on IG
Filming & Editing
•Canon 750D
•1 Neewer Ring Light
~Final Cut Pro
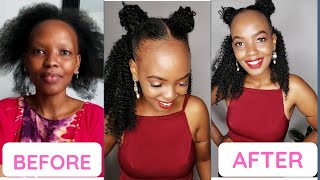
Hello guys welcome back to my youtube channel if you're new here, my name is, if you've been here before welcome back in today's video, i'm going to be showing you guys how i made this wig from scratch. I mean how i created this hairband unit using a sewing machine. So if you are here - and you want to see how i made this - my personal hairband wig stay tuned and keep on watching, as mentioned in the intro, i'm going to be making this trendy hairband wig using a sewing machine before i start. These are the list of things you would need in order to do this, and i'm just going to show you guys also the visual of all these things that you will need as well. First you're going to need your sewing machine. Definitely you're also going to be needing a canvas ahead, and today i'm using this one. These i got from chrissy bells. I don't know if you know christopher in london and you can go on our website. I think she sells it, i'm not sure, but um i'm using a 21 inch. My normal head size is 22, but because i want the wig to be tight, i decide to use a 21 inch and also i'm going to be using some hair bundles. I'M using two bundles two 14 inch bundles from ua's, hair and um, because i don't like my hair full. That'S the reason why i'm using a two bundles you're, also going to be needing a hairband. The one i'm using today is a stretchy hairband from super drug. You would also be needing a dumb cap. This is the one i'm using a mesh cap and you also need a vacrum, both the hard side and the soft side. You also need a tape, a chalk, a seam ripper and a scissors, and also you need some hair combs, which you can use to secure the hair. Now to start, i have gone ahead and put the dom cap on the canvas head the space, and i need to make some adjustments in order for this to fit my head. I'Ve taken the cap to the sewing machine and i'm going to stitch it down and just to make sure that the cap, it's my exact size, if you guys want me to show you how to transfer a size from measurement to a cap. Let me know in the comment section: i will do a video explaining how to transfer it your head size into a dumb cup, so now um. What i'm doing here, i'm just going to be doubling the width of of the hair to double your weft. You don't need to put it on top. You need to put it side by side. So a lot of youtubers don't tell you this. Basically, this is what you need to do. Don'T put it on top put it side by side so that it's easier and also use the zigzag method of your sewing machine. You can adjust your sewing machine in order to make sure that this is easy for you to do you don't necessarily have to use the same stitching setting as doubling your web. You can make it bigger so that it's easier for you to do as you can see. This is how knit it looks if you want me to do a video on that, i'm sure to leave a video. I didn't want to show every single thing, because the video will be so so long now, moving on i'm going to be taking the tape and i'm taking for the vacrum, i am taking a four inch on the soft side and i'm also going to be taking. I think was 2.9 inches or three inches on the hard side. I didn't want it to be exact same size, so you can adjust and make it tighter. So now i am going to be ripping the hairband. I am going to be stitching vacuum to my head to the headband and in order to do this, i am using a straight stitch method as if you can see on the screen and i'm stitching and making sure that i stitch every single thing down. I lift my machine up and stitch as well and also i always always have to backstitch when you are about to cut off the tread. So this is how it looks. It looks so neat because i've been doing this a long time so guys you don't your one might not look like this. If it does bravo, if it doesn't nothing to worry about, you just need to work on it. Okay, now, basically to line the tracks on my wig cap, i am using a tip measurement at the back. I was doing a one inch apart. Basically, i did this because i wanted the the spacing to be kind of uniform. You don't have to measure it, but and also i have two inch - two bundles of wig, so i needed to know how many tracks i was sewing, how many lines i was doing and at the top, because i wanted the top to be closer to each other. I didn't do one one inch apart. I did like a half an inch on top, so you see what i mean when i get to the top of this. However, i just wanted to say here: if you have issues with doing your measurement of your cab or anything like that on our website. There'S a wig cap comes already measured and also the size has already been done for you. So you all you need to do. Is tell us what the wig is for what the cap is for if it's for a closure wig, it's frontal, wig or even a headband wig. So we will do that all the adjustments, all the tracks and lining for you. It'S very easy i'll leave all the information in the description bar, so you can check that out. First thing you need to know when you're sewing this at the beginning, you have to back stitch. If you see what i'm doing there, i'm pressing the reverse method. On my sewing machine backstitch a couple of times, i normally tend to do like four times before. I continue and also at the end, before a cutting off, i cut off the the weft, and once i cut it off when i get to the end, i cut it off and once i cut i always back and forth stitch here as well. You will see me doing this all the time i have to do like couple of times like four times five times. Sometimes it's not stretchy, there's no lump it's all straight and the secret to this. Is you not stretching your cup do not stretch your cap just make sure that you sew flat make sure everything is flat while you're doing it? So this is basically what you have and always remember, to cut the tread. You have to cut the thread both the inside and the outside, as well the top and the bottom thread. Now i've got to the almost to the end. So here i'm going to show you guys i've kind of zoomed in so you can see what i'm doing i'm doing it bit by bit. I'M not rushing because here you don't want it to be lumpy, you don't want it to be stretched. You don't want to stretch your cup if you see what i'm doing, i'm doing it section by section. Give myself some spray air space make sure that i'm following the lines, the tracks that i've drawn and stitch until i'm comfortable, stop stitch space it out and stitch space it out stitch as well. You guys, you know what i'm trying to explain. So, if you're able to make this week, let me know in the comment section so, as you can see, the same same principle applies here as well. You have to back stitch forward stitch back stitch four stitch using the reverse method on my sewing machine. So because i used chalk, the lines were kind of disappeared by time i get to the top. I just have to to make the line more visible. I just went over on top again with the the chalk. That'S basically what i'm doing here just making the line more visible. However, if you want to avoid this, you can use a sharpie. I don't even know what i was doing this today. While i was doing chalk normally, i use this sharpie, i'm not sure what came over me that i wanted to use chuck. So you can see how flat that looks. What i'm showing you right now is basically where you would normally sew your closure. That'S basically what i was showing you so now. Basically i am just sewing that front, and here we are, we are at the top now i'm kind of sewing the last track before i attach the band. So, as you can see, i'm just letting you see what i'm doing just making sure that i'm not rushing i'm not trying to rush everything, i'm just going to do it gradually, because i don't want any um lumpy or any sort of mistakes. At this point, however, mistakes are not inevitable. You do sometimes make mistakes. That is why you have your sim reaper, so you can always um undo it and redo it again. Okay, so don't worry. If you make mistake at this stage, you can just take it down and make it again so now i am going to be stitching that last track before i attach the bun uh the band. What i'm also doing, i'm doing it a section by section, i'm not brushing i'm not trying to stitch everything in one go, so i stop stitch making sure that i'm seeing what i'm doing space it out stitch again space it out stitch again and before i get To the end, i do like a measurement and then cut off and just also back stitch couple of times. I do a backstage four stitch. Almost five times before i take the machine before i take the wig off the machine. So now you can see it looks knit it looks flat, it's time to sew the band so now to sew the band. I am going to be starting from the one end of the band where i want it to start from. It'S like now sewing the band looks like when you're, making a frontal wig if you've ever made a frontal wig. This is where you will take that skills of making a frontal wig into this hairband wig, where you need the band to start from kind of behind. Your ear, that's where you need the band to start from, so you sew it down from there and on the other side as well. So if you're taking measurements, if you're doing this for clients always ensure you take the ear to ear measurement. So you know where the band will start and where it will end. Also, when you get to the end of the band, do double stitching, not double stitching back stitching, i mean you need to do back stitching. If you don't want every everything to unravel. You have to back stitch four stitch, use your reverse method. I don't know what sewing machine you're using the one i'm using. I have a reverse method. You need to use that as many times as you can, until you are sure that the the stitching are secured before you lift your needle up. Okay, here is the finished wig. That is how the inside looks so i have to cut the bands off um. If you can't see it very well, you can see the stitching. So what i did was attach a comb here and another one on the side and one at the back. But honestly thinking, i don't think you need those combs, because when i tried it on it was really really tight. So you might not need to add combs to yours if you're trying to make this at home and i'm going to put it on and you can see how easy it is to slip on okay, also, i've kind of laid my baby hair and i didn't braid My hair, because my hair is all long guys. Look it's tying one at the back. I'M so excited. Look at this! This is really long. I never knew my hair can be this long guys if i can find a picture of me having my short hair i'll insert here. So you can see why i feel like this is long to me. It is long! Oh well, i'm gon na put this on. Oh, let me just hear an excerpt guys. Okay, this is a on and at the minute, i'm not even using the band, no i'm not using the the combs, and it feels okay. It feels tight, it's not going anywhere so, but i'm going to use the band anyway. So i'm going to turn around and show you at the back. How i do the band i'm hoping the back is. Okay, i don't see it. I hope you guys could see that and i need to trim a little bit off. I don't know for now it looks really nice. Okay, it's on this. Is it on. This is the end of this tutorial and if you haven't seen the video where i did how to style this hairband unit i'll leave the link here. So you can go watch that check that out. So you can see how i style the hairband wig. I hope you've enjoyed this video if you have don't forget to give this video a thumbs up and also, if you have not subscribed to my youtube channel, you missing out. I upload new videos new tutorials every week. So if you want to be part of the family, do hit that subscribe button and also click the bell notification, so you don't miss out on any of my upload. Thank you all for watching, and i will see you in my next one bye. You

Comments
Uwaz Hair & Make-up: Comment down below if you are going to try this out
JustpamK: Love it, i have seen how everyone is wearing the wigs. Yours looks good and the fact that you made it yourself! Beautiful
Crystal Zone: 1st time here and I've already fallen in love with your content. You're an expert and this is extremely lovely on you I have a sewing machine and "may" be trying it out
Nedoux Sews: You works neatly. I really enjoyed watching this, Thank you for sharing :-)
Single Ladies' : You are really a good teacher. So detailed, neat, easy to understand
Ivette Rolon: Very professionally done, I will try to make it this way. Awesome work!!
PjSaid's Lifestyle Channel: Wow you make it look so easy! I don't have a sewing machine though, but if I did, I'd try it. The wig is gorgeous, I might just buy one from you
Erica Jai: Omgee! This tutorial was simple and easy! I enjoyed watching you M2
Ruthie's vlog World: I feel like I may try this soon, maybe next week this is truly amazing thanks for sharing new subscriber.
Bridget Oladipo: It’s so beautiful and natural. Your hands are blessed. M2
June Suepaul: Absolutely beautiful !
ABIGAIL IFEOMA: Trust me you made it easy and it looks soo neat and beautiful..
Fatimat Momoh: First your makeup is nice! And you did a great job with this game changing headband wig.
The Zoe Platform: The outcome is beautiful, weldone!
Liz Talmon: Look at how you have made it look sparkling, I love job well done m2
Uzo Umemezie: Great job! I love it.
The Zoe Platform: I will love to try this but apparently I will need a sewing machine and all that but nevertheless this is amazing and love the way you explained everything.
JENNY SWEETS: This is so cool Can you show us how you took the excess space out the cap in more detail? I’ve never seen that technique before.
Treasured Space: Are there certain measurements you recommend for universal fitting wig ?
nattalee: Thank you so much I cant wait to start maken handband wigs for my clients excited to get my machine soon you help so much ima be watching this video over an over you did amazing ❤
Launa K [Namibian YouTuber]: Woooow! What impressed me is the sowing Machine, and how creative you are. Look at you, You look amazing.
Allison Wilson: This was a great tutorial
Saint Harry: I will be making my own DIY wig now. Great video
Ms Shan Noel: You are very talented at hair! so creative m2
bibia mb: Thank you so much for this video. I'm going to try to do it..
Dee Borah: Woow I love the fact that your video is detailed enough. I love your branding by the way "uwaz hair".. Thanks for sharing
Mwanida Sampa: Wow I am so impressed.....it looks really good and you look very beautiful. M2
NEKESA WANGILI: I bet am trying this. I have been thinking so hard. It's great that I came across your video.
Mercy Chikozho: Why you're talented, looks so nice and easy m2
Ruthie's vlog World: Wow mama , from scratch u are truly talented
It's Just Me Nicola: Thank you for this tutorial
Nadzz Sleek Nails: You did an awesome job
Gloria Osagie: I will try it out. Its so good
KASH HAUSE: Can you do a video on a full wig on the sewing machine? Like a bang wig with no lace
Ejiro Dowe: Love this video, Thanx sist
Rubie DarLin': wow.. this is impressive M2
Felicia Bryant: Beautiful
Nicola yardstyle cooking & more: U did well dear love it M2
WigCrush TT: Is it that you sewed the last track and the headband behind the elastic band of the dome cap. Based on my experience if I sew on the lining of the band it restricts the stretch
ABIGAIL IFEOMA: This sewing machine is it the normal machine for clothes or there’s a different machine for wigs
Okoduwa Fortunate: Can I use a straight sewing for doubling the hair
Joi Harris: What is the length and width of your stitch?
a handful of love: Please tell me where can I buy that sewing machine
The Zoe Platform: I just have to know how to do this really, I will keep on following. M2
LifewithGeetaGermany: You are a professional. Well done. Start a business
Gloria Osagie: What sewing machine re u using?
Onyinye Edwin: Wonderful video ma.. Please how did u sew ur band without the thread sewing
Nicola yardstyle cooking & more: This look so neat thx for sharing dear I will definitely trying it
Chanda Williams: Did you say that you are goin to cut the band of the cap??? If so where do you cut it? From what end to what end?
Liz Talmon: You look so beautiful
Magdline Nuom: is very nice
Dailynews by Esohe: I need to come and learn
Vanessa Trotter:
PjSaid's Lifestyle Channel: What happened to your eye makeup and lash? why only one eye
Latoya Martin: Check out our video on You Tube Where is my wig? Nia Martin