Synthetic Headband Wig Install | From Loose Body Wave To Curly!
- Posted on 12 September, 2021
- Headband Wig
- By Anonymous
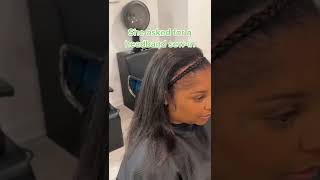
Hey y'all, welcome back/to my channel! In today's video, I will be showing you all how I installed this synthetic headband wig! This wig was originally long and had a loose body wave. Long story short, it was not my style and I wanted to transform it! I cut this wig and rolled it with perm rods to achieve my desired look. This is my first time trying a headband wig and I must say, I will be throwing these styles into rotation because it is easy and requires less time! This tutorial is beginner friendly because you do not need to know how to lay lace. All you need to know is how to put a headband wig on, which I will show you in this video! I hope you all enjoy the video and find it useful! Be sure to SUBSCRIBE, COMMENT, give the video a THUMBS UP, and SHARE with a friend!
#headbandwig #headbandwigtransformation #syntheticheadbandwig #headbandwigsunder$50
♡ PRODUCTS USED:
NOBLESSE Headband Wig - BW Julia in the color 1B
Wig Cap https://amzn.to/3saU2hS
Wig Grip without Lace https://amzn.to/3c1mZag
Eco Styler Professional Styling Gel https://amzn.to/3cy2O2a
Orange Perm Rods https://amzn.to/3np2Sc1
♡ MUSIC: epidemicsound.com
♡ POPULAR UPLOADS:
How To: Straighten Short Natural Hail | 4C Silk Press | Fixing Bad Trim | Styling Short Natural Hair
https://www.youtube.com/watch?v=N4qf0V...
Wash n Go on Short 4C Natural Hair + Nighttime Routine | Thick, Low Porosity Hair | DEFINED CURLS!
https://www.youtube.com/watch?v=dJ2mCp...
2020 APARTMENT TOUR | Modern Farmhouse and Bohemian Inspired | Starring Lia
https://www.youtube.com/watch?v=DJuImM...
Mini Twists on Short Natural Hair | Quarantine Protective Styling
https://www.youtube.com/watch?v=D6idIh...
3 WEEK OLD Cornrows + How to Detangle | Hair Matting? | STARRING LIA
https://www.youtube.com/watch?v=iO7r0Y...
♡ NEW VIDEOS EVERY SUNDAY AT 1:00 PM EST!
Hit the subscribe button for more videos like this!
Be sure to click the notification bell so you don't miss any new videos.
Subscribe Link: https://www.youtube.com/c/StarringLia
♡ DISCLAIMER: This video is not sponsored. All ideas and thoughts are my own. Links included in this description may be affiliate links. If you purchase a product or service with the links that I provide, I may receive a small commission. There is no additional charge for you! Thank you for supporting the Starring Lia brand.
♡ WHAT I USE TO FILM VIDEOS!
Camera: Sony a6400 https://amzn.to/3onN0Ue
Lens: Sony 18-135mm https://amzn.to/3qQvCca, Sony 85mm https://amzn.to/39oNyot
Mic: Saramonic Blink500 https://amzn.to/2NCIioJ, Blue Yeti https://amzn.to/3pWy2WL
Lighting: Ring Light https://amzn.to/3aeZDNO, LED Lights https://amzn.to/3oXikcU
Vlog Camera: Canon Powershot G7x Mark ii https://amzn.to/2M1pzD6
Phone: iPhone 11 Pro Max
Editing Software: iMovie
♡ ABOUT ME!
I am a natural hair enthusiast! I have been natural since January of 2014 and have experienced the ups and downs of styling my natural hair. I want to inspire you to embrace your natural hair in the workplace unapologetically, so I will be sharing everything I have learned so far about natural hairstyles, growing and maintaining healthy hair, and how to sometimes do it yourself!
♡ FOLLOW ME ON OTHER SOCIAL MEDIA PLATFORMS!
Instagram: @starring_lia https://www.instagram.com/starring_lia...
Facebook: Starring Lia https://www.facebook.com/starringlia
Twitter: @starring_lia https://twitter.com/starring_lia
Tik Tok: @starring_lia
Snapchat: jharnell
♡ EMAIL: [email protected]
♡ FREQUENTLY ASKED QUESTIONS:
When did I go natural? January 2014
When did I do a second big chop? July 2019
Where am I from? North Carolina
Where do I stay? North Carolina
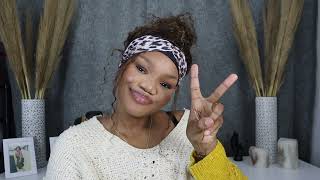
Hey guys welcome back to my channel in today's video, i am going to be showing you all how i installed this headband wig. This is my first time trying a headband wig and i figured that i really didn't need to do any cornrows. So i have about 10 to 12 twists here, i'm just going to tuck them away up under this wig cap so that i can go ahead and do my edges here are what my edges are looking like. I am going to be using a wig grip today, and this is because i do not like to use any cones in my wigs and the wig grip is going to make sure that the wig does not slip. Here is the wig that i will be trying out today. I picked it up from my local beauty. Supply store with taxi came up to be about 45 dollars. It is julia and i got it in the color 1b. Now this week is the synthetic we is not real. Of course it was 45 dollars and the wig was extremely long, so in the store. I already knew that i was going to cut this wig because it was a little bit too long for my liking off the bat. I noticed that the hair was really soft, but it does have like a somewhat of a synthetic look to it that i will be getting rid of by the end of the video and i'm just checking right now for shedding. I wasn't seeing too much shedding um. Now i'm just taking the bands in the back and tightening up the wig so that it can fit snug on my head. The headband is a velcro strip, so this is what you use to put the wig on to make sure that it stays in place, and that is exactly what i'm doing here, i'm just making sure i place the headband exactly where i want it. I do want my edges to be out, because i want the wig to look as natural as possible. I found that tying the hair up before hooking the band in the back helps me make the process a little bit easier when i'm trying to place the bands in the back of my head comfortably. Now i actually got this trick from my sister. What she does is she takes the comb and put it in between the band and the wig grip, and this just prevents you from having to put the combs into the nape of your neck, which can cause a lot of breakage and irritation. If you all know what i mean, when you have your cornrows back there, it can hurt and be painful. Sometimes now i'm just adjusting the headband applying my fashion headband right on top and just making sure that i am satisfied with the placement now before we get into cutting the hair. I am detangling the hair, and this is my favorite brush. I use this brush for all of my wigs. It'S just i don't know soft, it just does the job, and before i get ready to cut the hair, i am going to fully assess exactly where i want the hair to hit and i always cut less, because if i need to cut more, i can always Go back and do that now to make this process easier. I am going to be doing two ponytails and sliding the band to the placement that i want and then i am going to go ahead and cut and i'm going to make sure that the cut is as even as possible, because i am okay with the wig. Looking take her to your blunt and i'm going to match the other side now i do want to add some more curls and body to the wig, but first i'm going to tie down my edges so that they can last a few days now i did go Ahead and try to wand curl this hair, but evidently this synthetic wig does not light heat, because the hair was just left straight. So now i'm just adding some gel to the ends of the hair, because the ends are blunt and i'm going to use these perm rods to roll my wig all over now. This is really an old school trick that i am about to do. I used to do this in high school a lot when it came to rolling synthetic wigs and dipping them in hot water, and i wanted to take the shortcut with just using the wand curlers, but this did not work for this wig. So this is the process that we are going to do now. I do have some flyaways, but i'm not going to stress about them too much because they will be hidden in all of the curls. Now i'm taking off my scarves and also the wig, because we have to dip it in hot water. I did boil hot water on my stove for around 15 minutes until it was hot and boiling, and now i'm just setting this wig inside of this red bowl. This is like my hair bow. You guys, i'm not going to put it back in the kitchen to eat with it, and i'm just using the end of this comb to make sure all of the rollers are getting dipped into the hot water and then i'm placing it on this towel going to Pat it dry and then i'm also going to use my blow dryer to hurry up and dry the wig. I had somewhere where to be like exactly right after this. So i had to add this extra step in here, but at the end of the video i am going to set up under the dryer with the wig on so that i can get some of the water out. Now i'm adding the wig back onto my head and i'm being careful to not have the rollers fall out, because i already had one fall out. While i took it out of the water and now you just want to remove all of the rollers. And now i'm just raking through the curls to my liking, and i basically do this until i am completely satisfied now i did find a few short pieces near the top of this wig near the headband. So all i did was take the comb and go through those pieces to make sure that they are not flying away and now i'm just going to replace my headband on and get the hairstyle to my liking, and this is pretty much the final look. I really really like how this hairstyle came out. I didn't have to spend over a hundred dollars to get a headband wig. I originally went in the store for a curly wee and then i never knew that i was going to go home and basically make one myself here, i'm just sitting up on the dryer to make sure that the curls are locked in place. And yes, i really really hope you all enjoyed the video and found it useful and, as always, i can't wait to see you all in the next one see ya:


Comments
YasmineTV: Lia I'm glad you finally did a tutorial on the Headband Wig Install I remember I ask you to do an tutorial..thank you
T J: Now you’re a magician?!?!? Gurl you too talented
Christabell Muchira: Thank you so much for this video
Bertha Holley: Looks good but a lot of work❤️