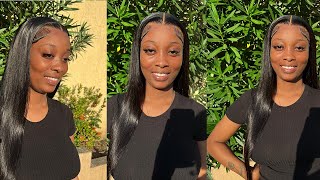
Pre Bleached + Pre Plucked Wig & How To Install! It’S Giving Silk Press | Hairvivi Hair
- Posted on 28 December, 2021
- Lace Front Wig
- By Anonymous
✄✄ Big Discount for Christmas Holiday✄✄
30$ Off Code: Mani (Limited Time)
Free shipping & One-time free return !!!
▶ #Hairvivi April Wig in the video :
https://www.hairvivi.com/collections/1...
Hair details :
Wig Cap Construction: Free-parting 13x6 Clean Bleached Frontal
Length: 16 inches
Lace Type: REAL HD Lace
Cap Size: Medium
▶13x6 #HDLACEWIGS:
https://www.hairvivi.com/collections/1...
▶Best sellers #LaceFrontWigs:
https://www.hairvivi.com/collections/b...
▶Hairvivi #GluelessWigs:
https://www.hairvivi.com/collections/g...
▶Same YT Gurus Wig Kit For Sale:
https://www.hairvivi.com/collections/w...
ALL To Make Your Wig Natural
Clean Bleached Frontal
Piano Keys Elastic Band
Pre-plucked Hairline
Pre-made Fake Scalp
Real Invisible HD Lace
Hairvivi Official Website:
https://www.hairvivi.com?sca_ref=14824...
Follow Hairvivi on Social Media:
Instagram: https://www.instagram.com/hairvivicom/...
YouTube: https://www.youtube.com/channel/UCWK7J...
Facebook: https://www.facebook.com/hairvivicom
777 Necklace: https://oneofsevyn.com
My Socials let’s be friends! (literally) :)
IG: @kamanijeann
Twitter: @kamanijeann
TikTok: @manijean888
Snap: @manijean
Wig IG: @wigssoldbymani
Email me for business inquiries only [email protected]
Hey everybody and welcome to my channel welcome back returning viewers. So if you guys would like to see how i installed this pre-bleached pre-plucked, yes, no work needed on this wig at all. If you'd like to see our install this week and got this scalp effect, even though it was already going to give that keep on watching so first thing: first, i'm starting off with some braids here and my hair sticked back with some edge control applying my cap Here stretching that on out, you want it to be stretched out girl and i'm taking my scissors here and cutting around my ears. This is something that you have to do when doing your bald cap. Okay, it's something you just cannot miss so yeah, i'm cutting that around comfortably and then i'm taking my evan wonder: lace, adhesive spray in the extra mega hold yellow can and i'm just using this spray. All around the perimeter of my hairline, of where i want my wig to lay, and i'm smoothing that out with my fingers as well once that is all smoothed out, i'm going to take my blow dryer and be blow drying this on cool okay, on, like a Medium setting of cool nothing too dramatic, then once that is dry, i'm going to take my scissors and i'm going to be cutting off all of the excess cap for the pieces of the cap. I didn't lay too correctly or just didn't dry fast enough. I'M going to be taking my better the melt lace glue in the white bottle, i'm going to be taking a little bit. Okay, literally, this side is a bit around those pieces and then smooth it out just with my fingers. So for the back of the cap, i like to cut it just like this and tie it so that my hairs will not interfere with the wig or it won't be uncomfortable. You feel me not itching or feeling any type of a weird, and i just cut off that excess piece of cap and, as you guys can see now i'm taking my makeup brush and my ruby kisses cream foundation. I didn't show you guys, but you guys will see it later, because i use the same version of it later on, but anyways my ruby kisses cream foundation in the color rd15 and i'm just smoothing that all around the cap and if you've seen my last tutorial. You'Ve seen i forgot to you feel me clean my skin off, but you want to make sure you clean your skin off with the surfa alcohol. Okay, 90 is what i like to use, and this is the wig you guys, as you can see, it is pre-bleached and pre-plucked already put into a middle part. I did not do any customization to this wig. Besides putting makeup all over the lace with my rd15 cream foundation by ruby kisses, this is the wig one. You guys know i have to go in with my hot comb before i actually put the lace down it just helps it look more sleek and more realistic. So cutting off the ear tabs was a little bit of a hassle not even a little bit a whole lot of a bit of a hassle, because the wig that they sent me had ear tabs that are called v-shaped ear tabs that are supposed to help. In some kind of way, but it did not so i'm glad that they have actually discontinued this - they do not have this on their new current wig. So if you guys purchase this, but you will not have to worry about it, but yeah the ear tabs make the wig look bulky and we do not like a bulky wig. But you know me the finesse queen, i finessed it, so it didn't look too bad, but yeah just wanted to. Let you guys know if you purchased this wig. You will not have to deal with that back to the video, though, and what i'm doing i just took my um better the melt lace glue in the color white. As you can see, my popsicle stick and i'm smoothing out these layers. I only showed you guys the two layers that i did, which was the first and the last, but i did do four layers of this glue with each layer that i did. I made sure that they were thin and i also did not use my blow. Dryer um on each layer. I did not some, i just let it dry on its own, because it does dry really fast until it was tacky and i moved on to the next layer, but on the last one i did use my um blow dryer on this setting cool. Okay, it's like a cool, medium, cold, medium and once it was tacky, i went ahead and applied it which we're not there yet, but all right, i'm going to take my wig, pull it down exactly where that glue is, i mean exactly where it is, and um Yeah just really pulling it here. You really want to pull it and get it right exactly on that glue, reapplied that glue smoothing that out with my fingers, kind of pressing that in there moving on to the next side and doing the same exact thing. You want to really press that in to make sure that is on the glue, then, with my blow dryer on a cool setting, i'm taking this comb here and just smoothing out that glue further and melting that lace even further, just making sure it is really dry. Okay - and i took my trust, my holding spray around some of the lace because y'all this glue still scares me, but i'm like okay, i'm just going to do it on the sides, because yeah we're just going to go on the sides only did it on the Side so um, i actually was able to test to see how this glue worked without any extra sprays and stuff, because i only did it on the sides at the front of the wig, where the front of the lace is, i used no spray and um. It lasted you found me the glue worked well so next install that you guys see me do. I will not be using anything extra i'll just be using the glue because it does work. Fine. I just needed to learn how to use it correctly. Okay but um yeah, so now i'm taking my elastic band and we're going to set that for about 10 to 12 minutes, and while that is sitting, i'm taking this comb here, making a part, as you can see, look at those knots, y'all bleached as but yeah. I'M going to be taking my hot comb and smoothing that out here, like i was saying with my wax stick, and i do not actually recommend doing this all throughout the hair, like on every part that i did, because it left the hair looking kind of um Greasy and oily - and that was not cute at all, like i had to i finessed it though, like i just ended up wearing the hair like with it tucked back, but i would much have rather be able to just wear it to the front, and i was Not able to do that because it was very greasy but yeah. That'S the waxing lustrous ring nutrients, not to show you guys, but um yeah. I still want to show you guys the process of what i did, even though i do not recommend doing exactly what i did because yeah it looked greasy and oily. So i recommend just using your hot comb and a little bit of like oil not actually wax. The wax stick is very oily. Just use some serum you guys, like the icy fantasia serum that i use just use that or something similar to it. In just hot comment or no product, and just really like, be slow with your hot combs that the heat can process through it. Well, but yeah the wig did get really flat, though this is what she's looking like. I repeated the same steps to the other side and i took off the elastic band and it is looking very much melted. So i'm going to be taking my scissors cutting down straight through the middle and then taking my eyebrow razor here and then cutting off that lace. Okay, just cutting off the lace being very precise, with what i'm doing being very precise, because i do not want to cut myself and i do not want to cut off any like of the hairline that i actually want. You feel me just cutting off the lace that we do not need, but i can't even see the lace bro. You can't even see where it's disappearing at like wow and for any of the pieces of lace. I didn't quite lay down i'm taking that same glue and a popsicle stick and going up under and just smoothing that back down with the popsicle stick in with my fingers as well. It was a couple of pieces, but i feel like that's just what's going to have to happen with this glue and the way that i install, i do not mind going back in and reapplying some spots down and now for the baby hairs. I'M taking my comb and i'm just taking some pieces out here. You feel me going for more of a natural look, but can y'all see the hairline, though it did look kind of bulky, but you feel me that was just happened to be my wig in the wig that they sent me but, like i said they discontinued that That they had on a wig. So that's a good thing. Your wig is probably going to look way better than mine, so um yeah, but, as you can see, i did something on the other side. Those are the pieces that i'm going to be using. I'M taking my hot comb, i'm just pushing all the other hairs back as well as hot combing. My baby hairs. Well. The pieces that i have out from our vape here is because yeah we want them to be very sleek, very sleek, so that when we lay them down, they just look so pretty. Now i'm going to let that melt, while i flat iron, this hair kind of shape it up a little bit to do a little shaping go to the salon. If y'all get the reference, then you get the reference girls that get it get it, but anyway, yes, i'm just buying the hair, while this lace melts some more as well with these baby hairs to get them a little bit flat but yeah. This is some really good, hair y'all. Besides me getting it all oily, it was very sleek like and y'all see the legs like. Where is it at where's watto like stop homie, but not even stop playing with me, because this is not my work. This is the wig. This is the wig company. They did all this for me and for us girl, but yeah. As you can see now it is melted, even some more so i'm just taking my razor and shaving off those baby hairs. Then i'm taking my pencil flat iron to curl these baby hairs to give them a fluffy natural look. This is a pencil half inch by kiss okay. I found this at my hair store, but maybe you can find it online or on amazon, something of the sort but yeah. That'S what i'm doing and i didn't just go over it once i went over it like maybe two or three times and now i'm taking my got to be glued gel in black in my edge brush here and i'm just applying a little bit of that to The edges - and i am shaping them now time for the shaping. Yes, i'm shaping them up and i actually thought they were a little bit too thin. So i put out some more hairs here and i cut them and then i did curl them as well. The same way, i did the first set of baby hairs and i'm just going to add that to the baby hairs that i've already laid down yeah lately, you guys i've been going for more of a natural look: okay, more of a fluffy natural type of baby Hair look because you know i'll just be looking at my work and i'll be like yeah. That was cute, but i feel like i appreciate the fluffy more natural baby hairs now still dramatic, though we still love a big dramatic swoop in you know, for them to be fluffy and curly, and all that, but just less hairs. Okay - and i actually like it now - i don't know if it's just the wigs that i've been wearing recently as to why i want to do this or just because that's what i'm feeling, but it may vary between wig to wig. I don't know well. This was quick, but now i'm going to be defining my part y'all. I love this. This is my favorite part of the install well one of my favorite parts, because it just makes it look so natural like when you turn to the side. We didn't give it the side view just look so realistic, but that was the rd 11 cream foundation by ruby, kissing i'm taking this little itty bitty brush here that i got from the hair store and then boom voila. We are done. I know that was very fast. You guys it was very simple and straight to the point install so. Yes, you guys make sure to check the description box for all the information on this hair and also use my code monty for 30 off for a limited time. You guys should thank you guys so much for watching and i'll see you guys my next one


Comments
Myriam Petit: You read my mind I have a wig and needed the same look and here you go ms. Teacher thank you
Jasmine Darville: I love your videos!! This gave me so much motivation to start doing my own hair
BeBossy HairDealer: Love this look you always slay girl. I’ve been learning so much from your channel
Akhona Bhengu: This was definitely one of the easiest to follow tutorials.
Deborah Frederique: You really be putting us on with these bomb ass wigs❤️
Alana Jones: Love watching how you install your wigs
Providence: girl you are toooooo goood omgggg !! I be putting my wigs on I be scared of baby hairs but you just motivated me to come out my comfort zone fr ima lyk how it goes lmaooo
Shay Cannon: I adore watching your videos !!!!❤️❤️❤️❤️ I’ve been doing my own hair now because of “YOU”!!! lol I love you and thank you so much for your inspiration towards me
Ki Banks: You bodied this install sis
Keaisha Hunt: Baby hairs is the hardest for me so hopefully I can do them now after seeing this
CynthiaMarie: It’s hard buying from these companies that’ll send you the best wig for free but then when we spend our money they send shit the install was cute tho love it
hlsax7 Kal: I do this same method of using the wax stick in sections. I used to use that same brand and found that it is a bit heavy when you do it in sections too so I switched brands and it works well.
Aria: Loveee itt . It’s giving natural ❤️
Ramatha Sesay: ugh you make it look so easy
Willina The great: Loveeeee thissss! I’m going to follow this for my birthday hair!!!!!! So thanks girllllll
Nyny C: Best wig install I’ve seen u did that sis u ate ❤️
Nuria Ricci: Loveee it for my first wig imma follow every step ! But can u tell me how many days can we keep the wig on (using the ghost bond) using all the precautions (bonnet, scarf, etc.) ?
nibankss: you slay EVERY time yesss
Diamond Leonard: Always sleek ❤️
Ariel Goma Moukala: Love this
Your Internet Sister Daii: For your wig cap and the tint of the lace do u use the darker side for your cap and then the lighter side to tint your lace ? Or do u use one side for both
Mini DIOR: Love the hair
Loriann Cole: Finessed this
Uniqq: “Where’s Waldo? Like, Stop playing with me.” You had me rolling cause you are not lieing And you are amazing I swear ❤️
Trendy Kay: I love thissss
Kreamy: This is so pretty but my debit card started bleeeding this is pricey af
Kaila Waddy: Which wig was better in your opinion…. This one (hairvivi) or the one from xrsbeauty?
Rihana Perry: baby powder helps with grease hair!
super: Hey love how did you choose the option for no fake scalp?
sza: it’s soooo perfect come do mines omg❤️
jessica mason: Talented!!
Bre: So you use RD 15 for the tint and RD 11 for the part?
hayinrej: Do you think the ebin is better than the freeze spray? I see a lot of people using the ebin now
Lovely TC: It’s that particular wax stick that oily that was the first one I ever bought and hated how oily it was
Kadia: When you purchased the fake scalp which one did you press? Cappuccino mocha or honey ?
Melly Woods: What can I did if I have a small bald spot that keeps me from getting a nice middle part on the frontal
Xan: I can do all this and I’m still gone look a mess
LifeOfAmiyahMonaé: your so pretty
Mzfancyy: Chile this bald cap method & wig gaff the Gworlssss
Yk 3556: Where do u get ur foundation from for you lace front
keiara シ: you’re beautiful
Alana Jones: I’ve learned so much
SoLikeAira: How do you get a great middle part?
esigns: would you say this or the xrs beauty hair was better ?
esigns: what color scalp did you get ?
Dee Luther: New SUBBIE God Bless you and your FAMILY I WISH you all the BEST Kute thumbnail tho Your Pretty Self Cute Ass eyelashes tho EnJoy the rest of your Great Week Happy Fabulous Weekend ahead Stay Bless n Be safe Always
You see me: I love hairvivi lace but I haaaate how thin the units are
playboybarbie.: can we get a plucking video please?
Kammy Kam 💗: i am a beginner & i wanted to know if i should start with closures or frontals ?
bree: Did anyone buy this wig not sponsored let a sista know how it turned out
So Jay: GIRL ITS SO FLATTTT
XO ZOEZO: Can you do another wig reinstall video ?
Lifewithki X: I have the pink bold hold I’m not sure if it just how I apply it but after I apply it it’s like sticky glue like it doesn’t rlly stick it
Twinn Mays: New subbie where is this wig from?
glory girl: youre the
Willasia: it’s giving silk press
bree: U did that
Alana Jones: What ms the name of the wig you’re wearing?
Lifewithki X: Did u bleach the hair or did u just put makeup on it
Moya Pack: Ong wheres the LACEEEE
TheeRealKey: no seriously what focking lace ?
Yanique Gibbs: Hairvivi customer service sucks !
keonna white: What kind of makeup is this