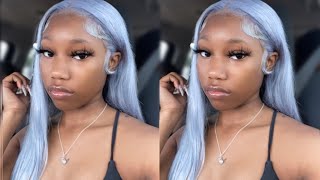
Requested|Full Body Wave Lace Frontal Wig|No Baby Hairs, No Makeup,No Lace Tint|Ft.Tinashe Hair
- Posted on 06 July, 2019
- Lace Front Wig
- By Anonymous
❤ Hair details: Brazilian body wave lace front wig 22 inch 250 density
Hair in the video:
https://www.tinashehair.com/product/13...
❤ Tinashe Hair Official Website: https://www.tinashehair.com/
Body wave with closure:
https://www.tinashehair.com/product/br...
Transparent lace closure with bundles:
https://www.tinashehair.com/product-ta...
Hot sale lace front wigs:
https://www.tinashehair.com/product-ca...
5x5 lace closure with bundles:
https://www.tinashehair.com/product-ta...
Contact Us: Whatsapp/Tel: +8618737406024 Email: [email protected]
Instagram: @tinashehair Facebook: @tinashehair
❤ Tinashe Aliexpress store top brand & rated seller: http://bit.ly/2sf2tvh
Body wave lace front wig: http://bit.ly/30erbup
Body wave with closure: http://bit.ly/2L38h6b
Hot sale lace front wigs: http://bit.ly/2YBsFyn
5x5 lace closure with bundles: http://bit.ly/2XP31sT
New 6x6 lace closure with bundles: http://bit.ly/2FWPHZi
Contact Us: Whatsapp/Tel: +8615203746156
Welcome to IAmBeautifulHustlerTV .
Be sure to SUBSCRIBE & TURN ON YOUR ALERTS
Follow My Socials:
Instagram:_Beautifulhustler
@thebeautifulhustlerbrand
@beautifulh.refurbishedwigs
Twitter:_Beautifulhustl
YouTube :IAmBeautifulHustlerTV
✨For Sponsorships ,Reviews,& Questions
Email:[email protected]
Contact : 786-571-1313
——————————————————
Here'S the mail it never fails. It makes me wan na whack myself. When it comes, I will so. Today'S wig is sponsored by tonight's, a hair company and they sent me a 13 by 4 lace, front wig and a 22 inch, and this is a body weight. Wig now this wig is extremely extremely afford. It is a 250 density, but before we get into this hair, let's talk about what's in the box, you will receive a little Tinashe card. I also received a mirror and - and the wig of course, so this is what the wig looks like straight off the box. The hair line is a little pre plucked. It is extremely extremely full, as I mentioned before, it is a 250 density and it has a lot of parting space because it's a 13 by 4 and this hair is extremely soft. I worked with this company before and I'll always love their hair. Now I did go ahead and plug bleach, my knots and everything on this wig and yes guys. I see all of your requests as far as doing a bleaching video and an update, a plucking video, and I would do that for you very soon. But I did go ahead and, like I said we should not put this wig and I let it air dry and I decided that I was wanting to add some curls too, and so I just showed you guys a little preview of me adding curls for this Week and then I will begin to install this week now, the color that I'm using is a carny hair curler, and I got this from a Walgreens as far as the like size of it, I'm not sure, but I just know it's bigger than a swamp. The smaller one that I use for you know my wand curls, but it's like a good size. If you want to do like barrel curls or like a soft look Roller set, you know those type of looks, but here is a preview like I mentioned before of me turning this hair, and then we would go right into this tutorial. Another thing that I forgot to mention I did go ahead and hop whom the roots of this week as well like that's, why it's very very like flat in need and, as far as me, are using any products across this hair. I did not add any heat. Protectant or anything like that, I just let this hair air dry overnight and I'm just curling it s is so, and the look that I'm going for today is pretty much like a soft look. Roller set look, but I did not cut like any layers in the hair at all. I just curled everything going back and I didn't pin it or anything like that. I just left the curls tight until I was done, curling everything and then once I finished curling I just took like a wide tooth combs and I combed everything out. So this is very, I would say this is pretty much beginner friendly, because all you have to do is just wrap the hair in a barrel and just go with the flow of it. As far as you know, like twisting it, and everything like that and still achieve like a nice, pretty layered look without actually cutting layers like if you're, not good, at cutting or anything. If you just curl your hair, using the same technique that you see me doing here in this video, then you should be able to achieve these same results, and this is pretty much like. I said it's not too fancy, not just a big curl is all over. It wasn't like no specific pattern that I was following, or the amount of hair that was grabbing at the time. I just wanted to get everything curled, because I'm going to comb all of these curls out, because I didn't want to achieve like that brushed out. Curl effect, I didn't want it to be tight and I just wanted it to be like free, fluffy and like loose. So this is exactly how I curl did you know once I finish doing this curl here, I'm gon na go ahead and brush those curls out, like I said, using a big, wide tooth comb and then we're gon na get into installing. Now. What'S so special today about me assaulting this wig, I received a request that you guys want me to install the league without having to use any foundation or lace tent before putting you know like, while putting my we're going to get a very nice like natural-looking effect. I know some people may be, you know allergic or just don't like to use makeup or just don't know how to so. This video is very, very beginner friendly, and this will also be a clueless install and I actually have a different way of putting my wig ones, this time sort of Conda in a way but yeah. So this is pretty much what the hair looks like after I went ahead and brushed and combed everything out and, like I said, I just wanted those curls to be very like those fluffy and like that. So here's what it looks like after everything, that's calm down. So now it is time to slay this install now for today I will not be doing the ball cap method. As you guys know, I haven't really done a ball cap method in a while, because I do everything glueless, but, as you can see, this is actually what the wig looks like. This is only bleaching. The knots like I said I would not be adding any lace tent or makeup to my wig application today, because you guys requested it, and I am here to bring you what you request. So how you see this week pretty much is how it's going to look up against my skin, but of course, I'm going to do like my little molding and melting effects to give it a even better look. So the first thing I want to do after placing my wig on my head, is I'm going to cut off the extra lace from around this ear? I'M for today I'm gon na be working pretty much side by side, so I'm gon na go ahead and start off with this side, where my part is and as you can see, I went ahead and cut off that extra lace around my ear and now I'm Just gon na take my got to be spray, which would be my best friend and I'm just gon na spray right up under my right on my hairline, where I want the wig to lay now you wan na kind of be a little neater than I was As far as applying that that way, you don't have to like pull up in the extra lace and you know cuz, but that got to be it - can hurt it poor, like the little hairs on your face on your skin. So in this case, just apply it a little bit neater and you will understand why, once I began to cut off the lace, but so I'm just gon na go ahead, and I am gon na put some of that got to be spray. On top of this. Top of my hairline right here in this section as well, because, like I mentioned before, it will be glue this and the got to be will be my best friend and because I would not be adding any baby hairs. That'S another reason why I sprayed they got to be sprayed on top of my hairline. Now, if you do want baby hairs, do not spray on top just try to get it melted, underneath the lace versus a being on top of the lace, because once you spray their free spray on their hairline, it does become hard. So if you want those baby hairs, you actually have to comb their hair out, but to prevent yourself from doing any extra words. Just you know, get it melted, I'm putting a spray underneath like it is possible. I just wanted to hurry up and you know just get this done, but nevertheless I am on the other side. Now I just worked my way from my left side to my right side and I'm gon na go ahead and cut the extra lace. Also around my ear here as well and then continue to going with that got to be sprayed and I'm going to mold everything down before I began to cut off the lace. Okay, so now that everything has been molded down with the got to be spray, I'm gon na go ahead and take my scissors and begin to cut all of that extra lace off now. This method also works for beginners because, as I mentioned before in my new Buddhist method, previous video, if you are not good at cutting the lace before applying your wig, then just do it afterwards. Now I'm just gon na go ahead and continue to cut off that extra lace and after I cut that lace off, I'm gon na go in with some alcohol using like an old stocking cap and just getting some of that extra got to be spray off. My skin, because it will look white ish and you don't want to walk around like a white hairline, and this is why I also mentioned try to apply it neatly because, as that part was stuck like it can get stuck like that, you actually have to pull It off your skin to cut off the extra lace and that just you know you just don't wan na have to do like extra stuff. It'S like that's just so unnecessary. So this is pretty much what it looks like so far. It'S not looking the best. It looks white and everything like that, but we're gon na go ahead and clean this thing up and I'm using that 99 % alcohol try not to go all the way on the hairline just too much on the skin and rub that extra away. But as usual y'all know, my best friend is in a row be smooth, so I always have to use my moves to just give me like my extra extra melting look, so I am going in with an aerobics moves and I am applying that all over my Hairline and on my part as well, because I wanted to be very sleek and smooth in this, like the finishing look of this was just like everything like. Even when I went out it was like. How did you get your hairline to look so push back and Stoney and stuff like that? I'M like y'all, just tuned into onion, beautiful, Hudson TV and I can catch also gag, but any whom I'm moving forward. I am using that moves like I said again and I'm applying it on the top of where I like, parted everything, and I hot combed already just give it that extra extra smooth, smooth look, and I actually let my hairline dry for like 15 minutes this time. Like I really waited it out, because I wanted to melt for as long as possible because I did not use any foundation or lays ten and I was kind of nervous how it would come out. But it came out to be perfect. So I really let that stain stick so for after 15 minutes, because you guys always acts, I'm a repeat it again after 15 minutes. This is what it looks like when I removed this scarf like it is super super melted and it still looks also natural. I did not want any baby hairs for this look, so I'm just gon na go ahead and call them that mousse out. So it's a little bit softer and I was very, very happy with the results and I'm just taking my wife who's, calm and playing with my curls. You know just combing it planning with my finger. You know rubbing my fingers through it until I got like my desire look of how one of my hair to be, but this is pretty much the finishing look if you feel like your curls is too loose for you. You can always go back and add some curl to it, but this is the finishing look and I hope you guys enjoyed this tutorial. I went off camera and then got my face right, but thank you guys so much for tuning in to onion beautiful, hustle TV and stay tuned, because we will have more tutorials for you til next time.

Comments
Robbie Johnson: Beautiful as always!!
A E: You did that hunny!!!! Looks fab
Tiffany Smiley: Stunning!
Raven Hall: so pretty!
Maria RoChelle: Love it wish I could do this but I have 0 patience with customization lol
TheTinkersam: Would you ever do a wig sale on some of your sponser wigs? You style them so beautifully
Chelsie Davis: Do you by chance have an affiliate discount code for Tinashe hair?
Jennifer Forbes: I JUST ORDERED THIS WIG
Daneja Lashay: Your so pretty omg!
comfort olawoyin: What type of mousse did you use on your wig?
Ann Pressley: you did that
Kersha Beaver: Can you make a wig tutorial with already used bundles and closure. I always have a hard time reusing a closure once the lace it cut off
Tyra James: Is the lace on the wig transparent?
Prettyeyes Joseph: Idk about the extremely full part cause I just received the same wig 26 inch 250 density and lord it’s not thick at all ♀️
Valerie Davis: Slay
Brea Thomas: Is the lace transparent?
Blair A'dupree: ❤️❤️❤️
BajeBeauty: You never disappoint ❤. How many days will this last with just using the spray alone?
Christina Jackson Buchanan: Ugh I swear lace only looks the most natural on brown tones , it molds n the bleach knots match their skin so good then any other tone I see
ariana milano: can you pleassseee link your curling irons?
Nikki Harrison:
Charmaine Keating: You must have redone the styling of the wig because the part was on the other side during install...still looks good
Anne Scales: Beautiful u Did That Ok
Cornelia Thandeka Madonsela: Where can I get this frontal lace? I need it please help I'm in South Africa ,Mphumalaga province
Kersha Beaver: it looks good
Jackie Bang:
Caramel Crunches: nice
ASMR Channel: Is this a sponsored video ? Please respond
Marie-Adélina de la Ferrière: #werkandslay