Ginger Hair Color | Frontal Wig Install
- Posted on 09 October, 2021
- Lace Front Wig
- By Anonymous
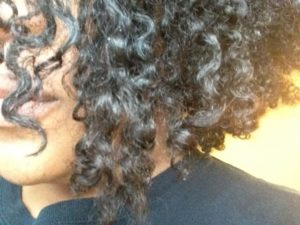
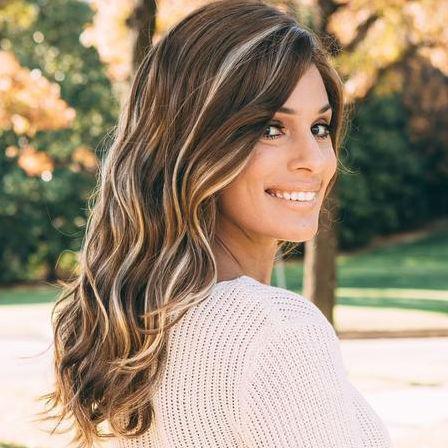
So what is up africa on the fam? It'S your girl, young africana, back at it again with another video, and today is the last day of the spice girls of the full series and we are giving a little ginger. He get mia so yeah. We did a nice ginger with a blonde patch, so if you guys want to see how i keep this color - and this look then keep on watching all right, you guys, so i have this wig sponsored from me. Of course, i have in a 24 inch wig. It'S a 13x4 frontal wig, so i'm just going to go ahead and just um. You know part out the part that i want to do a little side note. I actually did it on the wrong side, but it still came out really nice. I just switched it over and it still came out really nice, thank god, but yeah. You just want to make sure you just part out your part and i'm also just parting out the section where i'm going to have that blonde patch and i'm going to braid. It up so now that that's done, i'm going to go ahead and do the watercolor method. I have my bucket of warm to hot water and i have my kiss temptation: semi-permanent dyes in the color ginger and cajun spice, and i'm gon na use both of those bottles. I'M gon na empty those tanks out onto the water and then mix it up with my comb just so that there is no dye flying away and i'm gon na go ahead and just dip my wig inside as well too, when i'm dipping it i'm holding on To that patch of blonde for their life um, i don't want to get any color on that um blonde patch and it was definitely possible. I didn't mind it getting a bit on the roots just so it's like a nice ombre in between, but yeah i'm going to go ahead and just dip that hair inside again, i'm holding on to that braid for their life. Getting some of the roots colored as well too, on the braid part, and i'm going to use my brushes to comb through the hair so that the color is nice and saturated. Once i was done, i just rinsed it out conditioned it and let it air dried and now on to the install you guys so right now, i'm just gon na go ahead and carve around my ears with my rat tail comb and i'm just going to go Ahead and part that part and then cut around the ear section just so that the wig fits more snug around my ears, just re-parting, my part, sooner or later, i'm going to realize that i have it on the wrong side, because that's not my picture taken side, But we're just going to show this for educational purposes, so i'm going to go ahead and just you know re-part my part and then i'm going to use my character wax. Stick just to you know, put that on the flyaways and make sure that the hair is nice and sleek. And then i'm gon na go in with my hot comb on the hottest setting and i'm just gon na go ahead and just press that hair out and the hot comb just makes your hair look way more sleeker and just nicer and yeah yeah get yourself a Hot comb and now i'm just going to go ahead and start cutting some layers into my hair. I didn't od with the layers this time. I'M just going to go ahead and do some nice long face framing layers, and i took the wig off and i'm just going to go ahead and part out a section of the hair in the frontal just to cover up the back of the tracks. And then just use my carrick wax stick and my hot comb just to smooth that out and i'm using my hot comb on the hottest setting and now i'm just going to go ahead and take my hair into sections and just start um. You know cutting my hair into diagonal layers, so pretty much. Your hair is going to end up looking like a v, i'm just going to take where you last left off at the layer and then cut diagonally downwards, and i'm just going to do that on the other side as well and again, these were pretty long layers. I didn't really od, because i definitely wanted to retain some length and not chop it up too much so right now what i'm going to go ahead and do? Is i'm going to go ahead and take my marcel iron and um? This is from hot tools. I believe it's the one inch barrel and i'm gon na curl away from my face and i'm just gon na go ahead and just take sections of the tracks and just you know, do my curls. Do my thing y'all, you already don't see me curl ten thousand times, i'm not gon na go into depth. Just watch me curl away from my face, hold them curls in your hands, even though sometimes i burn and yeah just let it sit all right. Y'All now on to the installing parts, i already have my ball cap method done, i'm just going in with a nice paper towel and my 91 alcohol and i'm just gon na go ahead and prep my skin for the lace i do about. Like you know two rounds of this just to make sure that there is like no more makeup on my forehead or anything, and now i have the wig on and i'm going to go ahead and just cut some slits near the temple areas. Just so i can have it nice and stretched, and i am going to go ahead and roll. My wig back now i'll be using my erica j homie dot adhesive. This is the watermelon one and i'm gon na go ahead and use two layers of this. On my hairline i'll be using the metal tip of my rat tail comb just to smooth out that glue, you want to make sure, with between each layer that you do. It dries completely clear before adding the next layer now that the second and final layer is now dry. I'M just going to go ahead and position my wig in front of the glue and where i want it to be at before. I start pressing the wig or the lace into the glue. So have it positioned, first again in front of the glue and then press it in so now, i'm gon na go in with my eyebrow razor and i'm just gon na i'm just gon na go ahead and just cut off the lace as close to the hairline. As possible and i'm just gon na go ahead and do this all around the hairline and then i'm gon na go ahead and just use my um my excess glue that i have as well as my rat tail comb and start detailing and just i'm getting the Pieces that i missed in regards to lace, i'm gon na go ahead and outline that and then you know, do two layers and then just tack it in now that that's done, i'm gon na go ahead and start carving out some baby hairs um. So i did four baby hairs in total. I did two on each side and i'm just gon na go ahead and just use my hot comb just to lay it down and press it down. So it's nice and tamed so and now i like to go in with my fantasia spritz. This is the i believe, the ultra hold one and i'm going to go ahead and spray that around my hairline just so that we can melt that lace in and i'm going to put an elastic band. I get this band off amazon and i'm just gon na go ahead and tie it around my hairline for about 15 minutes or until it's dry and yeah, then take it off. Now i'm going to go ahead and take off that headband. Well, the elastic band, as you guys can see it looks for the melted and i did my makeup off camera and i'm now going to go ahead and just cut my baby hairs about an inch long with my eyebrow razor and i'll be using my tvx flat Iron, this is the 1 3 inch flat iron and i'm going to go ahead and just start preparing my baby hairs. I like to curl upwards and then for my baby hairs like that, so i'm just going to go ahead and curl it upwards and then i'm gon na use a bit of spritz and um on my baby, hair brush and then just kind of form. My baby hairs with um the spritz and my baby hairs yeah, so you guys want to see the process of it. I like to spray the spritz on my brush and then start you know combing my baby hairs and just play with it. Until you get your desire, you know look and, as i can see, i am just combing the baby hairs in to the hairline and using the brush and just kind of forming my baby hairs. And now i'm just using a wide tooth comb and i'm going to brush through my curls and kind of form them to how i want them to look and i'm just going to keep on playing around with this. Until like it looks how i want it to look like, but overall these are the final results. I hope you guys enjoyed day six of the fall series. It'S the ending of the spice girls and i have one more category for you guys until the series is done. We already passed the halfway mark, so i hope you guys enjoyed and i'll see you guys in the next episode later.


Comments
Fayeloni’s world: You delivered just in time!! these are the two colors I was trying to combine in my head for my birthday
KISS HAIR: Such a nice color!!! love it!
Miss Hadijah: She just delivers
Hlambile Sibanda: Absolutely stunning
purple28: Yassss love this series!!!
reni: This hair would look soooo good on me
Jodian Thomas: Love this colour
Greta Tolbert: Gorgeous color looks good on you
Kierra Malone: Damn this is . I love all of your color series.
Dee Luther: Road To 300k QueeN Stunning thumbnail tho Gorgeous u are Ur Makeup always on Point EnJoy your night Happy Sunday Too Have a MarvelouS Week ahead Stay Bless N Be Safe Always
Andrea Mccall: Tutorial on how to use that curling iron, very detailed ? I have a set that I can’t use Bc I can’t get the hang of it
Sammy Da Goat: First Comment I'm Obsessed With The Hair Color, It's Giving Fall Vibes
Pretty Brooklynn: Can you do hair and makeup all in one video while doing a story time
ItsMe Dee: Heyy !! Could you do a video on curling wigs ?
Tijuana Skky: I love it
purple28: I wanted to know if you can make a video on essentials/staple products on making your own wigs and styling them?
TheCRYSTALLURE: Ooooo weeeeee! This is muy fuego! ❤️❤️❤️❤️❤️girllll you did that.
Nycole&Bianca: Love this color
Olaiya Hadijat: Does the hair dye affect the lace
Nyia J.: i love your videos i was so upset when i saw someone using your pictures on aliexpress
Amber KayJay: Wow
Wavymy Hair: so fashion,friend
Kyeda Keating:
The Generous LifeStyle: To prevent getting any color on the part you don’t want dyed, you can just put conditioner on it.
Itz Deryahna__: Can we get the details of the wig though
Lathera Forbes: Bomb everytime
Brittany Williams: ❤️❤️❤️❤️❤️❤️
Esther Levace:
Tequila Williams: New Subbie
Empress Leesa: Here u go again for us Chocolate Candy Sistas.. #udelivert#approved#needanappointment
Jamie Fernandez:
chocolate kisses75: Notification gang happy Saturday
Cyiwanwilliams:
THE GLOW UP GURU: Ouuuui
NayNay M: Yes
Reo RileyCarswell: Yazz