In Depth Jerry Curly Lace Frontal Wig Install For Beginners In Real Time! | Hurela Hair
- Posted on 19 November, 2021
- Lace Front Wig
- By Anonymous
Im backkkk! Hey my new subscribers thank y’all for 37k I love all of youu sm
#HurelaHairBlackFridaySale #BlackFridaySale
►Use discount code“hurelaytb10” order Get $10 OFF
►Don’t Miss Flash Deal Every Friday On Website!
●▬▬▬▬❤ #HurelaHair - Make Every Girl Afford Beautiful Hair ❤ ▬▬▬▬●
I’m using 13*4 lace frontal curly wig 24 inches:https://bit.ly/3jiG4rK
https://www.hurela.com/ Top Selling Series: https://bit.ly/2Z3wDFp
Most Invisible 5*5 HD Lace wigs: https://bit.ly/3jiAmWM
❤2021 Autumn Fashionable #HeadbandWigs: https://bit.ly/2Xs1r1V
❤Hot Sale 13*4 Lace Frontal Wigs: https://bit.ly/3ASrMEd
☛2021 New arrival Wigs: https://bit.ly/3jj39uc
☛Can't Miss Blonde Highlight wigs:https://bit.ly/3lUNN0Q
☛Affordable Lace Part Series: https://bit.ly/3C1B5mt
☛Recommend Bundles & Closure: https://bit.ly/3ji46mO
✿Msnaturally Mary Hot Selling Curly Headband: https://bit.ly/3uGudr3
#HurelaHair #HurelaWig
★ Follow #Hurela Hair Social ★
Instagram@hurela_hair: https://bit.ly/2DWtBZa
Youtube@Hurela Hair: https://bit.ly/2DVAmue
Facebook@Hurela Hair: https://bit.ly/3hq1zCX
Twitter@Hurela Hair: https://bit.ly/3kfLgdT
TikTok@Hurela Hair: https://bit.ly/31ZeRB3
✔Wholesale Provided: [email protected]
My Socials let’s be friends! (literally) :)
IG: @kamanijeann
Twitter: @kamanijeann
TikTok: @manijean888
Snap: @manijean
Wig IG: @wigssoldbymani
Email me for business inquiries only [email protected]
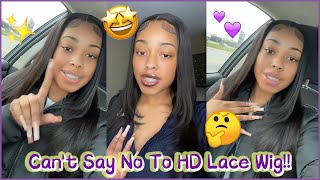
Hey guys welcome to my channel and welcome back if you are returning viewer, so today's install is going to be on this 13x4 24 inch: 150 density, dre curly wig from hurilla hair okay. So if you'd like to see how i installed this wig and achieved this look be sure to stay tuned for the rest of this tutorial in this install. So let's get straight into it. I have 20 braids in my head. You want to start off with the really flat foundation. You don't have to do exactly 20. It depends on the density of your hair, but the foundation when it comes to a flat and scalp looking install. You definitely want to have a lot of braids, or at least have the braids that you do have really flat. If not, you know it doesn't matter. If you pluck the wig really good - and you have your part, all nice and you got your wax stick and your hot comb and you're, laying it all right if that foundation is not flat girl, i'm telling you it's not going to look exactly like scalp. You want the part to look like it's coming directly out of your head, or even if it's a no part, you want it to look like scalp. Now enough of me, rambling on that topic, let's get back into what i'm doing here. So i'm applying my got to be glue free spray on the perimeter of my hairline and i'm using my finger to help smooth that out, because when you do spray that it kind of it can go everywhere. So i just like to keep it stationed and where i want it with the help of my fingers, so i'm doing that all the way around when using spray to spray down your cap. You also want to be mindful of where that is being placed, because we have to remember after we do all this we're going to cut this off and that's going to be like the layout for the wig and where it's going to lay. If you place the product too high or too low on your head and not directly onto your hairline, it can make it look like your forehead is bigger than what it is or smaller than what it actually is, and we want it to look exactly like our Hairline now i'm taking my ghost bond xl glue and you don't necessarily have to do this step, but i just personally like to do it after this spray, because i feel like it helps mold the cap even more and gets it even flatter, especially when we cut It we don't want it to lift up, but that also has to do with if your cap is not dry, if your cap isn't dry and it starts to lift up, that's why you need to make sure that you blow dry it all the way to where Your cap feels hard not in a bad way, but you want it to be dry. Okay, because if it's not that is the worst thing like having your cap done and then you go to cut it and it's just peeling back. I know if you have experienced that you know how stressful that is, because at that point you just have to start over, but yeah. You want to use a little bit of glue too, because that's also what's going to keep it too wet, is if it's too wet like. If you use too much product, you want to use just the right amount, so when it dries, it dries well, and it should look like this now taking my scissors and i'm just going to be cutting off all of the excess cap and you will be able To tell just like how i showed you guys in the last clip how the glue and the spray was dried down, it's going to be kind of like a tint to the cap, so you'll be able to tell where to cut off and how much of the Excess lace, not lace on g, the excess cap to cut off so yeah. That'S what you're going to be doing here so so i've seen this tick tock on my fyp of this girl, basically doing this. So what she did was she cut in the middle of the cap boom and then she tied it into a double knot, and this basically secures your cap like to where your hair of the of your braids doesn't have to just be sticking out of your wig And causing your head to itch and feel all weird we're having to um sew it down, because who really wants to do all that when it comes to a wig installing yourself. So, as you can see here, what i'm doing is tying it in those knots and then i'm going to be cutting off that extra cap in the not extra cap, but those extra pieces of cap yeah in the back. So yeah shout out to her for giving us that alternative, but let's get into the rest of the bald cap. The product i just showed you guys is ruby, kisses cream foundation, and i am in the shade rd15, if you're lighter or darker than me, then you can definitely find your shade at your local beauty. Supply store, as i know that they have many, and this is a very popular brand. So if you don't like the product that you're using now or you're, having trouble finding your shade, they have really good shades to um help with the matching and stuff so yeah. So this is what it should look like. It should be giving very much balls giving balls, so you want to use your simple alcohol and a cotton pad. You don't want to use the cotton ball because those are so messy and irritating. If you know you know, you do not use cotton balls when installing a wig you want to use the cotton pad. Okay, a lot less messy, but you want to just clean off any excess oils you have on your skin as well as the makeup that could be and could have gotten on your forehead, which nine times out of ten it did enough of bald cap talk. Let'S get into this wig so, like i said in the beginning, this is a 13 by 4 24 inch, 150 density, jerry curly wig from hurilla hair. So this is the inside of the wig. What it looks like that's how much lace you get and the inside construction of the cap and then this is how the hair is moving she's very thick. It gives kinky curly almost but jerry curly for sure, like the texture was perfect. But let's get into this wig so as you can see it's on my head and i'm using my finger to kind of help figure out in place where i'm going to cut off the ear tabs, i like to cut off the ear tabs before i apply my Glue just because i don't know i feel like it just fits better and it's more comfortable that way in my opinion. So that's what i do and i'm going to take that behind my ear. I always do that just to make sure that it looks correct. You feel me and it looks pretty correct, so i'm going to repeat the same thing on the other side before i apply the glue. I also like to take my hot comb and press back the hairline and again i cannot explain to you how this makes a difference, but it definitely does. If you try it, you will be able to see the in the results, but i'm using my ghostbun xl glue for this install today and i'm going to be applying that right on to the bald cap right to where that cap is - and i can't explain to You how much or how little i'm using you guys can really kind of tell just by looking at it but um it wasn't too much or too little. It'S just the right amount for me and for you, because i mean it's the same thing: i'm taking a popsicle stick and i'm going to be smoothing out that glue, smoothing it out really well too, because you want it to be very thin. You want to be a thin layer of glue because if it's not it's going to just dry all types of clumpy and we don't want that - we want it to just be seamless. You know what i mean. So that's what we're doing here, i'm going to do three layers and then blow drying that on medium, warm with my blow dryer until it is tacky, okay, so boom! Now we are going to be pulling down this wig and placing it exactly where that glue is y'all got to be precise. You want to place it exactly where you have that glue and where you applied that glue and then using your fingers as well to help mesh it in and get it to stick. Okay, you don't want to be too heavy-handed or rough with that. You just want to be. The goal is to just make it stick, so don't be extra with you. Don'T have to be extra, just press it in with your fingers a little bit. You have to do extra, but um yeah. Once that is done, i'm going to be using the teeth of this comb and a blow dryer. Now i know for sure that this was on medium. Warm too and um basically helped to seal that in to get it to stick and to get it to mold into onto your head. Just like that. So, to also help with this, i like to use my got to be glued spray, but i ain't gon na lie. I'M not doing this method anymore! You guys. I just wanted to show you guys, so i can explain to you why i don't like to do this method anymore. I noticed that gotcha big glue spray can make my lace look a little ashy or lighter than usual and um gotcha glue spray is definitely the culprit, because i've been hearing other people say this as well, and a good alternative that i'm hearing about is bed head. So stay tuned for you know subscribe, so you guys can see when i do that when i install my next week, yeah being a perfectionist, i'm willing to try new products and doing what's going to have my wig looking the best and giving scalp as we want It to so we use it in this install and it doesn't look terrible. So you know you don't have to switch over, but i'm definitely going to be one of those people. That'S going to be switching over and trying the bed head spray instead, but, as you guys can see, i use my elastic band, which you guys can find on amazon and buy them in multiple packs. I believe - and i'm going to have, that on for 10 minutes. As i'm styling this hair and just seeing what i want to do with it, i like to use my icy fantasia heat protector, serum one of the hair when i'm hot combing it too, because it just helps the hair. Look real silky, like i don't know, especially and even on curly hair like if it was curly or body weight whatever i like to use this serum because that hot comb combination, y'all just makes the hair look so silky and shiny. I love it. I love it. I love it. I honestly didn't know what to do with this hair, so i was playing around with it like i don't know what i'm about to do, but i eventually put it in the middle part and the reason why i didn't show you guys how putting the middle part, Because it didn't stay in the middle part, but look at the scalp, it's definitely giving scalp, but it is time to cut off the sleigh. So i'm going to be taking this eyebrow razor here that i got from my hair store and i'm not my hair store, but my local beauty supply store. I guess, and i am going to be cutting off the lace now you want to get really close to the hairline. You don't want to leave any extra lace that doesn't need to be there because then it just looks like lace on your head and we don't want that unless it's molded onto your skin and it looks like scalp, it can say you know that's different, but if It'S no hair on there; it should not be there, so you want to cut all of that off. Just like this, it depends on the wig, but for the most part i take my shirts and i cut off extra legs that didn't lay down. Sometimes i will go in with my glue and just lay those pieces back down, but if i don't feel like the lace needs to be there, i'm going to cut it off. So that's what i'm doing here. I wanted you guys to see how i do it. Like y'all see how close i am to it, i'm not playing around i'm weak, i'm really cutting off every piece of lace. That does not need to be there. I wanted to zoom in for these baby hairs just because you feel me, i wanted you guys to have a good angle to see how much hair i'm actually pulling out. When i do this so yeah, i'm pulled out three sections. I want to have three on each side, including um baby hairs in the middle, but okay never mind no, but to that i'm going to explain that later so right now, i'm just filling out these hairs on both sides and i'm going to go in with my Hot comb to kind of help press it out to give it back, get it back to looking like style, because it looks like this. It looks a little messy, so hot, coming those hairs back away from the hairline from the hairline to the baby hairs makes it look like scalp again. I also like to comb out the hairs for the baby hairs, just because this hair is curly and the texture is thick and you guys see how slow i'm doing it like this was not sped up at all like. I was really trying to press this hair out. The baby hairs are just easier to do when you have curly hair and you press them out to get them straighter, they're just easier to do honestly. I don't know how to explain it they're easier to do. Yo. Look at the time shout out to you guys if you do you're here late. Like me, i wish i could show you how it's 4 31 in the morning and not in the afternoon, but yeah we crazy for that. If you like me, give this video a thumbs up, but i'm taking the same rd 15 cream foundation by ruby kisses and this little itty bitty brush just to give it more scalp and look it did it? Did it's very much a giving scalp after i did that last application of makeup? Oh - and i also um, laid this lace down again with the band for 10 minutes. I forgot so um yeah! That'S what it looks like afterwards taking this razor again for the baby hairs, i'm going to be trimming them down and um. I ain't gon na lie. Y'All these baby hairs was kind of like a trial and error like i didn't like them, but they were also cool. Like i didn't hate them, they weren't terrible, but they were not my ideal baby hair. So, like i basically figured out, i do not like the triple baby hair. Look on me. I feel like my hairline is just um too short for that, like on my actual head and the way that, like i map out my wigs, it's kind of the same as my actual hairline, so it just not it's not enough room. My head is too small for it, i'm going to stick to doing the two baby hairs, but i did do something different, which also kind of made me feel weird about these baby hairs. Um, i use the tropical roots, molding foam and i use too much y'all. Do not use this much unless you know what you're doing do not use this much. I use it entirely too much and then to put it on all at once, like what was i think it was clearly. I was clearly being delirious because it was 4 31 in the morning and i needed to go to bed, but um yeah, as you guys can see, though, i'm still sweeping them with this um edge brush, i'm using not the calm side, but the brush side and Using my fingers to help it out, like they didn't, look bad, but they weren't my ideal baby hairs. They were definitely not the best that i've done before, but um they worked out. They worked out for the time being and for this install they didn't look terrible or anything like i said, but um yeah, but i did still want to show you guys my method, because what would be an install tutorial without the baby hairs, hello, but um yeah. You guys so i just want you guys to want you guys to know that, like when it comes to your hairline, some things will look better than others when it comes to these baby hairs and stuff, like some people, look better with thinner baby hairs rather than Thicker or more baby hairs other than less, but it's all about preference and what you feel looks best on you, so yeah. If you like this method, then you can still use it but um. I just wasn't too much of a fan personally, it's not even that. I didn't like the way that they looked. It was more so it was very difficult to do like. I was really struggling trying to fit that middle baby hair in like omg. I was struggling so hard, but um. You will be able to tell that with this side, like i kind of gave up and going, i was just like. Let me just free ball this, i'm not trying to get this all perfect, so yeah, the other side was kind of a fail, but the other side turned out pretty cute, but yeah. It'S just too hard. It'S too hard to do. The other way is a lot easier and simpler for me, i'm using the same heat protector from icy fantasia, but just in the spray version - and this was after i realized - i wanted it to be in a side part. So i'm re-pressing out the hair to get it molded into the side, part that we want and when it comes to side parts. I like them to be curved in a c-shape and it is still manageable to do this even with a 13x4 lace. It doesn't have to be 13x6 lace in order to achieve this kind of part. So with this, i'm just going to make it more like a c-curved part, and that gives it the illusion of that. It'S deep in that you know it's deep and we love a good, deep side part. I live for it and i love it. So i'm using my little lusters re-nutrient slick, stick to help mold this as well and using that hot comb to have it looking sleek and pressed out okay, this step, you don't have to do, but i just like my installs to be as flat as they possibly Can and since this is a molding foam, i use this to mold everything in place. The same tropical roots, molding foam that we used before for our edges. Now i'm using this spray bottle with just water in it to detangle this hair before we add product in it, and i stood up because this hair was really long and big, and i wanted you guys to see what i was doing so i'm using my fingers And i'm also going to be using a wide toothed comb to um comb out the hair from the bottom to the top. I'M using the curl maintenance, defining curl whip by auntie jackie's, and i didn't use a whole lot because i like the texture of the hair with just water. I just use just enough just enough really just because i couldn't just leave this hair just wet with water. I needed some product in it, but um yeah, so this is the texture of the hair. When it's all said and done it looked really pretty all this hair was really soft. I loved it. I would not lie to y'all look at it. You can see it. Lastly, i'm using this salon - graphics, high beam, semi, permanent hair dye spray in the color black, just to define the part even more. So this is the outcome. I was not mad at this at all. I think that part looked really clean. It was giving scalp look at all of that. Okay, those edges over there was a little messy, but overall it was really cute. I tried to be as in-depth as i possibly could, and i hope you guys enjoyed that make sure to leave a like comment and subscribe and turn on my bell notifications, because i'll be posting a lot. Well, i'm back officially so i'll be posting live and i'll see you guys on my next one.


Comments
always unbothered: Did you dye the hair? And because of you I'm convinced I can lay my wigs like this lmao <3
kaylawilson67: This was so good definitely need to follow this step by step
MUKtea: im a beginner and i feel so confident after watching this videoo
Boss White1242: You can also use the treseme holding spray it’s really good
Jazzmine Monroe: Did you bleach and tint the lace girl this came out so good!
Cassandra Jacobs: can you do a video on how you bleach your knots?
Daisha Holloway: wow that lace is laidd
mira Danielle: how long did your hair take to ship ?
The DOLL: im here from instagram ''yesssss girl i been waiting '' but i hope your feeling better and back for good
glory girl: yess this unit is soo cute
gracia i: you’re backhope you’re feeling better mama
trinity eshalomi: yay!!!! you finna have me giving scalp
Boss White1242: Girl this is nice
Daisha Holloway: luv this install definitely trying . Is this a 13x4 or what kind ?
Sskie: Do you mix the 2 colors in the ruby kisses foundation or do you just use 1 of them?
msnewby1000 Newby: Nobody ever shows how they do the back. I really want to see
Gigi_loves_sushi: How did you get the lace not to start lifting when you put the mousse on to do the baby hairs? Mine always starts lifting
Lay Banks: do they have this same wig in blonde ?
Jai Dominique: you’re backkkkk!
Smiley Meraki: Was it a transparent lace or brown?
Iesha Gray: Can you show us how you pluck please I’ve watched so many video and still mange to over do it
D.monayyyy 🤍😩 .: Can u review a shein wig i also love ur videos ❤️
Taeshanii: New tat❤️? Love the install hunniiiii
Donellia: Did you pre-pluck? Or it came this way
PrettyShay Mua: Can we get the name of the stuff you used in the video please cus sis i need my wig to look like urs lol
I'm keyya: Do you have a bleaching knot video ?
Devin Zortman: How do I fix if I got a small bald spot in the front n if I cut too much off in front
DaLadyum Davis: Where are you located? I love the way you do your wigs
Lexis Capalot: How much density
nadia harris: Do you think the makeup you used is better den using powder make up ?
TheOriginalChunli: Yessssssss sis
Sun Ni: So if you don’t know how to do cornrow what else you can do ?
JAY • DUHH: yes maaaaam
khalila berryhill: did it come preplucked
Dior Nuni: What lashes are you wearing and wats the link?
Daisha Holloway: What kind of brush is that I cannnever find a small one
Alexandre Sarah: wheres the makeup brush from please x
Ashley Brown: Did you put makeup on lace
Theteaisreal !: start you a hair business!!
Patienceez._: Can u do a video of u pluckin nd bleaching yurr knots .
Martine Augustin: The behin is better
Kennedy Moore: Sponsored video?
Chaniya: where do you put the little combs thats on the wig?