Gorgeous Loose Deep Wave 13X4 Frontal Wig Install | Super Deep Side Part | Nadula Hair
- Posted on 29 July, 2021
- Lace Front Wig
- By Anonymous
Did a deep side part style wig install with arrogant tae inspired baby hairs using a loose deep wave lace front wig from Nadula Hair.
◆ #NadulaHair ◆▬▬▬▬▬▬▬▬●
♛All the hair can be paid in 4 installments
♛Use the Special Code get EXTRA $10 OFF: nadulatb
———————————————————————————
I’m Wearing: 13*4 lace Loose Deep Wave Wig 24inch
Direct link➤ https://bit.ly/3y45Gh6
https://www.nadula.com/ ➤ Top-sale wigs: https://bit.ly/3hPigLG
Can’t miss Beyonce Blonde Highlight curly wig: https://bit.ly/3hAK4Dx
Invisible 13*4/13*6/5*5 HD Lace Wigs: https://bit.ly/3kAZVUk
How to install kinky straight headband wig: https://bit.ly/3kIIqi3
Affordable sorts of Bob Wigs: https://bit.ly/3wRFQvJ
13*4 Lace Frontal Human Hair Wigs: https://bit.ly/3hNOE1h
Glueless Headband & half wigs:https://bit.ly/3ioHhMY
Perfect tutorial of kinky curly headband wig: https://bit.ly/33rv16R
All highlight color wigs for the season: https://bit.ly/2UjCEf7
Different sorts of bundles&closure: https://bit.ly/36PlJDA
Aliexpress Nadula Hair Official Store: http://bit.ly/3bW23QD
Bob Curly Headband Wig With Removable Bangs: http://bit.ly/3068Mlt
#NadulaHair Youtube: https://www.youtube.com/c/NadulaHair
Nadula Instagram: https://www.instagram.com/nadulahair/
Amazon Nadula Hair: https://amzn.to/2rqyP57
#nadula #nadulahair #nadulawig
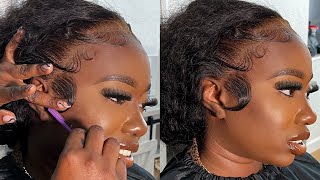
I tried something new and did a deep, deep side part with this loose wave unit from the doula. So if you want to see how i did it keep watching okay, so i've already laid my bald cap, i'm using uh my maybelline fit me in warm coconut to tint the cap to match my skin tone completely. After that i tipped my lace. It was already kind of brown, but i needed it to like match my skin tone of brown. So that's why i tinted the lace with my color and then i also like to seal it with some freeze spray, as you saw, and then blow dry it um. I use the blow dryer on the heat setting, not the cool setting, because it makes it go a lot faster. That way, i did bleach and pluck this unit off camera and also i took a row off the front of the hairline. So that way, i could pull the wig up farther and be able to cover my sides, but not have it too low on my forehead, because my forehead is kind of small. So i've had this sample that kisses pr sent me a while back of this dual applicator glue that i wanted to try today, since i want to leave my wig on for a few days, and i love this little precision tip that it has on it. It really lets me put the glue on my hairline and like nowhere that i don't want the glue to be like it's just so precise and perfect. That'S the only thing about like using lace. Glues to me is just that. Sometimes you can get too much out and it's hard to get it off. This little precision tip made everything so easy. I like this glue a lot. I was pretty impressed. Usually i have like ghost bond or anything else, but this i like it as well. It also came with the remover too. I did three layers of glue and i let it dry clear in between each layer before i apply the next layer, and then that was enough for it to stay stuck on for the three days that i wanted to keep it on with no issues. Yo tell me, while my camera died, when i was about to lay the lace just make sure that your glue is clear before you lay your lace down, or it's going to give you some problems. I did not cut any of the lace before i put it down. I just put the whole thing down at once, as you can see, and now that the lace is dry, i'm going to go ahead and cut it off the same way. I always do with jagged motions or you could use the eyebrow, razors or tiny scissors. If you want to anytime you're using scissors, make sure you're going in like an up and down jacket motion. You don't want straight lace, because that's gon na make it look like a wig. I also cut back any little tiny areas that were just a little too close to my eyebrows. Since i pulled this wig all the way up. The other thing with cutting the lace too, is you want to make sure you get any little excess, little lace pieces that are left over, that don't have any hair on it, because people can see it. You want your lace to be as close cut as possible. Once i laid this, i noticed that there was just a little bit of piece that came up too far to my forehead. It wasn't even laying on the glue, so i knew it was too far, so i just sectioned it out and used my scissors and cut it off still cutting jaggedly. I also realized - i didn't quite fully lay the sides on the wig, so i just went back and did that really quick. While i let that little corner piece get clear, i went over the front of the hairline with just a little bit of glue to lay down those little tiny pieces that didn't quite lay. You know once the aftermath is all said and done. That is why i love this precision tip it made it so easy not to get the glue anywhere that i didn't want it. Okay, so this hairline right, i left it a little bit full in the front, because i wanted to attempt to try like the extra baby hairs that you see like people when they copy arrogance, hey or they do all. Like the you know, the little swoops going. Every which way i was trying to be cute, um i'll spoil it right now it was, it was a fail. I did something, but it was not all that, but we'll talk about that more once we get to that part. So once i sectioned out the baby hairs, i then went ahead and plucked the hairline a little bit more because on my head, i realized you know what it's still a little too thick for my liking. So let me go ahead and pluck this out some more, especially because i've already sectioned out the baby hair that i know i'll need all right back to the baby hair. So i first i'm cutting off the excess hair. I cut them off pretty long to start because i just didn't know what i was gon na need for what i was trying to do with all the intricate baby hair stuff. Y'All know if y'all watch my channel. I don't be doing all that. I do my little soup here, my little soup. There call it a day, uh, that's pretty much what i went back to by the end of this, but i tried you know i tried to branch out. I took some setting foam and i used that to just help me push the rest of the hair out of my way, so it wouldn't get in my way, and then i tried that trend where you curl the baby hairs with your flat iron first and then Start to swoop them, i do think it does make it easier to swoop everything. So i will say that, but i'm still struggling with all the intricate baby hair stuff trim them down some, because i was already seeing it was going to be a little too long. And then i went in with my setting foam and just started playing around trying to swoop things and cutting things and just trying to get it right. I will say, though i have a foam you'll see a little bit later. I prefer the foam over this setting. Uh mousse, because it's just a little too, like light that foam was heavy and it made them hairs stay in place, but i didn't figure that out so way later, but anyways yeah y'all can see me play with these baby hairs. Real, your quick all right. So eventually i got the job somewhat done. This will do for me, but now i'm going to put my scarf on my edges to help that set in place, because i do not want all of my hard work starting to come up on me in 2.5 seconds. After the baby, hairs are laid, i'm ready to start prepping this to go in the deep side part i begin by just sectioning out just a little thin layer of hair. As i move all of the hair to the side, i just want to make sure that it's parted, so that my tracks, where my frontal ends are covered to define the curls i'm using pantene's curly hair mousse. I really like how this reacts on this loose deep wave hair. It does not weigh it down, but it still gives it back its curl pattern. So i like this, a lot with this hair, but before i put any mousse on top i'm going to go in with my wax stick in my hot comb and set that side part in place, i'm going in using the wax stick in about three different sections. So that way, the hair will really lay well, after that, it's back to the moose, so we can finish defining these curls and then after i've done all of that, then i let it air dry for a while, so it could get big again, okay, so this Is the final result, i'm happy with how the baby hair turned out overall and i'm happy with. Like the deep side, part look. Y'All know i was a little bit nervous because i never really done a deep side part like this before, but i really want to try it out, because i love how it looked on sochar. So i was like yo. I want to see how that look and i like how it turned out. I love it with like this deep wave hair. I love how it dried, it's so lightweight and still fluffy like i'm feeling this hair like this is really nice. So, if you're interested in this unit, of course, all the details will be down below in the description box. Thank you guys so much for watching, don't forget to like comment and subscribe, and i will see you guys in my next video

Comments
Ms. Shabria Gxo: Really gorgeous
Shannessia K.: Really pretty !!
Love Yourself: This is really pretty and like the deep part. Beautiful hair. Baby hairs aren't my thing either but you did a good job. Have a Good Evening
Blackberry- Rose: ❤️ this. You look Very Pretty
Livanna Batista: Link?? You look gorgeous boo
Tracey Boyland: Looking very cute. Fits you to a T