Quick 10Mins Detailed Lace Frontal Wig Install | Westkiss Hair
- Posted on 31 August, 2021
- Lace Front Wig
- By Anonymous
*** CONTACT INFO: [email protected] ***
HAIR DETAILS
▬▬▬▬▬▬▬▬▬♛#westkiss♛▬▬▬▬▬▬▬▬●
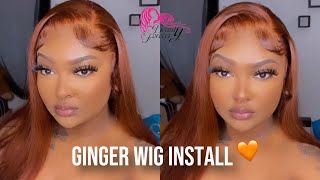
Hair details: 250% density straight 13x6 HD lace front wigs 26inch (HD, medium size)
Video Hair Direct Link ➤https://bit.ly/3C2Jd6u
Hot selling HD lace wigs ➤https://bit.ly/3C2NC9y
★ westkiss official hair store ➤https://bit.ly/3fdgnqg
Up to 43% off Lace Wigs ➤https://bit.ly/3zTK9s5
Hot curly lace wigs➤https://bit.ly/3feyjB9
#westkisshdlacewig #westkisswig #westkisslacewig
#WestKissHair Official Site Huge sale Big Discount
❤ Follow West Kiss hair on social media :
Instagram @westkiss_hair_store: https://bit.ly/2OlKstu
YouTube @West Kiss Hair: https://bit.ly/2Ol5U1m
Wholesale WhatsApp: +86 13323741050
❤ Let's be friends ❤
MY SOCIAL MEDIA:
Instagram: https://www.instagram.com/diutoajoku/
https://www.instagram.com/cocobayhair/...
Twitter: https://twitter.com/diutoajoku
Snapchat: DIUTO
SUBSCRIBE to my MINIMALIST Youtube Channel: https://www.youtube.com/channel/UCTpur...
What'S up my babies welcome back to my channel. You know the vibes, if you're friends with somebody you're, absolutely welcome to consider subscribing in this video we're giving we're giving in fact we're just giving, and this is obviously back to school season. You know i mean anyways. This video is kindly brought to you by weskie's hair. I have to bleach the knots and also pluck them, and you definitely need to do that for yourself as well. So it's not that difficult, because the knots are not too thick, which you'll be able to see. If you look properly in my hair, this video honestly is just to teach you how to quickly install your wig before you fly out the next day to class, see you want to look like a beep. Do you remember that we just got from corona we've not been in actual physical classes? So if you're going back to school this season and you're looking like a club head run back home because you need to look sweet and that's. Why i'm here to give these baby girl vibes? Okay, we have something sweet anyways, let's get right into this video i like to do the first few snappings on the sides. The first place is here second place here and i'll do two other snappings one on this side. It'S a quick, quick installation, so i'm going to be using this black one. This is actually not really for sticking on your wigs. This is more for like styling, for today's video, i'm sorry, i'm going to be using different utensils that i don't have. Let'S use my finger, i already washed my hands, so my hands are already free from oil and i've already like, wiped my hairline. Before doing this. No foundation should be underneath your cup, i'm lowkey, blindly doing this installation because i can't really see do you know what let's just work with it? Okay, so i'm gon na get this glue on every single part of this wig cap, partly on my own skin. You want some contact with your skin as well, not just the makeup. I'M going to blow dry it to get it dry, not tacky, completely dry, okay. So the next thing i want to do is put more of the glue on this section of my hair, but this time around, i'm going to like spread it deeper into this area of my makeup as well, and then dry it down to this tacky when it's Tacky then i spray this once and i leave my wig down. Okay, let's do this. I really like having my hair very flat down, i'm only applying to this middle area. That'S because i'm working from the middle to the sides you want to make sure you're focusing on each part. You'Re working on for me is the middle. So we're going to work on the middle side, i'm going to dry it down. So it's a bit tacky and then i spray some of this spray on it. I'M just going to quickly spray this onto the hair. You really shouldn't be using your fingers to be very honest with you, but this is like a quick, quick back to school. I'M installing my hair kind of vibes, so that's what you're trying to go for. Maybe you need to save time and move quickly. If i do this, you can see some white residue. That'S when it's tacky immediately. You notice it's tacky, you pull onto your lace and you drop it. I usually put dots here and when i place dots onto my lace and make sure the dots transfer onto my forehead. So that way, i know where exactly to place my knees, but i already know where my knee is going to stop, so i'm just going to pull it forward. This is the part where you don't use your finger, make sure you're using your comb press this one down. If you don't have a rat tail, comb get one after this, you want to just dry it completely until it's like dry dry, not tacky anymore, like completely dry, and one thing i like to do is when i'm drying, i usually press onto the hair. That way, it actually helps it to last longer be mindful, if you smell any sort of burning thing, if you just take it off for please, because, like your hair's, probably stuck in it before we get to birds, if you can make sure it's hot or close To hot people have dryers that are extremely hot. That can literally burn you if they're on a hot setting. So if yours gets really hot make sure you put on a medium setting, so you don't burn yourself now we're done with the front. Clearly, it's not moving anywhere, it's literally stuck down, so now i'm going to focus on this second side. One thing i like doing when i'm installing my reads that helps you to have the most symmetrical looking week is when you install this section, come back and install this other section. I realized that whenever i do weeks i install weeks - and i completely do this section most times - this one is like hanging all the way up here, so it's usually more difficult to install both sides if you're doing one side before this set. So it's best to do any section. You do make sure you do it on the other side as well, just to complement everything, so we're going to repeat the same process, which is obviously putting some glue on the section. This glue is what i'm talking about, or your yellow glue, because you want to do like a painting as you're going back to school. You know i mean i keep pressing it in and all the way backwards. Oh my god. I realized that when you wash your face or when you sleep and wake up, these sides are usually parts that come out very quickly. One thing i also realized is when i'm installing my wigs, i think it's because i have a big forehead so most times the sides are usually hanging. So what i do is when i'm installing these two sides i raise my eyebrows open and that way. Actually, it does work for me, like i said, raise your eyebrows up pulling as much skin as you probably can don't do too much, so you don't have a headache and then you want to press it backwards. This is what i like to use the comb itself to press back press for weeks. I have done so many videos on how to block weeks. Actually, no i've done this one. I did one very detailed video and i was talking and i'm going to put it somewhere on the screen. I think it's up here. We have successfully installed the sides of the suite, so we're going to install these ends now, and this is actually supposed to be. Like the easiest part of this installation, but one thing that makes it a bit more difficult than it should be, is the fact that you have to cut above your ears, and that is aka. The flaps of the hair that actually overlap onto your own ears, which is so annoying you want to make sure that you have like a hair. Clip reason for this hair clip is to make sure you've taken the hair away from your face, because if you have the hair onto your face, when you're cutting off the lace, it is going to cut the hair, especially wearing straight hair. Then it's more of a problem because it will show, but if you're wearing like curly hair, it might not really show that area overlaps onto your ears. You want to pull up the hair in that section and clip it somewhere, and then you pull it down now. I'M going to go from behind, you can go from the front as well, usually with straight hair i like to go from behind just so. I can really see what i'm doing or feel what i'm doing. You need both hands in this situation. You'Re gon na go from behind feel the parts that are overlapping your ear and cut the lace off towards your face, so it will come out as just this section. If you cut it right, if i didn't cut it right, it would have probably come out. Looking like this area chopped off, it's not overlapping anymore. Do you see that it's sitting right in place where i want it? I'M gon na raise my brow up again and just repeat the same process since i cannot really fit my corn behind my ears, okay, now so it's time to do the do it's time to cut the lace. This is the most important part of everything, because you this up. So let's cut this. What i like to do is i like using the pair of scissors, or sometimes i like to use like an eyebrow eraser, which does most of the work much better, but for something more controlled for people that are just new to the installation world. Please don't use eyebrow results. You will just your lace up, so you just get like a very tiny paper scissors or even just a tiny pair of hairs or something and get yourself together. So what we're going to do is snap snap, snap thingy. I can't even see what i'm doing snap snap snap, snap snap make sure you snap snap snap in it and please don't go too close to your hair. Don'T go too close to like where the hair starts. You need a little bit of this in front to just mask it properly snapping. It makes it look more natural. It'S still going to come back to you because it can't be looking like you have two different foreheads now, if there's any place that has gaps, and there will always be the best thing to do is put some of this on your finger and then rub it Onto that section, as you're rubbing it into that section, you dry at the same time. So let's do this. So this is the next part where you obviously need to have an elastic band. I'M going to use this to press on the lace and you want to go from underneath your ear, not above your ear. If you go above your ear, you won't touch these parts. I have a hot comb. This is my hot cone. You want to make sure your hair is as flat as possible and then just to tame your flyaways. You put some got to be onto your hand and you press it onto your head and then you go in with this, and you want to press it in. Like really really flat this way, do you see how flat this is? Laying? Yes, honestly, i have to do some good work to the front of this hair to get it to look this way, so you definitely will need to pluck it yourself bleach the knots yourself so get ready for that. For me, at least so the next thing i'm going to do now is this and make sure it's pretty much done properly. You hold it to the corner of your head and you cut in an angle because the reason you're cutting an angle is because you want, when you sweep it this way the longest one flows in properly with the other hair. So that's why you're going to cut it at an angle. So this is my styling glue, i'm going to put a little bit of that on my hand, and you take a little bit and you soup, as you're soupping, use your finger to soup as well so sweep each section and push it in and you have your Slick baby hair: do you see how easy that was? This is the part where we do the review. Let'S do this reveal it's actually quite nice. The texture is beautiful, it's very beautiful. I hope it helps you

Comments
Lizzy Ayodele: I remember when I did my first install,I dragged too much skin causing me to have a headache all day Thank you for this tutorial!❤️
Oyana: Finally !!!! and your makeup as flawless as always
Mirage: Thank youu! I'm sure I'll look sweet this semester
anne anabui: You look so beautiful ❤️❤️❤️
VLOG WITH TYNA: Who else has missed Diuto???I just needed to lift my spirit a little and remembered her channel
VLOG WITH TYNA: Who else has missed Diuto???I just needed to lift my spirit a little and remembered her channel
Merdie Ngalala: You look amazing ❤❤
Okosun Aiwanose: You’re so pretty. Can you do a room tour?
Portiaaaa😵💫: Will this last long?
OrevaIgho: I love her videos sooo much
Gauvin P.: I think you are suppose to use the Cool air setting on the dryer to fix your wig
West Kiss Hair: Wow! Dear, you are so pretty with our wig.
Zi: so sleek!
Karabii Mojela: My favorite youtuber.❤️ You’re beautiful
Jen: Yassss it is Givin, Hunny❤❤❤
Temi Tayo: Loving your new wig dear❤❤❤
Chikezie Family: diuto i missed you so much ..nice to see your face again
Naomi: I'm so sorry ma'am but I need this makeup looksuch a beaut
Izo A:
obaje mariam:
Abigail Theophilus: I missed you ❤️
Ity Eddy👑✌:
Angela Iheukwumere: Uto nwa❤️