No Glue Or Gel! Easy & Quick Glueless Wig Install | Hd Lace Melt Ft. Wiggins Hair
- Posted on 24 February, 2021
- Lace Front Wig
- By Anonymous
════════დ #WigginsHair დ═══════
Get $8 off with coupon code”Delizzle” !!
❤Direct Link➤https://bit.ly/3hwauVb
Hair details:Body wave #hdlace frontal wig 180% density 22 inches
You may also like:
1.Hot selling lace frontal wig➤https://bit.ly/34WmMRR
2.Premade colored wig➤https://bit.ly/38M0jId
3.Lazy girl approved headband wig➤https://bit.ly/38QeDPQ
Follow @wigginshair on instagram:https://bit.ly/3n2Fygy
Tiktok@wigginshairbest
Facebook @wigginshair:https://bit.ly/3o6iM8L
E-mail: [email protected]
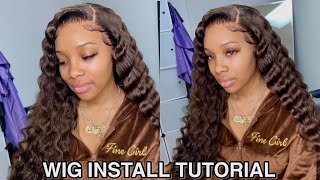
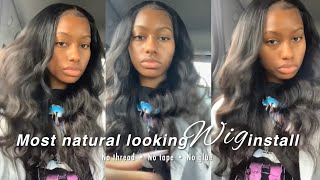
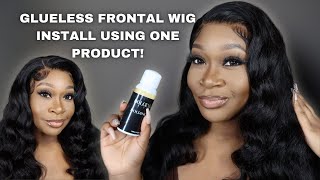
Hey guys and welcome back to my channel so for today's video i am doing this quick install and this is a really really really easy, very very beginner friendly install. I literally use no glue and no gel at all. All i did was literally cut the lace. I plucked it, you guys can see it moves. I cut the lace um, but first i bleached the knots plucked and did all that. But there is no gluing. No, nothing, no gels super easy and you get a really really nice and flawless. Look looks like it's coming right out of my scalp, so the hair is from wiggins hair. This is my very first time trying this wig. They sent me um i'll, explain in the video, but this is their body wave wig and it's in 22 inches natural color and it was such an easy install. But it looks so good and i wanted to give you guys a different option if you don't like using glue or if you're a beginner to wigs. This is a really good way to start and for me talking, if you guys, uh, would like to purchase this hair or want more info on this hair. I'Ll put all of that um in the description down below and comment below what you guys would like to see next for me or if you have any questions, comments. Anything comment that below give this video a thumbs up. If you guys uh like this little tutorial, install enough of me talking, i don't know why i'm talking this much, but let's just get right into the video all right. So i just have my edges laid and stuff, but i'm just gon na. I think i'll put them back. I know like some people like to do this with their own edges out, but i like to use the hair on the wig to do my edges whenever i have a wig on and i'm just putting water on my edge brush, because i do have some gel On them - and this is like the safest way to take your like to remove your edges and lay them back without like ripping your edges out, some people forget that, like you need to be careful when you take out a style, it's not just how you take Care of your hair, um like when you have it on and stuff afterwards, matters as well, so so like when you take the glue um off your wig installs or if you remove gel from any kind of hairstyle, just be careful with it, because the takedown can Rip out your edges as well, it's not just how you put the wig on: it's also how you take care of it and how you remove the style okay, so all i did was pretty much um like last night was the day before and after this last Night, i just um put some oil in my hair and i had it in braids just to soften it up and everything and it's dry now, so it can lay really flat and i just put into a low bun like you could braid it, but i just Want to show you guys, like an everyday type of wig, look like some people, don't really have the time to go and do braids, and this is like for when i feel lazy and not want to do all that. There is another way to look slayed without having to do the extra stuff, so just make sure it's really really flat in the front. That'S what you really want and the reason why i have the bun in the back is so that there's some kind of like tension in the front, so i'm gon na explain it as i do it. So here is the hair and it's just air dried. I i just bleached the knots and only washed like over here. I don't bleach them like all the way, but they're pretty bleached you guys can see and it's hd lace. We love that hd lace, the best lace. So it's 180 density and it's really really thick trust me. I try to pluck in plucking, took me a long time. I'M not really a fan of 180 density wigs but for the sake of the video i'm going to show y'all how to slay a high density. Wig and it's 22 inches - and here is the box that it came in y'all, can see, and they gave me a wig cap eyelashes and a little little flyer thing. So what i'm going to do first, another cap on this is a light. Wig cap, i might be able to get away with just the wig cap on without putting any like foundation on it. Let'S just see because it's really really light. I feel like it's going to it's going to balance it out, because i didn't bleach the knots like all the way. It'S not really perfect. So if this is really really light, it might balance it we'll see we'll see as we go. Let'S do this um. Okay, it does look a little bit too late. I'M just gon na put um some of my i'm gon na put my foundation shade onto the wig cap, i'm just using a little powder and i'm gon na take a concealer that matches my skin tone. You guys could use a darker one, but i'm just gon na put it on this line. Right here, use something darker, that's what i would usually recommend, but i think it'll do for now. It should be good honestly, i'm gon na put this shade. Actually, i was gon na put the powder, but the powder is a bit too dark and you never want your lace to be darker than your skin. Always lighter is better. So i'm going to use this shade and i think i'm going to mix a little lighter, concealer and put that on the lace and you want to lightly do this. Don'T go crazy! No reason to you just want to give that little tint. You could tint it a different way if you would like. I just prefer this method. Okay, so for this wig, all i'm going to do is basically just cut out the excess lace, i'm just going to follow the hairline and just cut it. If this is easier to do like when it's on your head definitely go ahead and do that, but because i'm not really gluing it at all um, it won't be necessary. So i'm just going to cut around the hairline okay. So i have everything cut and it's looking like this. It should fit perfectly, i felt it and it was really tight and i i've only um. I only have it like on the last setting for the what's. It called the elastics, it's very, very snug. So what i was saying was this little bump right here is going to create tension. So if it, if i didn't, have this bun right here, um the wig could just go over here and it might move around. But this bump adds some extra tension so use it. However, you need to if you need, like a bigger bun, do a bigger bun, but you don't want it too big, because you don't want to be noticeable and boom have yourself a glueless glueless wig and i don't really need it to be. Like super super secure, it's not like a wig that you'd wear to be active. This more for, like to look cute, have something easy to wear. Oh yeah, it worked perfectly um. I might do some edges in the front, possibly but i'm kind of liking the no edge look honestly, okay. So now, let's just get on to the curls. So now for the curls, i always like to use heat protectant just so that we don't mess up the hair and i just feel softer whenever you do that, but the hair already has a bit of layers. I believe i feel like i need to pluck a bit more right here, but it's it's mostly because of the the knots i'm pretty sure. I usually just leave like the very first like two rows of hair um until the very end like when it's on my head, just so that i can know like how much i'm taking off, because you can never reverse your plucking, but you can always fix it. Up later, plugging is weird, though, like everyone has their own techniques and whatever works for them. So just do what works for you yeah. It looks a bit better, all right, so the heat protection i'm going to use is this one right here: it's the ors olive oil protector and just put a little bit and put that all over this hair feels like 24 inches. You guys can't really see, but it's yeah. It feels like 24. So i like to work section by section um. I guess you don't have to like. You could just do the front, but you won't get the same. Look. It just looks way better. When you go section by section in my opinion, or else it's gon na look like super straight and then crows at the end, because you didn't get everything that you needed to get if this was like, if i was really dedicated to wearing this wig all the Time what i would do is cut off whatever is sticking up and just use my own hair, but my hair is blonde, so i'm gon na split this into two in the very like back, i like to work in bigger sections and then, as i move um To the front right here, i work in smaller sections. Okay, so this is the barrel that i like to use, and this is the ion curling wand. I believe it's a one and a half, if i remember correctly, okay, so when i'm working on this is my left side like no matter which side i'm working on, i curl kind of outwards. Well, is it outwards okay? Let'S, let's just do it and then i'll see what i'm doing so i put it on and then i curled this way. I guess it's inwards. Just inwards, curl, like this hold pull a little bit flip hold yeah. So i guess i'm i think it's outwards to me. It'S outwards like it's curling this way and then it's gon na go out instead of like curling it like inwards. I don't know you see the curl yeah, it is outwards. It kind of goes outward so on this side. I curled it and went that way, but now, on this side, i'm not going to curl it the same way. Of course this is also going to be outwards but to the right. So if i was on this side, i would curl this this way, but because i'm not curling it that way. So again, i'm going to show you guys put it on top and because it's on my left side, i'm just going to work with the hair going left. That makes sense. It gives you that, like shape, you guys, can see like that and then, when you brush it out, it's gon na look awesome. So before i brush the curls out, i'm just gon na hot comb, um the wig i like to use my beeswax uh. This is the murray's beeswax, not my beeswax, but this is what i like to use. I don't want it to be too too flat, because i want it to look natural, so i'm just going to apply a little bit. Please be careful with hot combs. Don'T burn yourself with this technique, i would say it's best to hot comb. It way before you put it on your head all right. I think that does the job and it looks so realistic right now. Oh, my goodness, i'm actually shocked very, very shocked. Okay, so um you don't have to use a comb. You get different, looks with different things. I use to brush out your hair. So if i use my fingers it gives it more um like volume because you're not like flattening it completely. So just go like that. I'M just gon na take the comb and push this part up so remember when i like curled it inwards. It gives you that little bump and there we go - and this is your everyday type of wig. When you want to look really nice and look like you did a lot, but you really just plopped this thing on. You can see this. I like that, no baby, hair look. I was actually kind of scared, but it looks pretty good to me. Looks very very realistic: you see you don't need glue all the time. You just have to make sure that your lace is good, so with hd lace, wigs you can definitely do that. Sorry guys. I just realized. I wasn't looking at the camera. I was looking at myself, my apologies, but you guys can see how cute this looks. The hair is really really nice highly recommend this hair um one of its hd lace. Wigs the hair is usually really good. I'M not sure why, but with every company that i've tried anytime, it's an hd lace, wig the hair, always um feels really soft looks good. Has a bounce, and this high density wave is actually not that bad. I thought it was going to be way bigger, but looks really nice, and i hope you guys liked how i did the curls. I know a couple of you guys were asking me um so hope this little tutorial helped but yeah. That is pretty much it for this video. I hope you guys enjoyed this quick, install and styling tutorial, if you guys did like it, give this video a thumbs up and comment below what you would like to see next from me and this channel, and also subscribe. If you haven't already and yeah i'll, see you guys next time in my next video bye,

Comments
Wiggins Hair: Yasss!So easy install! Scalp look !
Lilian Tseggai: Love this!! Can you do a tutorial on how to pluck/customize your wigs?
Kalyn Pressley: show how to remove wigs when you use the gluing method. LOOOOOOOVVVVVVEEEEE this look!!!
abby arosomade: Game changer
BobbyWorId SODMG: ❤️
H B: It’s moves so won’t it come off ?