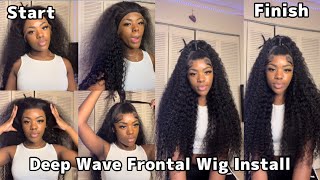
Elastic Band Method: Glueless 6X8 Curly Lace Closure Wig Install ( No Freeze Spray, No Glue/ Gel )
- Posted on 02 July, 2020
- Lace Front Wig
- By Anonymous
Hello everyone, welcome back to my channel!
In Today's video, I'll be installing my Curly 6x8 Lace Closure Wig I made from scratch. I'll be using the elastic band method to install the wig ( No got2b freeze spray, no glue/ gel ) although, I used edge control to lay down the baby hair...I hope you enjoy the tutorial if you do, please don't forget to give it a big thumbs up!
Thanks for watching and have a blessed day
Click on the link below to watch the video on how I made this beautiful kinky curly human hair wig with ventilated closure from scratch.
HOW-TO: DIY 8x6 Lace Closure Wig With Kinky Curly Human Hair Bundles https://youtu.be/6BKSo9sNpGE
✨ DIY: Lace Front Wig Cap For Crochet Braids Wig/ sew-in wig https://youtu.be/tSfUbhaWX-E
HOW-TO: Lace Frontal Crochet Wig Using One Pack Of Braiding Hair! |Straight Crochet Wig https://youtu.be/bVY7Ulf9LfU
DETAILS/ THINGS USE IN MAKING THE WIG
✨Elastic Band
✨3 Bundles of kinky curly hair ( Inches 24 24 26 ) Color 99j... I don't have a link for the hair.
✨ 8x6 Closure cap: Made by me
✨✨✨✨✨✨
Where I purchase my materials/tools (Aliepxpress Links )
Wig mannequin head https://s.click.aliexpress.com/e/_9zLJ...
Adjustable Wig Stand https://s.click.aliexpress.com/e/_ADOR...
✨SWISS LACE NET FOR WIG MAKING✨
1/4 Yard Swiss Lace For Wig Making https://s.click.aliexpress.com/e/_A8SI...
Closure/Frontal Lace Material For Wig Making https://s.click.aliexpress.com/e/_9yye... (4x4'' 13x4'' 2x4'' 2x6 and more)
3 Pcs Pin ventilating needle https://s.click.aliexpress.com/e/_Agco...
Small/ Tiny Latch Hook https://s.click.aliexpress.com/e/_AO7y...
✨✨CAPS✨✨
Spandex Dome Cap and Mesh Dome Caps (Small-Large Size) https://s.click.aliexpress.com/e/_At3T...
Thick Mesh Dome Cap (Net Free Size) https://s.click.aliexpress.com/e/_A3t6...
Black Elastic Band For Wigs
AMAZON LINKS
Swiss Lace For Wig Making https://amzn.to/33JaChD
4 Pcs Pin ventilating needle https://amzn.to/3IfIfXw
Spandex Dome cap & Mesh Caps For Wigs Making (Small-Large Size) https://amzn.to/3BFOKAp
Black Elastic Band For Wigs https://amzn.to/3LW3FLy
✨ Curling Mousse
✨Castor Oil
✨ Detangling Brush
Click here for more videos!
HOW-TO: Super Short Jumbo Box Braids With Yarn on Medium length Natural Hair https://youtu.be/aCPF2lGYnOY
HOW-TO Braided Lace Front Wig With Baby Hair Using All My Leftover Braiding Hair | DIY Ombre: https://youtu.be/dtU2WsZGsBE
WATERCOLOR METHOD | Unplanned Blue Ombre Hair | Short Curly Lace Frontal Wig: https://youtu.be/RL1NrS4idsA
DIY JUMBO KNOTLESS BOX BRAIDS ON THICK NATURAL HAIR | Long Pink Braids https://youtu.be/KgRaqjyaIu8
How To Make A Lace Frontal Crochet Wig | Yaki Straight Hair https://youtu.be/3PMboDarNCs
Elastic Band Method: Glueless 6x8 Curly Lace Closure Wig Install ( No Freeze Spray, No Glue/ Gel )
This video is not sponsored. The links above are affiliate links... if you make a purchase using any of these links, I'll earn a small commission.
Hello, everyone we come back to my channel if you need your walk-up okay, hope you hold on doing well. So in today's video we're going to be installing this wake. Yes, it is. Finally, so I finally took up my short box braids. So now it's time to install the wig. I know you guys have been waiting for this video. So here it is, I'm gon na. Do it alright. So before we start, if you need to my channel when you have a subscriber yet please go ahead and hit the subscribe button down below and also I'll put a link to the video on how I made this beautiful coyly wig from scratch, so be sure to Check the description box, alright guys so first thing: I'm gon na take off the wig from the mannequin and I'm gon na put it on to see so that way, I can show you guys the the face before going ahead to add in the elastic band. So I'm just gon na go ahead and do that right, pain this all right, so I'm just gon na put her see right. I just ripped that off the stand. Oh boy, all right, I'm just gon na I'm gon na fix this later. Most I'm done with this video. I think I grabbed it so hard, so just like all right so back to the wig. So this is the wig right here and no elastic. I haven't had the elastic band so well, I'm gon na go ahead being tried on first before going ahead to add in elastic band, see how it fades before playing the end by adding the elastic band. So I think before I do, that I'll head in the trim off the excess list next gon na take the wig this way, I don't want to mess up the koi, so I'm gon na do it this way. This is not straight hair I can combat. If I messed up so I need to make sure the coils are intact all right, so I know that I put it on the wig in a weird way, but its water, alright, so this has looking I haven't at the elastic band happen. Also, I haven't had the foundation to the lace yet, but so far this has looking States in place by running of being tired when it's stayed in place right now, you can move where everyone eats you, but I just want more hold on on the cap. So I'm gon na take this all things attach the elastic and sure it looks good, but I still have to a domestic bad just to come up so that way the walk. I will do to lay down the big me here: woundedness, okay, so I've already cut out the elastic parents, so I'm just gon na place it back and see if it's right, if I mean so, I mean so, I just the length because right turn around right. This is the elastic batteries. This work that'll be without pulling it so for you to get it tightness of the elastic band. You need to pull it and feel it alright. Remember once you're stationed there is little pull it back. So so I'm gon na show you one more thing once I sew down the elastic band so that if you cut it too long, you can actually adjust the length by sewing on this code right here like folded over after you attach it to the wing. Okay. So, after Andy elastic band, if you try it on and it's big to lose, so what do you need to do? You don't need to undo this in order to cut it? The quick way you can just hold this find the middle of the elastic band. By doing that, you put the both points together like this okay, so you find the middle points. Then you pinch it together. You can decide if you want to hang it out to be on the inside or the outside. It depends on here. For me, I'm just gon na put it over like this okay. So next you want to take your needle and thread and sew it down. Okay, so most artists don't even go ahead in the tight, just secure the trading place just like that next cut off the tread. So then you go so you've adjust the length of the elastic band just by doing that, all right, so I've added the elastic band. You can see right there, so next, I'm gon na go ahead and put the wig back on traditionally trickin. I don't really don't want to mess up the Kois coz all right. First, I'm gon na put it on just the elastic band. The Sadoway is looking after adding the elastic band. You see stays in place going nowhere so fold them back. I'M gon na use a bobby pin to secure the back of the week down all right. So now I'm gon na go ahead and crease baby here cuz. You know no baby here so next, I'm gon na take our edge control and Link down the baby here and we're just gon na go ahead and said that I think best ways to come from the bring it from the back like that and you just wrap It around and wrap it around. Okay, so it doesn't know what get right all right, swish, pin and wrap it around and wrap around back. This is a struggle and all the way back all right, messed up my makeup all right. So this is the installation, video no no jail, no spray magic. Nothing were just magical hair band. All right. If I wanted coffee, I can make it perfect just by raising it up like this button. It'S perfect this way and for the Kois come on a motor. Fine, if we want this modifying it, can just like spray water. I need to just bring the puffiness down, but I think it's perfect. I don't want it too small. You know all right, that's good! It'S not what I'm doing right now! This is why the Kois don't last a long time, because I'm always like this - whenever I have coin in like all over it right all right, nothing all right, so I'm gon na head in swish of the style of it right here I have like two braids Going back and one coming towards the friends right here so for the one for the break coming towards the friends, I use the colored rubber band in a little bit of decor on the front and now this kind of eschar. But it's cute for pictures holy. I'M not going out looking like this, it's just for pictures all right and for the video. Thank you all so much for watching today's video, and I hope you enjoyed this video. If you do, please don't forget to give it a thumbs up and also, if you're new to my channel, please don't forget to hit the subscribe button down below if you already subscribe. Thank you so much for subscribing. Thank you so much for popping by today and I'll see you all in my next one. I should stop playing with the hair. I'M messing with a cause seriously seriously. I just top whatever I'm doing right now. Just leave the hair alone, leave it alone. Vivian. I can't, but what does God like, damn it, alright for really does line


Comments
Onyix Amadi: Beautiful as always love the hair and installation.
Naturally curly mama: You did an excellent job making this wig
Chrystal C: The install before the elastic band looked great
Olushola Mohammed: Love the installation. Please please please make a full lace wig. I recently cut my hair really low and would love to make full lace wig and a tutorial will be appreciated
wineie smith: Very pretty and informative
Adeteju Laditan: Thanks and well done. How many inches is the elastic band?
Jesseca Roberts: Love your work
Morenikeji Akinyede: It's neat and perfect
Kylie heart: I love your work
R Carter: Great job!
last days: Your talent and beauty are next level!
TheMaraj: The style you did for pictures....
Galaxi: I couldn't stop looking at the bewildered dummy head her eyes. Seriously, love your videos. Haven't got round to making a wig yet. But hope to start soon.
Chilly Jill🧿🧿: I'd really love to buy one of your crotchet creations ♥️♥️♥️
Dicta Washington: I love it
pat ohonsi: Beautiful
Amarachi vincel: What is the name of the pin you used to install/ makethe frontal?
Naturally curly mama: I love the wig colour I like the curls
Jennifer Laignel: Very nice and beautiful
D Turner: Great Idea, I really don't care for the glue, spray , etc.
Doris Nyirenda: Please darling consider selling the wigs you make I personally love them so much
Lilian Chege: You are the best when it comes to tutorials...❤❤❤❤am your number one fun from Kenya..love you my mentor.
Betty Nicy: You are really in love with this colour meanwhile can I buy the hair or do you create it with attachment
jennifer iroham: I wonder how u do this especially taking one strain Cox my net always cut
Myfamily_ Thatprays: Love your hair I just subscribed ❤️❤️❤️❤️Myfamily_Thatprays
Hollymat: Très jolie
Eyere Takem: Wow! Do you take orders?
Elizabeth Adeola: Love u Vivian u are the best
Tolani Kausara: Did you make the wig, which weavon did you use pls
jennifer iroham: Pls where can get the crochet pin pls
Francesca Lima: Sa été réalisée avec de la mèche ???
Mabel Idehem: I love your video... is it possible u can make some thing for me? Can I have live a contact.... Thanks
Adebiyi Mojisola: Nice work but u love using this colour
Jada136: First!!!!!!
Kate Kitchen spices: I have dance o