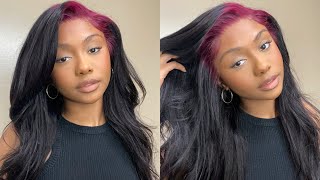
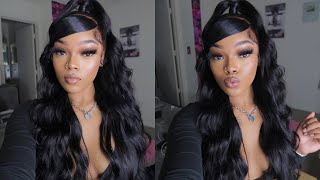
Easy Arrogant Tae Lace Wig Install No Glue Or Spray Ft Ali Pearl + Flat Iron Curls Tutorial
- Posted on 04 June, 2021
- Lace Front Wig
- By Anonymous
SHOP MY HAIR & BEAUTY STORE - https://amorantasia.com/store/ I saw the Arrogant tae full masterclass clips and also watched iamerickaj and tried my own arrogant tae inspired lace closure wig install with natural baby hairs plucking without bleaching the knots for a faster wig install tutorial for beginners! No spray no glue or adhesive was used for this natural wig customization! My method is easier and has worked for me for years! Ali Pearl Wig & I'll be testing the Kipozi 2 in 1 titanium flat iron curler for soft curls tutorial
Products Mentioned:
Stylefactor edge control level 5 hold
Tresemme Mousse
Kipozi V7 Flat iron curler
✨Extra 10% OFF Discount code: 2021AMOR
Hair I’m wearing: 24inches Body wave 5*5 HD lace closure wig 180% density
Shop Now➤https://bit.ly/3pedgCr
❤Ali Pearl Hair Store ➤https://bit.ly/3pc8Trq
❤Glueless 5*5 Lace Closure Wig➤https://bit.ly/34DDbd9
Use code “alipearlyoutb” to save $10!
Instagram @alipearl_hair: https://bit.ly/34I3Oyd
Youtube @Ali Pearl Hair: http://bit.ly/2H0Gmmc
#lacewiginstall #arroganttae #alipearlhair
FTC This video was sponsored but all opinions were my own honest thoughts ❤️
So i saw the arrogant, tay master class method and i figured hey. Why not go ahead and try this myself but add a little bit of my own method to it to make it much easier for you guys to do at home with fewer steps. So i went ahead and customized this five by five lace: closure to look like a frontal and i'll be reviewing this kaposi two in one flat iron to curl, my hair, okay, all right we're giving bounce so to start my easier method, i'm using the ali pearl 5X5 lace closure unit, and this is what the insides look like with these straps that are adjustable, and i love the space that you have to. You know part your hair instead of having a full frontal. So the first thing that i do is make sure that it is laid flat just to get the parting space correctly, because you always want to map out what your edge line is going to look like first. So i just pretty much start with just either a middle part or side part, and then i just use the mousse to lay it down really flat like this is the best fast acting mousse ever like it leaves your hair in place like for real. So please go get it it's like six dollars. This is not sponsored by the way from them, but yeah. So i'm just getting my middle part together, so that i could go ahead and tell which direction that i want my baby hairs to fall into so etching out. Your edge line is the most important part of a wig unit. Customization like this is the part that makes your hair look natural, so i just tend to use scissors to just cut it in a slanted direction so that the edge edges won't be too long and overlap. You can feel free to cut it. However, you want to, but i like to use the scissors so that i can know which direction it's going to be in versus the the jacket um razors, but you could use both honestly for the same effect. So i use my edge control just to get it to stick there for a while. Just so i can see what i'm working with and then i just start plucking. This helps me to pluck in the right places when everything is like laid. So i make a part - and i make sure to separate the very front, follic hair follicles, and then i pluck right behind it, so that i won't give it like a bald spot. But this is the key to thinning out the edge line to make it less dense. Basically, because you don't pretty much, have a really really thick dense hairline, so this will make it look more flat. It makes it look more flesh like and the more you pluck. The more natural it will look and match your own edge line. Well, for me, okay, this part is easier. Also, if you use what like apply water or mousse like i do, because when it's wet, the hair follicles slip out easier when you're plucking and you can actually use your hand if you want to to just pull out certain pieces. But i tend to go back like three layers back well, not layers, but three parts back and then sometimes i'll. Just you know flip it over and see how it looks every few minutes and then pluck it from the front just a little bit to thin it out a little bit more and quicker versus going each layer so yeah. I definitely cut the whole thing just for the front piece, because i wanted to like lay over like a comb over on the side and when you don't cut it, it's going to be hard to like get it to lay in place like that to comb over. On the side, so i just cut that very front part out and then that way it lays seamlessly like how i want it to be laid like off of my face a little bit but onto the sides, as you can see now, and so to thin out. The edges a little bit more to match my hairline. I just pluck a few more of them after i've said it and then yeah it's starting to look natural and already customized simple as that, and so next is just bleaching the knots or to make it easier. What i do is just apply my foundation color all along the whole lace, part the part the front of it, and it should look more flesh-toned, like you know, like your skin and so to make it. You know all of the black knots look better or like bleached in a way i just color on top of them, i do and it bleeds over and it bleaches like everything, not bleach, but it stains the lace. That'S what i'm doing. I'M lace staining and it takes only a few minutes. You know what i mean: who has time to sit there and bleach knives all the time, and this totally works trust me so now, i'm just going ahead and cutting the edge line out now some people like to leave the lace on for the edges like right Under the edges, which is what i do, but there are others that like to cut the entire lace across and then just blend the edges with your natural hair. I don't like to do that. I like to leave the complete lace underneath the edges and where the baby hairs lay so to make the unit tighter i'm tightening it by. I guess i don't know how to explain this part, i'm basically anchoring it to the side of the wig cap to make it fit tighter on my scalp now this is the last part of customization. This is how you get your wigs to lay really flat. This may take a little bit more time, but you can just take your time to do this. I promise it'll be worthwhile, so i just go by each section: small sections apply a little water and then flat not flat. Well, you could do flat iron, but i just use the hot comb because it gets it bone straight and like really really down pat and then i use the mousse and it freezes it in place. So this is it for the customization, hey girl. So i'm going to go ahead and apply this wig from ali pearl. This is their brazilian body wave 5x5 wig and, of course, it's a lace, closure wig! You don't have to worry about having your edges snatched out, but this is their 24 inch. The new capacity two in one flat iron and hair curler. I cannot wait to see if it actually works because back in college, when i used to do sew-ins like that, i used to always use a flat iron to do curls, because it was just so much easier to me to just go ahead and straighten and then Curl versus just straighten the hair completely like for like 30 minutes to an hour and then curl it like that, make no sense. So when you curling with the flat iron, you get it straight and then you get the curls. So i'm gon na go ahead and put the wig on first and then get this geared up and we're gon na test this baby out. This is looking good, so you can also use my discount code in the descriptions box, as well as the ally pearl. Wig. Look at that look at this baby, arrogant tay has nothing on real taytay. Yes, i'm the real tay tay, so yeah, and you see how well this mousse that i i use it just lays it down, and this is my natural hair. So all i did was just take out some uh edge control. I don't use got to be. Nothing got to be absolutely not that's what no. I don't feel with that now. Okay, now some of this is residue. I forgot from the edge control that i put right here and right here too. That'S like crust. You can do something with it if you want to, or you can use edge control and lay this down, but i don't have to like, because my it just looks so good. I think on camera i can't see and i'm not wearing my glasses girl. So it might be ugly but we're just gon na pray, because it looks good with my blinded eye. Okay now this is the edge control that i used, the yellow one, the the number five high shine from style, fat style, edge, factor, style style. Whatever these people know me girl, edge booster, and so i just put it just somewhere on my edges, just so it'll stick down, but honestly, sometimes that's that's like too good. You know, but you see how it's stuck there. It'S it's there. It'S stuck, and just you know, do a little something like that and that's that now i need to pull this down first of all, and if you don't, if your edges sit low like mine, then pull it down a little bit more we're gon na do 410 Degrees, okay, all right, bye, okay, so i'm done and honestly overall i don't know if it was my wrist skills or just the curls in general. I think it's a typical hair curl job with, i guess, a flat iron yeah. This would definitely work for it. I did do this other side and i tried to cut it a little bit as well off camera, but it looks really good. This looks like a frontal almost like it really does it's giving frontal vibes. So what do you guys think so? This is it: if you wanted to look more melted, you could definitely lay it down with a little bit more mousse, but hopefully this video was helpful comment below if you found this video helpful share this video and i'll see you guys in my next one

Comments
Nicole Jae: Watching all the ads and full video so you can get your coins! ✨✨
Chanda Williams: New at the lace frontals so I absolutely enjoyed this video. I wear wigs and braids as protective styles. But wigs been my fav
Hazel Jones: You made this closure look like a frontal!
Nicole Jae: Yes girl you slayed this!
Kipozi Beauty: Thank you so much for your hair tutorial!
Natasha Raisor: You look gorgeous. The wig is slayed
Namubiru Nsubuga: “Got-to-be absolutely NOT “ lol
Shannessia K.: Very pretty!!!
Beautiful Surprise: Thanks Antasia for the video. The only thing I can request for next time is when you are plucking the hairline please don’t speed it up or don’t speed through all of it. I can imagine that the video will be long if you don’t speed through it so maybe when you first start the plucking process maybe do it at regular speed so we can see exactly what you’re doing. I know we can see it when you’re speeding through it but I still think I at least would understand it better if I could see it at regular speed. Great video. Thanks!
Rudina Eve Fefe Diaz-Shallow: Helpful thank u very much
CiearraB: Sis you are the only one I know that cuts the lace like that.. ima have to start doing that because there melt is serious!!! Let me find out you in 2025
Nicole Jae: Can you link that mousse?
Ali Pearl Hair: Lace Melted! Periodddd!
Beautiful Surprise: I’m also confused because I think you said they you don’t cut the lace away where the baby hairs are. How does that work? Wouldn’t people be able to see the lace there? But I don’t see it in the video when you put the wig on so maybe I just don’t know what the heck I am talking about. That is definitely quite possible.
Hazel Jones: Here early just to thumbs up!
Rudina Eve Fefe Diaz-Shallow: Name of the flat iron?
Mariah Carey: Lawd ham mercy