How To Install A Lace Frontal Wig For Beginners! | Step By Step | Outre Donatella Ft. Ebonyline Hair
- Posted on 06 October, 2021
- Lace Front Wig
- By Anonymous
Check out my other videos:
- Crochet Bohemian Twists: https://youtu.be/gj-eScDhWm4
-Easy Headband Wig: https://youtu.be/m4KoU7_9tcA
- Butterfly Locs, No Wrapping! : https://youtu.be/w2WfJ8YYW4E
Follow me, let’s connect!
IG: @__lindseybeth: https://www.instagram.com/__lindseybet...
Twitter: @__lindseybeth: https://mobile.twitter.com/__lindseybe...
TikTok: @__lindseybeth: https://www.tiktok.com/@__lindseybeth?...
Facebook: LindseyBeth: https://www.facebook.com/LindseyBeth-1...
Snapchat: @LinziiLuv
Email: [email protected]
Watch in 4K!
Thanks for watching! ‘Til Next Time!
Xoxo
Lindsey
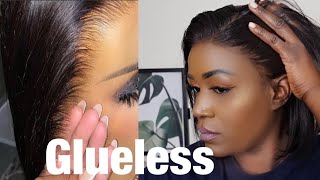
Hey beautiful people welcome back to another video, it's a girl lindsay beth, so today we'll be reviewing and trying on this sleek lay part lace, front wig from outre, and it was sent to me by ebonyline as in ebonyline.com, and i have it in the style donatella. In the color dr2 cinnamon spice, so they also sent me this safe lace, one glue kit with a lace, bun remover and the lace glue applicator. So this is a hair straight out of the package. I waited to do this video to take it out, for you guys it comes with the usual stock card, with some instructions there in the little flap and the hair. As i said, it's in the color dr2 cinnamon spice. Now i was not expecting this a vibrant color. I thought i was going to get it in black, but i mean well, let's see how it goes so, as you can see, i'm showing you guys the inside of the wig. It has a typical lace, ear-to-ear frontal and it comes with a headband. I'Ve, never gotten a synthetic wig with a headband. So that's pretty nice if you're not really comfortable with combs and such it comes with some combs at the back and two combs there at the front and it also comes with the adjustable head strap. So you have a lot of options to secure your wig. Now, that's me showing you the lace against my skin. As you can see, it's a little bit light for me, but you know we're gon na adjust that and it also comes with some baby hairs at the front. So i'm giving you guys a little bit of close-up like they're, showing you the hairline, the baby hairs at the front, and then it doesn't really have much to give in terms of like the side you know. So if your hair, i mean your hair blowing back, it won't really be a problem, but you don't really have much to work with anyway. So i'm just gon na go ahead and put the wig on my head just to see how it fits. As you can see. My hair is freshly washed and cornrowed, and i have on my wig cap. Wig cap is optional if you want, but i really wanted to just get a feel of the wig, see where i would have it lace. If it's tight too big or what and just you know, i guess i generally to vibe and see how it is now. This wig is made of a heat resistant fiber and it's safe up to 400 degrees. Fahrenheit, and let me tell you this wig is long like really long like to my top of my butt long and i'm like 5 11.. So if you're shorter than me, you're gon na be feeling real fancy in this week. Okay, so, as i said, i just wanted to get a feel of it see how i'm feeling with this color um and i mean, even though summer is almost over, we can still we can still squeeze in a little vibrant color. Well, you know this can kind of work for fall too. You know if you're feeling spicy so yeah all right. So now that i have an idea of where i want the wig to lay i'm just gon na go ahead and clean up my hairline using some rubbing alcohol, regular alcohol, not in fancy just to get rid of the excess oils now this is this - is going To be interesting, because i don't really do like the glue method and i'm not doing the ball cap method, but we'll see so they sent me the safe bond lace glue. So this is gon na be interesting. As i said, i'm not really like a glue girl, but we can do this and also the lace glue remover and they also sent the lace glue, applicator, which i thought was pretty cool instead of using like a tongue depress or your finger. Okay. So i see this is how, like all the youtube girls do it. They do it in this dot motion and we're gon na. Do this in front of our hairline like remember, even though we're dealing with glue, we still want to save our edges. So don't do this on your hairline. Do this in front by the way the lace glue and the lace glue. Remover smells pretty good. It has like a fruity smell, which i liked and i'm just going to go ahead with the applicator or spreader or whatever. You call it and apply the first layer now the instruction says to like apply it and then wait until it gets clear and tacky, and then you can go ahead and apply the wig. But i did go in with about two more layers. So i have about three layers. I mean this is good if you want your wig to last, like a few days to a week, so yeah we're just gon na wait, apply and then wait until it gets clear. So now that it's gotten clear or well clear enough, i guess i i just really wanted to apply this wig, so i guess i could have waited a little bit longer, but i didn't want it to be too dry. So i'm just gon na go in go ahead and apply the wig, but oh my gosh. One thing i forgot to do was to color my lace. Remember. I said earlier that the lace was too light for my skin tone. I would have normally gone ahead with my foundation or, if you have a lacing spray of you, tint your lace, the good old, hard-working way to match your skin perfectly go ahead. But i don't know. I completely forgot that step and didn't realize until i saw that i had a white cast on my hairline, so make sure you go ahead and tint your lace, alright, so i'm just pulling the wig forward and then i'm just gon na press it gently onto where I applied the glue i'm trying to work carefully but work swiftly at the same time. If that makes sense. Yes, no, maybe so let me know if that makes sense and as you can see, i'm just gon na go ahead and like press it down. So i'm using like the base of the glue, applicator and just pressing the glue pressing, the wig, sorry down where i had applied the glue now guys. I am not an expert at this wig glue thing because i normally don't use glue, but we decided to give it a little try and see how it works this time. So now that i have that um glued down onto my hairline, i'm just going to pull my hair back and i'm going to go ahead and cut the lace into three separate pieces. I see all these like beauty, gurus doing that, and i just decided to take hype and go ahead and do the same thing, because i wanted to work on the lace section by section. Some people might do this step before some might do it after. I don't really think there's one right way to apply a wig um, but you're gon na get similar results. You know what i mean. Two plus two is four, and so it's three plus one right. So, whichever one works for you, so i realized the side of the wig, and i noticed i'm feeling, like a lot of people, usually have problems with the side. It didn't really stick as much as i wanted, so i'm just gon na go ahead and apply an extra layer of glue and have that dry down a little bit more and reapply it, but the center, where the part is stuck perfectly. So, as i said earlier, i'm just gon na go ahead and reapply the side. So you know looking back it's a good thing. I decided to cut it into those three sections, so i can work on each part separately and give it attention that it deserved and then just you know, kind of press it in and just have it lay flatter. So now i'm gon na go ahead and cut the excess lace off. So i tried my best not to cut this in a straight line. I kind of did it in like a up down zigzag method, because i noticed when you cut it in a straight line. It kind of gives you that, like dolly, look and just cut the lace as close as possible, then i'm gon na go in with my molding wrap, which i got from my beauty. Supply store and you know kind of hold use that to melt the lace. A little bit more, if you want to take it a step further, you can go ahead and use your blow dryer on some low heat, and you know blow it onto the area where you have the molding wrap or the lace glue down just to melt. The lace a little bit better, so i'm just gon na go in and cut some excess off of the sides, and then i did go in and cut some of the lace off over my ear. Like those ear flaps, i know i cannot be the only person who has a rough time with the ear pieces on my wigs, but i just went ahead and just cut those off. You know trying to lay this wig as best as i can and make it look presentable. I'M not a wig expert, i'm not tay, but we can do a little cutting. So i'm just gon na cut the lace a little bit more to my liking and it was at this moment. I realized. I forgot to tin my lace so now that i cut off like the excess. I'M just gon na go back to the front and cut a little bit closer, not too close, because you still want something for the glue to hold on to, but just a little bit closer, because my problem is sometimes i don't cut off enough lace and it One thing with synthetic wigs: the lace tends to be a little bit hard and it's it can get a little itchy. You know, and i don't like to that sensation feeling like. I have something like tight on my head, so i just want as little lace as possible so now, because someone didn't tint her lace before applying the wig to her head, i'm just going to go ahead and apply my foundation using my makeup brush to the part And to the lace just to blend it a little bit better, so i went ahead and grabbed my molding wrap again and tied it around the lace because i'm gon na re-melt the melts. If that makes sense, yes, no, maybe so i just wanted to make sure the lace was as melted as possible and looked. You know as seamless as i could possibly finish it and then i'm just gon na go ahead and rub the makeup. You know kind of blur it out a little bit with my finger. Just you know just so it doesn't look overly cakey. No, i personally prefer to use powder um instead of like the liquid makeup, because sometimes the liquid makeup can look cakey in the part but use what you have use whatever works for you and then, of course, i'm gon na pull the hair back and start ahead With my edges now, if you're not an edge person, you know - and you laid your lace properly, you don't need to do this part, but the hair came with baby hairs, but i'm just going to cut a little bit extra because i got a little lost in My maneuvering, but i'm just gon na cut the baby hairs and then i'm gon na lay them, and i use i like to use mousse to lay my edges because i don't know it gives it a more like. What'S that word, it doesn't have like the same harsh effect as when i use gel, sometimes i use gel, but for the purpose of this video i'm just going to go ahead and use mousse and lay the hair stone. Now, i'm not even going to be like fronting with you guys, but sometimes i'm doing these baby hairs and i look crazy. It looks crazy, but you know we trust the process. We trust the process and i just lay it down, and i just you know, use it to hide the lace a little bit anyway, that didn't maybe melt as well as i wanted it to just to cover it. If you use a edge brush toothbrush, fine tooth comb, whatever works for you, you just make it work, and you just swoop, and i like to sweep them into the hair. So removing the molding wrap we're gon na see what we're working with gon na start. Working with mine look a little crazy, but no worries we're on our way. So when i remove the molding wrap, i'm just i said whoa, that's probably exactly what i said when i removed it. I'M just gon na go ahead and take my edge brush and kind of you know play with the hairs a little bit loosen them up, so they have like a natural like flow instead of looking too pasted on to my forehead. If that makes sense, and then with this hair, the curls are a little bit too uniformed for me, so i just grabbed a wide tooth comb and i combed them all just a little bit. I didn't want it too big or too frizzy. I just comb them out just a little bit and it is synthetic, so i don't really think water would really do much for this hair, all right, beautiful people and we are done. This is the hair. This is what we're working with. As i said, it is extremely long right above my butt and i'm 5 11.. Oh, yes, she's long, all right! So this hair, it's very soft, very smooth it! Oh! As you can see it's blowing in the wind. This hair comes in a wide range of colors suitable for any personality from a 1b to your blonde check it out and get it from ebonyline.com. I also did a little shed test for this hair, and this is all the shedding i got. Definitely after i did my little comb, you know to juice it up a little bit, but it wasn't anything too too crazy. I mean curly. Hair does shed, as i'm sure we all know, all right, beautiful people. Thank you and never mind. I wanted to show you guys how the lace glue remover worked, so it came in this small spray bottle. So what i'm gon na do is just spray, the lace remover all on the lace right there at the front. All around you know anywhere. Where you put the glue, i mean lace, remover, glue yeah, so once i sprayed it, i just rubbed it in a little bit and then i gently lifted the lace off and it came off perfectly now. This lace, i'm gon na be honest, doesn't seem like the strongest on the market, but it is perfect for those who don't want such a harsh hold. You know what i mean if you're still a little skeptical with the glue, and you really like skirt for your edges. I think this glue would be good for you, because it's not extremely strong, where you know it don't move, but it gives you a good enough hole for a few days. So i'm just showing you what was left on the lace. Not all tourists did you grade for cleanup. Thank you guys so much for watching. Don'T forget to follow me on all socials at underscore underscore lindsay, beth and and follow ebonyline as well i'll leave their social links down below catch. You guys in the next video till next time, bye guys


Comments
alex tracey: Absolutely stunning
natilue: Is it me or does every hair style fit you
lorenz rowe: I need to share this video with my girlfriend. Great video
Brittanie Darrisaw: Whats the name of the lace glue and glue remover that you used?