How I Apply My Wigs|Melt Down Wig Glue
- Posted on 23 September, 2020
- Lace Front Wig
- By Anonymous
The review video will be posted on 29 Sept 2020. Subscribe and turn on your post notifications to be a part of the premiere!
Don't forget to Follow Me
My Blog: https://tayzlife/wixsite.com/tayzlife
Facebook: https://www.facebook.com/TayzWayOnYout...
Snapchat: TayzWay
Instagram: TayzWay
Twitter: TayzWayy
For business inquiries
Email.: [email protected]
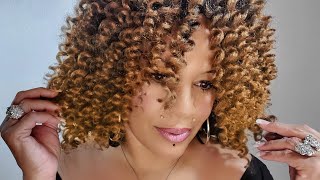
So much beauty in my brothers and sisters wait so much power. My brothers and sisters ate so much love for my brothers and sisters. What is up youtube nation? It'S your girl, tay, and i am back with yet another video or whatever. First and foremost, i'd like to thank my fam bam aka, my loyal subscribers aka, the type that got my back like cairo, prac y'all, know. I love y'all. 24. 7. 365. 366. In a leap year now, for those of you who may be new to the channel, whether i came up in your recommendations or a friend told a friend who told a friend who told you, let me help you find out how you become a carter, fan bam Too, it's not hard! You ain't got to get married, you don't have any kids real simple. All you got to do is hit that subscribe button, one time for the one time and once you're done there go ahead and slide a little bit over to the right and tap that notification bell that way. You'Re notified every time on time when i upload a video now that we got all that technical stuff out the way, let's talk about what we really hear shall we so today we are going to be talking about how i apply my lace, wigs using the meltdown Extreme hold lace wig glue in this tutorial, i'm going to tell you all the tools i use nothing, super fancy or high priced and how i do each step. Super quick super simple. I want to say it didn't. Take me more than 30 minutes to apply it and it bonded what feels like to me almost instantly, so just a sneak peek into the review. I'M all the way here for this product with that being said, however, if you're curious to see how i got this thing as snug as a bug in a rug check out my video. So i start by pinning all the hair around the perimeter back into the wig, because you don't want it falling into the adhesive while you're installing it i mean every baby hair sideburn, whatever it is, pin it back, then i'm just going to place the wig on My head and size it up cut it where i need to cut it, because i got a little peanut head y'all. My head is too big for the small size but too small for the medium size. So i just got to buy the medium and cut it up. That'S how i get the wig to lay perfectly because a ill-fitting wig can also mess with how well it bonds. Then i clean the perimeter in front of my hairline with alcohol pads. I use a new one each time, so i don't redistribute any of the dirt. So here's the glue next i'm going to show you. The waxing sticks that i use. These are not arts and craft sticks, nor are they popsicle sticks. Those sticks will splinter and you'll have pieces of wood in the glue. Trust me, i know so just pay the 20 bucks and get you 100 count waxing sticks and then you can have a bunch of sticks to apply your hook glue with now. I just take about a drop of glue literally and spread it about an inch across the stick, because you want to use a thin layer, so a little goes a long way and i'm just going to reposition my wig on my head. Now, if you are a amateur or noodle wigs whatever you want to call it, i recommend laying your wig and then using a makeup pencil. Maybe a lip liner or something like that to draw the outline of your wig and then place your glue behind the outline. If you're experienced like me, then you could do it this way. I just eyeballed it it's kind of like when you watch the elders cook in the kitchen and you notice that they don't use, not a measuring cup, a measuring spoon. They just dice it entice it slice it and go. That'S how i am with my wig. I pretty much lay it where i want to and then just lift it up and go from memory. I ain't saying it's the right way. I'M saying it works for me. If you decide to still do it this way and you make a mess, the cleanup during installation hands down the best i've seen across the board because, as you all could see, i got a little bit extra on my forehead, maybe my hand slipped. I don't know what was going on. Y'All see me just take that alcohol pad and wipe it off and it's clean, not oh, i smeared it and it got residue like my skin is clean. Now you see how quickly that this glue is drying y'all. This clip wasn't sped up. This is the normal speed. Y'All saw me just lay it and you see it dry and clear that fast, all right, so y'all are going to see me repeat what i did in the beginning of the video, where i just keep laying each let thin layer i'm going to do five of Each for each section - and i lay my wig in pieces because even though i'm confident in my application i still know i got like a funny shaped head. So i have to take my time because in the past, when i've tried to rush and do big sections, my lace ends up with wrinkles and it's just not a good time. So if i'm saying this is somebody with the experience, if you are new to this, you definitely want to do it in smaller sections. Now the forehead one's a little easier because it's one big shape, but when we start working the dips and grooves and curves of the hairline, i suggest you slow it down. Did i just really rock wait now you see me laying the wig but you're going to see me, lift it up. It hasn't quite bonded. Yet, thank goodness, so i have enough time to fix it and i'm actually glad that this happened. So i could show you all on camera. A lot of youtubers show you the afterthought where it looks perfect and then you're sitting at home and the minute you mess up. You feel like. Oh, i can't do it because i'm having trouble already i'ma show y'all what it's really hitting for. So i have relayed this week, probably about three or four times my glue still looks nice. It doesn't look like it's been attached and ripped up, and you all know what that looks like, but it doesn't look like that, which means i still have time to correct it notice, i'm being very gentle. Remember those wrinkles i was talking about when you don't lay your wig properly there. It is so you're gon na see me gently, lift the wig and fix it, because i just want to make sure i don't rip the layers of adhesive up. If i go to tug it and it feels like it's sealed tight, i'm going to just leave it and figure it out. So that's why i'm being very gentle and i'm taking my time and i look focused because i want to make sure i'm not going to mess with the glue's ability to bond. Also, what i forgot to mention in the beginning clean your hands, especially your fingertips with alcohol, because your skin naturally carries oil oil lint gel. All of that stuff can interfere with how well your glue works. So if your tools are dirty, your hands are dirty. Your perimeter is dirty. Your glue is probably not going to work, and if it works, it's probably not going to work as good as it normally could, because all of that stuff interferes so make sure you consider that when you're doing your install, keep everything clean and free from oils and Stuff like that, as you can now see, that's what i get for being fast. I tried to do it without outlining my wig, which i don't do anyway, but i ended up leaving like a little widow's peak of wig out so now. So this is just a different angle. You'Re going to see me applying glue to the sides of my hand, up close just to give you a different view, and i'm also even going to show you how much glue i put on the stick before i spread it. Just to give you an idea like i said, it's really just a drop and, as you saw in some of the other clips, i don't even use all of the glue on that, because you want your layers to be thin. This portion of the video is a hundred percent optional, i'm just separating the hair that i plan to swoop once i'm styling it i like to do it before i tie the hair down, which is the final step in the bonding process. You tie it down for 10 minutes. I end up tying it down for the rest of the day if i'm not going anywhere or as long as i can before i style it so, like i said, i'm separating my edges through my wig before i tie it down so that it kind of naturally Trains them to lay forward versus backward and as y'all saw, that bottom lip come out is because i forgot to lay down the sideburn. So now i got ta cut it and then lay down what's left, but i'll do that off camera. So after i get the wig bonded, i take and trim the hair that i've pulled out for my edges, so that again i can train it and it'll be less work for me in the end, so i tie my hair first with a wrap strip. You can get it from any beauty supply store. I take and lay that down because it collects the excess glue and it secures the bond without interfering, like scarves sometimes can leave fibers and lint balls and all that other stuff. So i always do a wrap strip. First then, once i lay my wrap strip down, i cover it with my satin scarf now. The directions on here say 10 minutes, but i ended up bonding mine for about two hours, because i wasn't doing anything special, hey, y'all, hey if you've gotten this far. That means you watch the entire application. I just want to say thank you all so much in advance. I don't just want to tell you. Thank you. I want to show you how grateful i am, and i'm asking that you do me this solid since i'm about to come out of pocket. You smell me: get this video to 200 likes or get 200 butterfly emojis in the comment section now it can only be one butterfly per person, but how do you get to 200 butterflies dante share it get your people to come. Watch it your boyfriend, your girlfriend, your homeboy, your homegirl, your side, piece, your main piece tell them to come check it out and comment down below and don't just leave a butterfly. Tell me what you think and if you've already tried the product go ahead and put that down there now, once i reach 200, either 200 likes or 200 butterflies. Remember only one butterfly per person. I am going to send you your very own bottle of meltdown glue. I'M going to do a video where i randomly pick the winner and then i'm going to hit you up for your contact information. So i can place the order and get it out to you and that's my way of saying. Thank you. If you're a youtuber - and you happen to win, feel free to hit me up for a collab now outside of that part, what i'm going to do is in a week i'm going to do a follow-up, video and tell y'all how it's been holding up during that Week, i'm gon na exercise in it, i'm a shower in it because it's supposed to be waterproof and humidity proof and i'm gon na tell y'all what it's really hitting for. So if you haven't already make sure you hit that subscribe button so next week, you know when the follow up is posted, thank y'all. So much for watching. I love y'all for free, don't forget to check out my hair loss, video and i hope you all have an amazing day. Peace. You


Comments
Tairon Holloway: I love this glue . I use to use bold hold active snd haven’t went back .! You did a good job girl .! Yo hair look really natural
Ava Gardner: I can’t wait to use this glue.
Crystal Wilson: This looks so good! Can you add the link for the wig and the glue? I’ve been wanting to try a wig for the longest
Amina Rose: Thanks so much can't wait to try this myself
Lindsay Erin: I’ve heard about this glue from someone else & they said they loved it, I haven’t tried it yet.
Jilli Woo: my stylist recently used this and I love it
HairKittyKitty [CysterWigs]: Love that you showed the entire process!! Not too many people show their mistakes on here, but it's so helpful to everyone on their wig journeys to see that it takes practice and TIME. Keep being great!
Keiis Planned Lyfe: Your hair looks so pretty i prefer the gluless because I be so busy but you installed that so good thanks for sharing
Avah Luna: I’m about to use the glue right now as we speak
Norma Kerr: Luv it TayzWay. Thanks.
Barbara Nelson: I want this glue
Chlora Mcpherson: Beautiful check this out friends