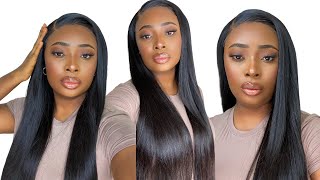
Ultimate Melt Step By Step| 5X5 Closure Wig Install For Beginners|Alipearl Hair
- Posted on 28 February, 2022
- Lace Front Wig
- By Anonymous
Hope you guys enjoy this video products are listed below! Be sure to comment like & SUBSCRIBE! Follow me on IG @_KikiAdams
Shop Now➤https://bit.ly/3qqeAEk
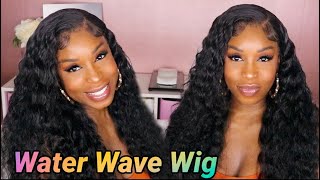
Hair Info: 26inch deep wave 5*5 HD lace closure wig 200% density
❤#AlipearlHair Official Store:➤https://bit.ly/3zXPZdb
1.Join FB Group, Win FREE HAIR➤https://bit.ly/3fqOF9g
2.Lace Front Wigs for Sale!➤https://bit.ly/3zW2fLs
3.Invisible HD Swiss Lace Wigs:➤https://bit.ly/3qnSlz0
#alipearlhairwig #alipearldeepwavehair #alipearlhdlacewig
Instagram @alipearl_hair: https://bit.ly/34I3Oyd
Youtube @Ali Pearl Hair: http://bit.ly/2H0Gmmc
Facebook @Ali Pearl Hair: https://bit.ly/3aKwxX3
WhatsApp: +86 15890076489 E-mail: [email protected]
Five Products that'll ensure a clean and flawless install.
1. https://erickajproducts.com/collection...
2. https://erickajproducts.com/collection...
3.https://erickajproducts.com/collection...
4. https://www.imaslayyobae.com/collectio...
5.https://www.amazon.com/Head-TIGI-Hairs...
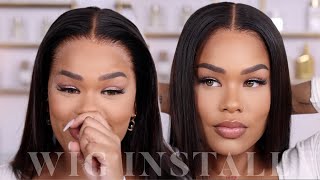
Hi guys so before we jump into the tutorial, i just want to lay down a few tips that i do that really help me when it comes to doing my hair. First thing you want to do is tint your lace before you apply it using a lace spray. You want to use a cap close to your skin tone or darker align your wig properly. You do not want your closure to be too low; it makes it look. Super wiggy and you want to pluck the closure while it's on your head, so you can see exactly what it will look like on you, okay, so i wanted to show you guys what it looks like when i have one of those light caps on to me. It just doesn't work for my skin tone. It doesn't look the most natural and you can tell there's a cap underneath so i like to go in with a a cap. That'S either my skin tone or just slightly darker and, as you can see it doesn't look like i have a cap on at all. All i'm doing is a side part. So i'm going to part the side, i'm going to do a little part in the back, and i'm just going to use my hot comb to help me mold that i don't like to use any um hair wax or anything like that. It just makes the hair look greasy and too heavy for me, so i just like to go in with this bed head hard head spray to help me in the styling process. I'M going to spray it apart down once i've hot combed it and i'm just going to take a plain old brush and i'm just going to comb those hairs into place, making sure i'm pressing everything down and getting it nice and flat. I did want to do a curved um side part, but the 4x4 um closure just wasn't giving me enough space um for the curve, which is totally fine. The straight part still looked really good, so i'm just going to take out a small section for some baby hairs, i'm just doing one swoop and i'm going to just twist it up and i'm going to start plucking. So, on this side, that's like parted, like the opposite of the side, part i'm going to pluck this um kind of a lot not too much. I just want to open up that space more, so you can see quote unquote scout peeking through and on the other side, i'm just going to go into sections and just pluck i'm not plucking too much because for this hairstyle, like i just didn't, feel like it Was necessary to do like a lot of plucking? I just want little pieces of the lace to show so that it'll imitate scalp peeking through so once i'm done with the plucking i like to go in and kind of see where i'm going to place. My wig just to line it up um on my head and i take an eyeliner pencil which is green. I need to stop using this pencil um. I'M gon na just take a pencil and map out where i'm going to be applying my glue, then i'm going to go in with my erica j hold me down spray. This is just a for skin protectant spray to protect your hair and your skin from the glue, and i just let that air dry don't wipe it off or anything like that. I pull my cap down because it kind of slides back a little bit while you're doing all the pulling and tugging i pull it down in the front um. I slide it back just right after my hairline and then before i even pick up my glue, i'm going to make sure the wig is lining up where i want it to line up. So i'm going to go back to where i put that line slide. My wig down and kind of look to see if that's really where i want it because sometimes we're wrong and we have to go back and i actually decided that the wig was a little bit too low and i wanted it to sit a little bit higher. I feel like the lower you place your closures, the more wiggy. It will look like even more wiggy than a frontal like it'll look you're already limited, so you want it to look even more natural than a frontal right. So i made my new line. It was about a half an inch back, so that's a good amount of space shot that wig was about to be too low. I'M going to take my erica j glue and i'm going to do three thin layers. So for me, when i do my hair, usually the first layer is the thickest layer and then i just lightly add on and i do like to use the popsicle stick, just basics. It works. I prefer over my finger. I prefer over mostly everything. It just gets. The glue nice and flat y'all, like nothing else, so i'm just applying that in front of my hairline as you can see, i'm not applying the glue on my hairline and i'm not pushing the glue back into my hairline if it gets on my little fine hairs. That'S okay, but i am leaving a space between the glue and my hairline once that first layer is dried. I go in with a q-tip and some alcohol to remove that eyeliner pencil once that's cleaned off. I go in with my second and third layers, and you want to make sure it looks like this. It should look clean and it should be super clear. Your layer of glue should be super thin so that you don't have any issues when you go in to apply your additional layers and i like to kind of smooth it out until it dries - and this is the third and final layer that i'm doing for this Install typically, i do just do three layers. Typically, i do just do three layers depending on you know where i'm going, but i'm not going anywhere child. So three layers gon na, do and it's a dead of winter. So once that's nice and dry, i'm going to slide my wig down when you slide your wig down, be sure not to press it in it's kind of hard to try not to press it in. But you want to make sure that the wig is laying exactly where you want to lay it so that you can easily readjust with no problems. I'M going to slightly pull my wig down just a little bit, mainly in the center. I just i don't want the wig to be even across so for this install i'm going to have the center um the front kind of be lower than the sides. Now i'm just going to take my comb and start pressing the lace into my skin. So this is probably the most tedious part of your install you're going to just go in and apply extra glue on pieces of blades that you feel like should still be on your head, so pieces of lace that you don't want to cut off because it'll make The install look funny, then you want to always cut off these little tabs that come on the sides of your closure. It just helps the lace lay down flatter you're, going to tie up your hair with an elastic band. Once this is tied up, i'm just going to style my hair, i'm going to wet it, hit it with some move and then i'm just going to start working on my parts. So i'm just parting out those hairs that are sitting in the middle of my part and i'm literally going to just pull it out from the root. Now then, i'm just going to go in with a little bit of makeup, and this color is really close to my natural skin tone. Um, i just feel like every install doesn't need a light part. I don't really like light parts anyway on my skin tone and then i'm just going to go in with this um root touch up products, i'll link it down below, but you can use any root touch up. It'Ll have a little brush on it. I'M just going to use this to go in and close my part up just a little bit. I don't like those super skinny straight neat parts because i feel like it doesn't look natural and it's a dead giveaway that you're wearing a wig. So i like to close my part up just a little bit um, just because, like on my natural hair, when i put my hair, it's not like super straight and super skinny. So i'm just trying to imitate what i see when i would naturally part my hair once i have that product on i'm just going to brush it through and blow dry it, because this is a product, that's um! You know you're supposed to like rinse it out, but we're not rinsing it out. You know we got ta, improvise and finesse, so once i blow dry it i go in with the hot comb. You just want to make sure that you're drying the product through and through so there's no transferring and there's not like a wet look around your part. It looks weird trust me. I'Ve been there done that, so all i'm doing is just combing a product heating. It up setting it with the spray and that's it y'all, once i'm done with that. That was about 30 minutes um i go in and i remove the elastic bands. I'M gon na just go in with my razor and do a jacket cut straight across. It may look like i'm doing a straight cut, but i'm not i'm kind of bouncing my razor up and down. So there's not a steady and straight part, and i'm also tugging on the lace i'm tucking downwards, so that the edges of the lace um, once they're being cut, is being cut like real jagged, like not straight. So that's how i do it and it helps me when i'm cutting my lace, i'm just going to take a little bit of the bed head spray onto my fingers and just press it onto the edges of the lace. It helps the um. It just helps the lace blend into your skin, even more for whatever areas that may need more glue. You'Re just going to use one of your fingers to pull the lace up, apply your glue and then once it dries. You can just press it on down. If your lace isn't glued down to your skin, whether you're using a spray or a glue, you will see the lace i just did like some random baby hairs on the side. Nothing special at all um wrap my hair, and then i went in with my lace. Tint and sprayed over the top of my lace, i'm sorry! I didn't get that on camera. I didn't realize that my camera wasn't a recording and then, since we're working with the 4x4 - and i did a side part, a little piece of that um last track is um is showing so i'm just going to take a little bit of foam and i'm going To take the hair from the unit and kind of swoop it over that a little piece of track, that's showing just a little finesse tab just so that in person like you, don't see that track or like when the wind blow, there's there's nothing being revealed. Okay and i just wrap my head and yeah - i let it air dry. While i did my makeup and everything like that, this is what it's looking like. I'M just finishing up my makeup here. It looks uh all nice and shiny because i used the hair oil by the brand melanin and yeah. This is the finished. Look i'll have all the information linked down below on this bomb wig. This is my new favorite curly wig, you guys, ah chef's kiss. I will catch you guys in the next video bye, bye,

Comments
Ali Pearl Hair: FLAWLESS Install! You are so pretty in this wig. Thanks for your video~
AndUDon'tStopYo: Wow, this look came out so beautiful Kiki
kellegeez: Good work! If you only have light caps available you can darken your cap with foundation. Works like a charm!
Ishaiah Baker: I love it ❤️
Tanya Petersen: How gorgeous. Ok love you and your slay, Kiki.
Serene Beauty / kimmy: Beautiful Kiki ❤️
Re Re: Do you have your loose glitters back in stock?
Daniella Humphrey: Looks amazing, however I am desperately awaiting an updated MAKEUP Kit video .
Born Nikkii: This is So Fye ❤️
Grace Blay: Yeah its giving closures from here on out
Chelsy Williams: LOVE THISAND MISS THE MAKEUP VIDS SO BAD BOO
Lefa Kobe: Beautiful
NiqBeat: More makeup pleaseee!
ANewMe33: I never understood why press out roots.... Of a curly wig♀️♀️♀️♀️
Indra Taylor: ❤️