How I Make My Lace Front Wigs Look Natural | Affordable $20 Hair
- Posted on 11 December, 2016
- Lace Front Wig
- By Anonymous
Subscribe HERE: http://bit.ly/2bgYhFJ
DON'T FORGET TO "LIKE" and SHARE!!!
Did you watch my previous video??? Click HERE: https://youtu.be/CxNOuDs74po
**Get Paid to Shop Online!!! You MUST use EBates. It's TOTALLY FREE!!! They give you a FREE $10 GIFT CARD just for signing up! Use the link HERE: http://bit.ly/2b8NP2H
**Sign Up For Hautelook HERE: http://bit.ly/2aKKNw9
-I am not affiliated with HauteLook, I just really love the site!
**Join MorpheMe HERE: http://bit.ly/2bgZbCm
**Ipsy Link: http://bit.ly/2b8NahT
**Business Inquires: [email protected]
**If you are still reading this, You're the real MVP! #DBFAM down below! It will be our secret!
**Purchase Blushing Bundles Hair HERE: http://blushingbundle.myshopify.com/?g...
**Watch My Previous Videos:
-Updated Makeup Collection Part 1:
-Updated Makeup Collection Part 2:
-How I Clean My Brushes For .97 Cents???:
-Easy Naked 2 Palette Tutorial:
*Check out my BLOG:
http://yvetteluvsbeauty.blogspot.com
*Connect With Me:
Instagram: yvetteluvsbeauty
Facebook: YvetteLuvsBeauty
My Fitness Pal: YvetteLuvsBeauty
Snapchat: YvetteB1
Twitter: ccyvette
**I Got A P.O. Box!
Camillia - YvetteLuvsBeauty
PO Box 23042
Euclid, OH 44123-0042
**Equipment I Use:
Camera: http://amzn.to/29kqAjl
Lenses: 35mm: http://amzn.to/29gWsmZ, 24mm: http://amzn.to/29lgLTz, 50mm: http://amzn.to/29o5VLv, 40mm: http://amzn.to/29o69T6
Ring Light: http://amzn.to/29krmwB
Soft Boxes: http://amzn.to/29eQdyJ
Thanks for all of your love and support:)
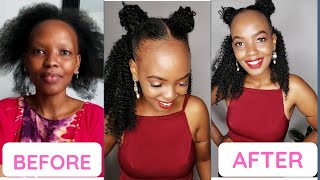
Hey guys Stacey back with another video, and today's video is actually a different one. For me, I am going to do a quick little wig ravu feel, and I'm also going to show you guys how I apply it. My lace front, wigs. Okay, so if you didn't know - and you thought all this luscious pneus with my her ah my hair - is not blue, okay. Yes, this is a way for in this video. Again, i'm going to show you guys how I actually apply my lace front wigs. So you guys can see how I put this bad boy on and how I try to make the parting look a bit more natural as well. I'M not a pro at wigs. I actually just started wearing them, but i am enjoying the ride so much because I just love switching up my looks switching up my style, and I still do that, however, buy wigs just so much easier honey and this is synthetic care. So, of course, the wig isn't going to last as long as, if you buy virgin hair and make your own way. However, the wigs are fairly cheap, they're, like 20 bucks, so I can definitely wear a wig for a couple of months for twenty bucks and then buy another one. If I really like it or buy a different style, but before we get started, let me introduce myself. My name is CC for all of you who do not know. Thank you so much for joining me. If you are brand new to my channel, do not forget to subscribe and also click that thumbs up button for the video. I would totally appreciate it, and you also want to subscribe just to make sure that you get all the notifications for all of my videos. You never want to miss an upload for all of you who are not new to my channel. Thank you so much for joining me high on do it and let's go ahead and jump into the wig review. Aren'T you guys so I look look crazy. So don't judge me, but here is the wig. This is the sensational taraji wig, and this is what it looks like. I have it in the color dark, blue and it's just so gorgeous. That'S how it looks alright. So here is the parting, and this is a lace wig, not a full lace, wig, but just a lace front wig. So there is lace going all around the hairline and also lace in the parting to make it look natural. So there was access lace going around the hairline, but of course I've already warned this wig. So I've already cut that lace off. If you guys want to see a video where I pull the wig out of the pack and how I tweaked it from start to finish, then I can do a video like that. Just give this video a thumbs up and let me know down below, but for this video. This is just how I put all my wigs on an everyday basis. So when I first got the wig, I tweeze it apart and just opened it up a little bit. So, as you can see, it's just a straight line, the straight lines: don't really look as natural as they could even this wig I could have probably tweezed it a little more. I was just in a rush when I first did it and I've never went back to to tweak it, but, like I said, even this week could have been plucked a little more. But that's how the party looks. These waves also come with columns and adjustable straps. So this one comes with two combs. If you can kind of see inside of there, there is one comb right here so on the right side, I'm sorry on the left side of the wig and then there's one comb here in the back and then the straps. Also adjust to to give you a nice snug fit so your way again going nowhere. I don't care if it's windy. If you get to a fight, I don't know about that, but uh. If the 2007, your wig, is not going anywhere so putting the wig on. What I do is I make sure I prep here I make it as flat as possible. I do not know how to cornrow. So what I do is twist my hair and the two strand twists and I twist them they're pretty big in the back and then they're a lot smaller coming toward the front. I probably have about eight or nine twist something like that in my hair, all together and I'll make sure they get smaller in the front, and then I just kind of pinned them down and put on this way cap. So I'm not taking this weekend off y'all. Okay, y'all see me in my week after I check it out, but um. There is just two strand twist it under here. If you can quarrel, that's great, but just get your hair as flat as possible. Another tip is that I make sure where I want my part to be in the wig so where I want my part to sit and make sure that my hair has a little opening there as well all right I'll, just brought y'all in a bit closer. So for me I will look. I love my part to sit on my left side so I'll make sure that there is an opening on my left side, where I want the part to sit. So I want the part to sit right there. So that's where I need it to be, so I just make sure I'll part, my hair up until the weekend yeah. I see that so now, it's time to go ahead and apply the wig. I just take it and I line that part up pull the back down. I don't put the call man yet not until I have the wig adjust it to the place that I want it to go, and I find the part put the wig there and when it looks like it's in the right spot, which it does. I go ahead and I put the combs in and adjust the straps if you need to adjust the straps okay, so a lot of people when they wear their wig, I see them kind of wearing it like this. No hair left out of the hairline. This looks very, very unnatural to me. There'S no hair left out up here and it just looks very unnatural to me. I feel like that. You looks like a wig. This looks like a wig, but if you just adjust that wig slightly behind your hairline, so what I do, I take a comb again make that part and adjust it just slightly very slightly behind your hairline. It makes a huge difference. I haven't even done the adjusting and look. It already makes such a big difference just from sliding it back like a half an inch. Look at that and you're not really leaving hair out it's just your hairline, that's sitting there. So we have that hair out. Now, of course, we need to do something with it. You want to leave a little bit out in the front rack right here and then, of course, you want to leave some out like at the park and again that just makes it look so much more natural. Just that one little step, so if your edges look like my and you need a sh control, this is the time that I put on edge control, i'm using the me o organics, pure simple and natural, flexible edge control. I'Ve been using this for a while, and I absolutely love it different freaked out Eddie and, like I told you guys already, I already tweezed a bit and widen out the part a little bit. It can still be riding a little bit more, but I feel like this looks okay, so, as you can see it blends quite well, but just to get it blend in even more we're going to use a little bit of concealer. Now you can use concealer. You can use eyeshadow whatever you want anything, that's your skin tone you can use I'm taking my. This is the bare minerals, concealer and I just have a little angled brush here. I just dip it in there and i'll. Take the concealer and add it to the part you and, of course you want enough in a blend, and that's really it you guys if you need to style your wig anymore. If you need to curl it, you can go ahead and do that at this time. But that's really it this week is so good. It keeps the curls, and I mean honestly, I can just shake it and the curls pop back into place. So that's another reason. I love this wig because it's super low maintenance, but that is it. That'S my whole tutorial, like i said, if you guys want to see me to take a wig out of the pack and kind of take it from there, then i can do that video for you to let me know down below, but other than that. I think we are done here so again, don't forget to comment rate and subscribe to this channel and also don't forget to follow me on my social medias, my snapchat, my facebooking off on my Instagram they're, always listed below in the description box. I love you guys. So so much thank you so much for watching and I'll talk to you in the next video bye, guys.


Comments
Johnnel Adderley: Fantastic video CC and the wig is so cute!!!
XxxLoveBrokencydeXxx: Yes I would like to see how you prepare the wig fresh out the packet. I love your videos btw!!!
Medeaij: Great tips babe, this wig suits you so much