Pluck A No Baby Hair Natural Hairline | Step By Step Extremely Detailed | Hairvivi.Com Lovelybryana
- Posted on 02 February, 2019
- Lace Front Wig
- By Anonymous
Twitter/IG/Snap: @LovelyBryana
Hi loves. So its been a minute since I actually did a step by step plucking video for you guys so I finally updated it! And it's a no baby hair slay!!!
⬇️⬇️⬇️ HAIRVIVI ⬇️⬇️⬇️
Link to hair: https://www.hairvivi.com/kim-luxe-curl...
30% OFF New Year Holiday sale code: NY
Ends 11st
15$ code (permanent): Bryana
5.5” lace front wigs: https://www.hairvivi.com/wigs/lace-fro...
360 lace wigs: https://www.hairvivi.com/wigs/360-lace...
Hair Length: 20 Inches
Hair Density: 150%
Hair Color: Natural Color
Hair type: Indian virgin hair
Part Length: 5.5 Inches
Lace Color: light Brown
Cap Constructions: glueless lace front wig
Cap Size: Medium
Follow Hairvivi on Social Media:
Instagram: https://www.instagram.com/hairvivicom/...
YouTube: https://www.youtube.com/channel/UCWK7...
Facebook: https://www.facebook.com/hairvivicom/
Pinterest: https://www.pinterest.com/hairvivi/
Products
Wig Grip - https://amzn.to/2W8mOjh
Wig Stand - https://amzn.to/2W8mFfJ
Wig Head - https://amzn.to/2TbZMGg
Scissors/ Shears - https://amzn.to/2RT00F9
Tweezers - https://amzn.to/2CCfW54
Got 2B Glue Freeze Spray - https://amzn.to/2BiTm1G
Clear Got 2b Glue (Black tube) - https://amzn.to/2Q8viXA
Conair Infiniti Pro BlowDryer - https://amzn.to/2DxWd8z
LovelyB's Edge Control - AmazonPrime https://amzn.to/2QaGZNr or www.LovelyBs.com (Also Amazon Canada)
Sephora Foundation Powder - Golden Almond - https://go.magik.ly/ml/kwtr/
FTC disclosure: This post or video contains affiliate links, which means I may receive a commission for purchases made through my links
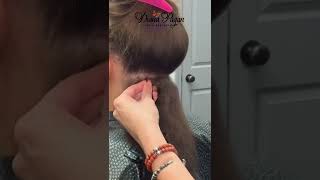
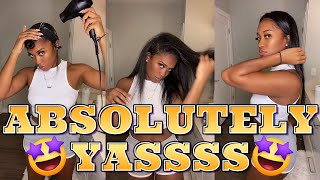
I love welcome back to my channel, so today I get to share with you guys all of my secrets on how I get my wigs to look natural. Okay, like super real, if you guys don't watching my last few videos - and you guys know that I am getting really good at this - okay and the wig that I'm going to be using today is from here Vivi calm. You know here Vivi, if you watch my videos and you know that's one of my favorite hair companies. I work with them a lot and they actually listen to us when we give them like feedback stuff. Sorry, I'm kicking boxes and stuff um, so yeah. The way that I'm gon na be using is from here Vivi. You know their units come pre plucked, they come bleached and the hair line. The shape of the hair line is like bomb, okay um. So this is what the unit is looking like. This unit is Kim and I have all the details, all the specs tool into density, coupon codes, everything you need about this unit down below and she comes with the adjustable straps again she is bleached already. So if you were scared to bleach the knots that hair Vivi is for you because they do do that - and this is what the hairline looks like fresh out of the packaging. So they do come free plus, but they're not like super pre plug, which is what I'm going to do and what I'm going to share with you guys today. So the wick hair and stand anything that I use. I always leave it down below in description box or try to remember to leave it down below in the description box. So if you ever see anything that I'm using and you're curious about it and wan na get it um, then just check the description box down below and if it's not in there, then just message me. Hopefully I see it and I'll put it in there. For you guys, okay, so now that we your odds UN's in I can go ahead and get started. If I have a middle part on the wig, I like to go ahead and line up the part with the middle of the canvas head, and it has a little indented line right here that I like to line it up with just so. I make sure that it's even on both sides and because you know like the temple areas right here - tend to be a little bit thinner for most people. And so I want to make sure that I'm thinning out the right part of the unit like this. And when it's centered, I know exactly which parts I have to thin out and which parts I don't um. So this is what the wig is looking like. So far, it's already bleached. So that's done, for I self thing that I'm going to do is I'm gon na go ahead and wet it a bit just with a spray bottle and just kind of comb, the hair back out of the way. So once I have everything brushed back, I go ahead and I go back about maybe till about right here, maybe about inch and a half on the entire front of the unit. So this is about how much hair you want to begin with. Plugging. Oh, this step is to actually get rid of some of the bulkiness in the front of the unit. It'S not really gon na thin it out too much in the hairline area, but it is going to make the unit lay flatter overall, once everything is done. This is what we have and then we're just going to start plucking right here. First so go ahead and take a clip and get this hair out of the way and then we're going to start plucking. So we're going to basically just thin this out. We don't want to create ball spots. We just want to widen the gap a little bit and you're just going the easiest way that I can explain it is to pluck every other piece like this, so you kind of create that wave like that. So that's what I'm going to start doing and just plucking a few hairs at a time and you're going to slowly start to see the part opening up a step further and start to pluck this portion of the hair same style. So in the beginning of the video I didn't have a bra on you guys and when I zoomed in you could kind of see my nipples a bit. So I cut a bra to put on under this shirt and it's kind of showing the entire time. So my bad y'all, if you feel like that part, is wide enough in a bit thin out. You can go ahead and we can work on the next section. So now we're gon na move up about maybe a centimeter. So a really small amount, just a thin part. You want to do I'm trying to give you guys the best angle start and they were going to do the same thing, and this is where I'm starting and just part out a small amount of hair like so. This is going to get brushed back now in the front piece out of the way, a little bit more water just to get things just to get the hair too slick all back and then we're going to do the same exact thing. And then now you see the part was kind of straight at first now it looks a little bit more zigzag and the part is wider. Now we're going to do the exact same thing, basically until we work our way up to the front of the unit, so that step is complete, and now I could show you guys what it looks like. This is the side we just worked on and then I'm going to show you guys how it came again just so you can kind of get a side-by-side and see again that this part is not to really do the hairline in the front. Yet it's just to kind of get the hair to be a bit more thin and to get the transition to be a bit more smooth, okay, so now that we thinned it out going back so far now we can work on this area right here. So this is the temple area and if your hairline is like mine, that you know that this is a little bit more thinned out, I'm going to start back here like I'm not going to start in front of the hairline, I'm going to start a little bit Back and just pull random hairs like I'm, not keeping the tweezers in the same spot for too long, because I don't want to keep plucking the same spot and you want to make sure you're constantly combing it back. Because when you call me back, you can see exactly what you plucked and exactly what areas are still like, clumped together and you just want to thin up thin out the clumps. So now we're working with something like this, and if you can see it, this area is a bit more thinned out now and this side as well. And then, if you get to the front - and it looks a little too full as well right here - you can kind of see like the line where it starts to get thick again. So if you see that line where it starts to get thick, how it's thin thin thin thin thin and it starts getting full once it starts getting full. This is where you want to start plucking. You want to leave this alone now, and you want to start plucking where it starts to get full, and you do the same thing that you did to this patch, where you kind of just pull the hair back, and you can even like go as far as Opening it up a bit and kind of just randomly pulling hairs just to get rid of that thick line that you kind of see or it looks like. Oh it was it's not plucked right there anymore. You just want to kind of pull that back again make sure you're combing it so that you get a good view of what it looks like again. You don't want to keep the tweezers in the same spot for too long. You just want to be able to move it around, so this is just a quick comparison, video to show you guys what it looks like once I'm done plucking compared to what it was in the beginning. It'S all about preference, you guys you can pluck more or less than I did, but you don't have to pluck that much to get a natural look and you do have to remember that the areas that you are creating the spaces with will expose lace. This is what the hairline looks like so far and then to take it a step further. What you want to do is you want to pull out literally like the first row of hairs, so I broke this. This will be ideal because it's so tiny, but you just want to pull out. Usually these are the baby hairs that they have for you and you have those hairs for it. You want to take some lotta body because we want everything to stay in place, because I want to tie it down for a bit so kind of slip, those hairs down in the front and push these back. Okay. Now it's been a few minutes. I can go ahead and take it off, it should be nice and set, and now we can cut the lace and I'm going to cut right behind the hairs that I pull it out. So these hairs I'm cutting off so literally cutting okay. Now so I am back, I applied the unit off camera just to save a little time because I figured it would be kind of a long video already, and I have hella video showing you guys how I apply my units with different different adhesives um. So I'll go ahead and leave some down below for you guys, if you guys want to check that out, but y'all get into this lace like what I'm assuming y'all it in a second um but yeah. I went ahead and applied the lace off camera and then I went ahead and put a few rata curls in and using my biggest rod it's in the bathroom, because that's why I put it on um and yeah. This is what the unit looks like this hair. Y'All is like amazing: no, you guys see it when it was wet and then I let it air dry kind of a little bit. It was still kind of damp when I did it and I just took a little, but I know I just took a few pieces like random pieces throughout the unit and just hit it with the wand curl. Just because I'm just such a fan of body wave um - and I just love the way it looks, even though this looks really pretty so this is what it looks like okay. So this unit is really long. If you guys can see I'm five five and it comes like, if I put it, it will probably come to like almost my waist um, but this is what it looks like SuperDuper soft like hose a curl. Well, even when it was wet, it was still holding the pure yes, so I'm really happy with the way this turned out super laying right now, so my makeup probably looks a little bit like its melting off and that's because it is I've been having my makeup On for hours now - and I have to clean in my forehead to apply the lace, so you guys might see like a little separation of no makeup makeup happening right here, but that's okay, because this looked like it is in my hair. Okay, so let me go ahead and zoom you guys in now, so you guys can get a close-up of this beautiful hairline and look how flat it is like what this this is. My hair, I'm taking this to New Orleans, I okay. So this is what the hairline looks like super duper like melted, y'all like honey. You can't tell me, and then I missed this side up a little bit by the ear tab, but that is okay, but this is what it looks like supernatural. No baby here is because I know you guys have been loving the no baby air look lately and so have. I surprisingly, because I used to like to cover like a little bit of the lace up with the baby here, but that's before. I knew how to really milk it y'all and I've really been practicing and it's really starting to pay off and I'm so far happy I'm not a professional. You guys know that, but I practice a lot and I think I kind of got it down back now. So yeah, if you guys, have any suggestions, any videos, you want to see any tips or questions you have about units that you want me to make a video on. I'M go ahead and leave them down below and I'll be more than happy to make a video for you guys. If I know what I'm doing, I meant to tell you guys that, if you purchase from like this point on from here Vivi, your unit will come like this, like when I told you guys in the beginning that they really listen to us, I'm so serious and They really listen to us on. A lot of us have been telling them that we needed the unions to be a little bit more free plucked because they just it just wasn't enough. You know, and everybody that was revealing them was still plucking them more. So if you order a unit specifically this unit for sure the unit is going to come like this, you will not have to do all that that I did. That is just for anyone who has an oh, you need that they want to do or unit for another company, maybe that they want to do or just something that they want to learn how to breathe like a unit or not pre plug, but how to plug A unit then this video is for you guys for sure. I think that's it guys, so I hope you guys enjoyed this video. I hope it really helps somebody out there. I love you guys, and I will see you in my next one


Comments
stan: Finally a hairline tutorial where the hairline doesn’t look like the wig has alopecia
Victoria Cavil: You’re untouchable when it comes to natural frontals
Reina B: this is so natural and not overplucked. tysm for this!!
F O O D R E V O L U T I O N: MAN this looks good and natural! And this helped me SO much! I’m finally ready to give it a try on my own.
This Ain't What You Want Period Poo: You make this so easy to do keep up the great tutorials the company must have design this hair with you in the mind
Kameron Allen: this was a great tutorial and super helpful! Can you please do a detailed tutorial on how you melt your edges with no baby hair?
Kyla Collins: This is the best tutorial on YT! Thanks to you my wig is looking so bomb but natural.
Shereese Richardson: so informative, best plucking tutorial out here HANDS DOWN!
Nikki: Thank you thank you!!! I couldn’t figure out the art of plucking until this video. TYSM for explaining this the way you did!
KENNEDY MEYERS TV: This length is soo flattering! You look amazing
Alexandria Henry: Very detailed. Loved how you showed all steps. Looks good!
MsEbonyVee: This video was SUPER helpful!!!! I’m going to try all of the tips in this video!! Thank you so much for sharing!!
britini campbell: Amazing video hun , very detailed and too the point , your wig is laid in this video
TheCryptoQueen: TFS I'm definitely am going to try your technique! Looks great
Shay Love: Wow looks BEAUTIFUL!❤
Beth Bonnett: This looks amazingggg!! And i cannot tell you enough how much i appreciate the close up WITHOUT a filterrrrr! As someone thats really new to wig wearing, i see every video or photo is filtered. I try to get an idea of what the reality of if what lace looks like when melted to the skin, but the filters blur and dont give an accurate idea! I was stressing the heck out thinking my lace looked weird cuz you could see it a Dropp! Thanks again xoxo
Brianna Bernice: Can always count on you for a good hair video !! <3
Foreign: Now I gotta buy a new wig. Ugh !! Thanks sis for this bomb tutorial
V Jones: THIS LOOKS SOOOOOO GOOD!!! I will definitely try this on one of my wigs. Maybe an old one first just to practice. Do you know of ANY wigs that come like this already?
Tori: Thank you it’s nice to see a positive review on there wigs they are my favorite company and they never disappoint me
Breonna Locks: Yes❤️ and the deep part it looks so natural
Myrna J: Look's Amazing!!! I got my Package today and I'm so in love with the Deep conditioner!! Haven't tried the edge Control yet but I know that I will love it as well. ❤
Mz. Kelly: This was sooooo detailed, so much information that’s not said in many vids. Did learn something never saw anyone cut off the baby hairs instead of pushing them back into the hair line
PinkLime Light: Great Video! Thanks! Can't wait to pluck my wig tonight!
NuclearNicole Fights Cancer: I have cancer and there are no good resources on how to make wigs look good. I am so thankful you made this and shared it. Thank you!
BeautybyMattie: Hi Bryana! Very informative. I have the Victoria unit from Hairvivi I purchased in 2017. I will definitely try this method out on my unit.
sunnysideup: This is very interesting in terms of understanding what an actual hairline looks like and how to customize a wig so thanks
kalenna🦄: Most helpful plucking video by far!
Francesca Lunar: Beautiful....I am ready to do myself...thank you for sharing.
tiffanyjackson521: Thank you so much for not speeding up the video I don’t get the reason of speeding up when showing us how to do something in really learned how to pluck my frontal from watching your tutorial new subbie so glad I was searching high and low for a great plucking video and you delivered
Brianna Bernice: Yesss that unit is flawless , I love it !
Cece: Really nice tutorial, but us average chicks that ain’t YouTube gurus don’t get sent wigs to just pluck the hell out off so I think most of us won’t take such chances to try n get it looking so slayed , but the prices of all these wig sites they should be doing the most work for us tbh !! But I love the no baby hair flag ❤️
Natasha: literally went from one slay to another
Ciera King: I needed this for when I decide to start wearing wigs
LaChristian Gill: Literally flawless!
Hydie 007: That is insane gurl...That is the best hairline I've seen so far...the hair is absolutely gorg...you slayed this and I'm just a lil jelly right now..lol...I still haven't tried to pluck mine yet and I want to wear it bad..Why doesn't mine have those little knots? mine is a Swiss lace is there a difference between the two laces and should I pluck it the same? mine also came with baby hairs...Thank you...I love your videos! xo Hydie
Skye Desend: Beautiful!
Shallando Shallan: Wow thank you so much for sharing
Annalise Rose: No shade I love the whole company in general and spent a few thousands on them because of your amazing reviews. My only issue is that yes their wigs are a lil too bulky. I honestly think they need to go lower on the density for the frontal of the wig.
Topaz P.: Gurl come all the way through that looks super natural!
ItsMeTrey TV: Very precise walk through on plucking!!!! I’ve to use this technique!
D. Davis: Great work!
Robin W: It looks so good! Can you show how to melt the lace?
Gemini Genesis: The hair on lace front wigs are so beautiful and silky! Where do the hairs come from? Is it human hair or synthetic?
1ycj: Your video is the only one I found on YouTube that details the correct way how to pluck up close and not rush through it. I want to know especially since I'm about to shell out over $400.00 on one of the wigs you premiered ombre Bob and you washed first then blow dried and then you French braided two braids on both sides. I want to commend for all of your detailed videos. Bravo
Just Jeenie: Thank you! ❤️
Imri Starks: Bombbbb! Can you please post a video on how you get it to melt into your skin w/o the baby hairs!?
Simplicity: So glad I won’t have to do all that extra plucking lol
Ileiah Marie: omg!!!!! thank you cuz i needed this!!!
leon: Beautiful
Raquel vescio: can a white girl wear a wig like this? i always see descriptions and they say for black women? would it be okay for a white women too? thanks
Amanda T: beautiful
V M: This looks so fun.
Literary Lex: Awesome video!
Ify Nweke: Seriously love your new intro!!!
Kylie Tv: I love your nails
Val: Please leave the link to the wig stand. Thanks beautiful!
Jhe Mara: I love your intro!!!
BLACKFOOTmyTRIBE-CHILDofLIGHTbyTMH: Very PRETTY.... I have always wanted to ask youtubers ,where do they order their choker style name necklaces ?THANKS
Goldie S: Which tweezer are you using in this video??
Glenda Page-Quave: You Rock!
Megan Daniels: Oh so need.. I'm still LEARNING how to pluck.. Really everything making wig.
SAMUEL Blackman: Amazing on u
Lisa Stark: Cute wigs on their website but hairvivi is too expensive for me me.
Airi: Love u sissyyythanks for this
Tee Tee: Slay all day
Laporsche La Belle: How do I melt it?
Adinda Morgan: Wow
tynera elliot: Don’t buy it it’s a scam! I did.. they acknowledge that the wig doesn’t look like the pic but they reserve the right for you to return it. And then they say u can only FEDEX it back and that’s $230
Debra Morton: Thank you.
MagicQueendom: I love the scarf. Where is it from please. Thanks.
rac Gillett: Nice
Tracy n: Great video
YolanKy: I so into learning how to pluck the wig. That i did notice the bra. Ok back to the video
immortaloshun: Not a fan of hairvivi. They sent me a wig with orange lace and a few of the roots were orange. I toned it down (using Precious Maries method) but feel if i was an influencer they would have sent a better wig. Of course all any of us have to do is share a review like this so the practice of sending ordinary customers overbleached wigs doesn't make sense.
Min Dee: im worried im going to do it wrong. Is there someone who can do it for me because if i take too much out, she might be bald
Tica Mich: Girl the way my bankaccount is set up! But Kim be looking cute on you. Just a curiosity, why did you cut off the first row of hair? Just to pull the no baby hair look or is there another theory behind it?
Lynn Worthy2: BryaNA!!! I just LoVE your HaiR INSTRuCTiONS!!!!!! *LaCE UniTs EMPreSS*❤
brittany boyd: Is your wig whole bleached front??
afure adah: ur necklaces are so cute! Where r they from?
Vanisha Marshall: You're coming to my home state of Louisiana! Make sure you get some beignets from Cafe du Monde.
Richonda Fegins: Looooooooooove
Kimberly Joy:
Lia See: Hairvivi like many of these companies pick and choose what to send to certain companies. I bought a wig from them and after some months the front started balding. I had to keep making different parts to hide where the areas that was balding. I was so disappointed cause I paid $325 for that wig. The quality of the hair wasn’t all that either, it was a little dry and it was very thin event tho I paid extra for density
Ciera King: So upset I didnt get this notification
Amelianna: #FreetheNip
Benitta Phillips: THIS IS A RIP OFF DON'T LISTEN