My First 360 Lace Frontal Wig Install | Ft. Alibonnie Hair
- Posted on 21 April, 2022
- Lace Front Wig
- By Anonymous
═════════════════დ Alibonnie Hair დ═════════════════
Usᴇ ᴄᴏᴅᴇ “bea20” ɢᴇᴛ $20 OFF
Hair info:Pre Plucked 360 Lace Wigs Deep Wave Transparent Lace Wig Brazilian Virgin Hair with 24inch 200% density
Direct Link ➤ https://bit.ly/37vNB3n
,
Highly Recommend Hair:
360 Lace Wig ➤https://bit.ly/3IUn4dN
HD Lace Wig ➤https://bit.ly/3AF6YAz
Thin U/V Part Wigs ➤https://bit.ly/3Debsj5
Contact us:
✅Alibonnie store : https://www.alibonnie.com/
✅Facebook @Alibonnie Mall :https://www.facebook.com/AlibonnieMall...
✅Instagram @alibonniehair :https://www.instagram.com/alibonniehai...
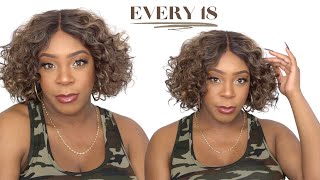
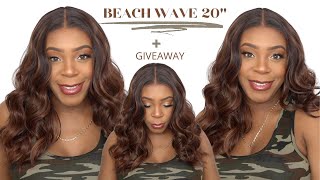
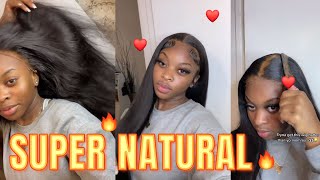
Do what's up you guys and welcome back to another video if you are new here, i am qb welcome to my channel. I hope you are here to stay and if you are returning a subscriber, thank you so much for your support. So in today's video we're going to be reviewing ali bonnie's hair - and they sent me this wig along with some lashes and a razor comb, and this wig is their 360 lace, wig, deep, wave and then 24 inches well. First, i like to start off by bleaching my knots. I always make sure i do this process, because i want the lace to look as natural as possible and as scalpy as possible. So i always make sure to bleach my knots and then i get into the plucking. So first i you know make sure i use my hot comb and i just go over the hairline so that it's very flat because it just makes it easier to install - and i always make sure it's not over plucked. And then i go back in with my hot comb to make sure everything is looking all right before i proceed so right now, as you can see, i'm doing my bald cap using my erica j um lace glue and i'm just creating the bald cap. So i can protect my edges and um. You know make sure that there's no hair sticking out then i like to go in with my nars foundation. Um. I don't remember the color, but i'll probably put it in the description box below, but i like to go ahead and use that on the cap, so it matches my skin tone and then i just cut the lace to any extra lace around the um. The cap, the hairline and just to make sure everything is smooth. So i'm showing you guys the lace again here and the knots are looking really good. Although the lace looks white, but we're gon na fix that we're gon na put some foundation on that as well. But the lace goes all the way around to the back. You already know what 360 lace looks like you know. It goes all the way around to the back, so you can put in a ponytail. You can do a bun. You can do different styles with it. Although in this video i really didn't do any styles, but i am going to insert some pictures of when i did put it up so so right now, i'm just going ahead and cutting the lace where i kind of want to lay it. So i usually cut like two slits on the sides. Just so i can start with the middle with the glue and then i'll do my sides afterwards, and i really like to look at where i'm putting the glue and also put the lace over the glue. So i can see okay, it's like laying exactly where i want it to, and this method is really really good. If you don't want to mess up, if you don't want to do the lace all at once, you can just cut it into three sections and then do it that way, and now i'm going in with my comb to smoothen out the hairline just to make sure That the lace is really melted into the glue, and i also like to go in with my hot comb just in case, because the hot comb has heat, and so that really helps with making the lace melt further into your scalp. And now i'm using my silk scarf to tie my lace down and um just make sure it's just like melted and i'm gon na wait like at least a good 20 minutes um. While it lays because you know it just needs time and i'm going to take a drink break, you know i was drinking a milkshake. I was on my phone. I was just doing the most okay. I was taking a selfie or lag okay. So now it's time to take off the scarf and, as you guys can see, it's laid honey like it's, no hair sticking out and that's how i like it to look now, i'm going ahead and i'm cutting the lace and don't worry guys. I know it looks white right now, but we are going to go back in with some foundation on the hairline, so we can get rid of that ashy look. So i also went in with some alcohol wipes to clean the hairline, but, as you guys can see like the the white cast is still showing and in my mirror it didn't look like that, but it looked like the on camera. Clearly, so i don't know like. I just you know, tried my best to make sure that i blended it at the end, but for right now it was just looking like crazy. So right now, i'm just doing baby hairs, just cute little baby hairs. You know my usual and as usual, i'm going to be using my alpha g style in mousse and i'm going to go ahead and lay my baby hairs down all right. Once that's done, i'm going to go ahead and use my wax stick and just go around. You know the top of my head and use my hot comb to basically make everything flat and seamless and to style my hair, i'm going in with my water bottle and i'm spraying the hair um. I usually like to drench my hair in water, because i, like my curls to look very defined and after that i go in with my mousse and just drench it some more like for real, and i really really like this mousse, because it really like sets my Curls into place, and even though it does dry down you know, curly hair dries down and gets bigger. It still makes sure that my curls are very defined throughout the day and, as you guys can see, it's given scalp is giving very much like my hair. Okay, all right y'all! So when i went on my birthday trip to mexico, i tried to get my man to install the back of my head, so i could show you guys what it looked like, because obviously this is a 360 wig. So i really wanted to show you guys how it looked like put up in a bun and when i tell y'all this process was so crazy, like it was just. It was more than what i thought it was gon na be like. I was not expecting that at all, when i tell you guys, if you are buying this 360 wig definitely get a professional to install it, at least the back, because it was a hot mess like we ended up, not even using the first layer of glue because It was just two down on my neck, and so he had to go in with another layer of glue at the top like above the first one, because it just was not laying - and it was just so funny like it was a hot mess. When i tell y'all this was comedy like it was really really comedy for real, like look at my baby blowing my neck bro like it was so funny like, i was getting so frustrated, and this was my birthday too, like we literally was about to be late For dinner and everything, but i'm gon na insert some pictures, so you guys can see what the hair look like. I mean it ended up working out in the end, so i wasn't too mad at it, but definitely get you a professional to install your 360 wigs. If you do not know how to install your 360 wigs by yourself, this was my first time so yeah, but other than that. I really really like this wig. I really love the curls like it was my favorite part about this wig and um. It was really really thick at the ends and it was very full the scalp it was giving like. I can part it anywhere from side to side in the middle everywhere and even in the back too. So it's really really nice really convenient um. Thank you. So much alibani here for sending me this hair. I really hope you guys enjoyed this video, don't forget to like comment and subscribe, and i will see you guys in my next video

Comments
Sammy Da Goat: First Comment This Hair Is Super Cuteee You Look Very Pretty In Pink