How To: Chocolate Brown Ombre & Highlights Using Developer + Install & Style | Westkiss Hair
- Posted on 30 March, 2021
- Lace Front Wig
- By Anonymous
*Watch Me In 1080P*
Hi guys! In this video I will be showing you guys how I was able to achieve this chocolate Brown Ombre color using only developer. I'm going to be walking you through it all from start to finish and in detail so this is definitely beginner friendly. Enjoy and let me know what you think!
#ChocolateOmbreWig #DeepWaveHair #WestkissHair #FrontalWigInstall
▬▬▬▬▬▬▬▬▬♛#westkiss♛▬▬▬▬▬▬▬▬●
Hair details: 250% density HD lace 13*6 deep wave lace frontal wig 26inch
Video Hair Direct Link ➤https://bit.ly/3p2lYSq
Hot selling HD lace wigs ➤https://bit.ly/39W93Nx
★ westkiss official hair store ➤https://bit.ly/3aDCRhe
Up to 43% off Lace Wigs ➤https://bit.ly/3aJEYQz
#westkissstraighthair #westkisswig #westkisslacewig
#WestKissHair Official Site Huge sale Big Discount
❤ Follow West Kiss hair on social media :
Instagram @westkiss_hair_store:https://bit.ly/2MHe3cA
YouTube @West Kiss Hair: https://bit.ly/2YcFSAx
Wholesale WhatsApp: +86 13323741050
*
Connect With Me
SNAPCHAT - @beautyinfinity
TWITTER - @omoo_lewa https://twitter.com
INSTAGRAM - @omoolewaa https://www.instagram.com/omoolewaa/
*
HI GUYS! My name is Oréoluwa, Oré for short and I’m a 21 years old college student from Houston, Texas. Originally born in Lagos, Nigeria. I hope you guys like my channel and support me. Make sure you’re subscribed, so that you can see more of me and turn on the bell so you can be notified whenever I upload. ;) I post videos every week. Hope you keep coming back to real ass bit*h lmaooo love you guysssss.
Business & Collaboration
I Film A Cannon T6i
Chocolate Brown Ombre Wig, start to finish, Chocolate brown hair color, chocolate brown wig, ombre wig, Chocolate brown ombre + highlights, Highlight Wig, Deep Wave Hair, Westkiss Deep Wave Hair, Curly Hair Routine, HD Lace, lace frontal wig install, lace frontal installation, lace frontal wig install start to finish beginner friendly, chocolate hair color, chocolate brown hair color,
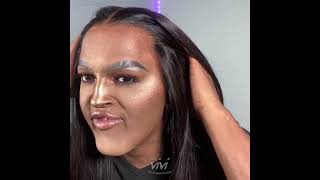
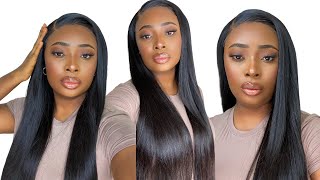
Hi guys welcome back to my channel and welcome to another video, so today's video is actually inspired by another video that i did like two years ago, where i showed you guys how i got this chocolate, brown, ombre wig and in that video i said, i'm literally Just basically going to be using developer, i think i had 40 and 20 developer and 50 and i just mixed all three of those developers together and that's what i use and the little tiny, tiny piece of bleach that i had left so for this hairstyle. You don't really have to use bleach, but you can, if you want to a lot of people, were very confused and just flabbergasted that i was able to achieve this color without using bleach or with using a little bit of bleach, which is literally what i did. But anyway, i realized that i could have been a little bit more descriptive so because i am somebody who likes to correct their mistakes in today's video, i'm gon na be breaking it down to you guys from beginning to end, using the exact same methods that i Used in that last video, but of course we're going to be stepping it up a lot more because you know progress, it's like two years later. Of course, we've learned new things. We know how we want it. So if you want to see how i did that make sure to keep on watching, let's go ahead and get right into it, because there's not much to say so. The hair that i'm going to be working with today is from weskis hair, and this is a hd lace wig and the lace is so transparent and hd that you can literally see everything behind the lace. Yeah this place is beautiful. I did bleach the knots as you can see, the knots looked bleached and it came with three clips one on the back and two on the sides. The wig also came with this little velvet scarf another silky scarf, and this reversible bonnet that i've been obsessed with y'all. I am loving this bonnet. I literally wear it every day, it's so bomb, it's like the perfect bonnet. So moving on to the color. These are the things that you are going to need to achieve this color, i'm using the clairol developers 40 and 30, i'm also using a mixing bowl, which i also got the beauty supply and a coloring brush, which i also got at the be supply, and just Two clips just to have if i need to clip the hair, if i need to get any hair out of my way, oh and of course, you're also going to need to wear a glove stuff, but that's literally all you're going to need to achieve this color. This is what the curls look like before i bleached it. I just wanted to show you also that we can compare at the end if the curls stay the same, so i'm putting a bag over my dome head, because i do want to protect my dome head. I don't want it to be bleached in the process or to just get damaged, putting my wig right on top. We don't really need it to look perfect on there. We just need it to be on the block head. You can also do this on the floor. You can just lay some trash bags on the floor and just put the wig right on top, but because i do want to be a little bit more precise about the way that i am coloring it and the way that i am layering the colors. It'S easier for me to do it on a dome head, because i can visually see exactly what i'm doing and all i'm doing is sectioning my hair off into four sections and it's gon na be three sections in the back and then i section the frontal off Completely by itself, because we're gon na be doing that at the end very last we're gon na end up with four sections, like i said three at the back and one with the frontal all by itself. So literally, all i did was pour the developer into the mixing bowl dip the brush in my developer and apply the developer to the hair. The only thing that i did that was strategic about this was that i used the 40 developer on the bottoms of the hair and the 30 on the top more at the top, and the only reason why i did that is because 40 developer will lift faster. So putting the 40 at the bottom will make sure the bottom of the hair is very vibrant and colorful, and the color will kind of just ombre on as we go. So that's literally the only thing that i did that was like strategic. I just put the 40 on the bottom of the hair and then, as i made my way up, i started to put the 30. and i'm just going in with my brush and brushing the hair to make sure that the developer is really saturated. Inside of the hair and another thing that i realized that i did in the last video was dipping my brush in the developer, and then i went in with my brush again dipping it in the tub of developer and i'm just brushing through the hair. Just like a crazy person, okay and it ended up looking good. That was like the most genius thing that i ever did. I don't know why i forgot to do that in this video and i literally remember myself watching the last video and thinking like i need to remember to do this and i forgot. But yes, you should do that because it's a good technique. If you do this in your room, be ready to make a big mess and have to clean up at the end, because this stuff was splattering all over the place. It was getting everywhere. But i would suggest that you do this in your bathroom, because that's what i did the last time and it was really easy clean up or you can put some trash bags on the floor all over the floor so that when you're done, you could just pick Up the trash bags, i didn't really do any of that. I just made a huge mess and at the end i had to clean up a lot because it was just everywhere, but anyway yeah, like i'm literally just putting the developer in the hair like it's. That simple, honestly, it's not rocket science. I promise i'm not bamboozling y'all. It'S that simple, okay, you literally just need developer and hands, and that's it. Okay, it's not hot! It'S not hard at all. I promise. Now we get to the point where we're gon na add bleach. Okay, please do not get confused. I promise it's not anything crazy, we're just adding a bit of bleach just to make the color a little bit brighter and that's just because i wanted to add, highlights in the front and as you can see, i'm taking the tiniest scoop of bleach and i'm pouring A bunch of developer in there at the end, we're still going to have a liquidy consistency like it's still liquidy, i'm just trying to make sure that the colors are on the same level and that everything's matching up the frontal portion is matching up with the hair Portion doing the exact same technique of putting the product on the hair and then brushing it through just to make sure that it's really vibrant and i did do like two little pieces in the very front. I made sure that those two pieces had a lot of developer on there. I went back in and i took the color much higher than it was before and that's literally just because i thought it would be cuter that way, and i thought i would like it better that way. So yeah, it's no big deal. I just wanted to say: get higher, i'm gon na go yeah. I just wanted to take it higher whatever but yeah. This is the part where um people also didn't believe in the last video, but i literally let this sit overnight like i went to sleep after this and then the next morning, the next day i watched the developer out of the hair, and then i'm going in With my shimmer lights, shampoo, just to make sure there's no brassiness and just to make sure that we're really getting the full experience, we're getting the real color of the hair. And then i also went in with some shampoo and conditioner. And i let the conditioner sit. So i deep conditioned the hair. I let the conditioner sit for about 10 minutes. I believe in the hair just to make sure that the hair and the curls are intact, because we did, you know, add a bit of bleach onto this and we added bleach to the frontal, which is the part - that's usually the most fragile. So you know make sure you let that conditioner sit because yeah the hair has been through a little bit of a tassel. So this is a couple hours later. As you can see, the color is beautiful, but this is not the real color of the hair. We'Re not going to see the real color of the hair until the hair is fully dry. So i'm going to go in with my blow dryer and my diffuser and i'm just gon na diffuse those curls, because we want to see the real color of the hair and, as you can see, as the hair gets dry, the color does start to really show And it's really obvious the parts where i use bleach and the price where i didn't, because the parts where i bleached the hair were obviously the frontal parts and you do see that the frontal parts are much brighter than the other parts of the hair. So now i'm just gon na go ahead and start plucking, my frontal and i did have to wet the hair a bit because when you wet the frontal it helps you to be able to pluck a lot more so yeah, i'm just gon na give this baby A good plucking, nothing crazy! So now that i'm done plucking, i also went ahead and obviously put my parting in my hair and, as you can see, we over bleached our knots just a little bit to fix that. I'M just gon na go in with some mascara brush the mascara through the parts of the hair that are over bleached like this hack. It'Ll, save your life. If you over bleach, your knots just put some mascara on that thing, and it will be back to normal. Like look at that, it's such a big difference. This is what our wig is. Looking like, like sis, is a baddie okay. Now i'm just gon na go in with my wax. Stick, give her a nice little wax job. You know press it through with the hot comb a couple times just to make sure she's really perfect before we go ahead and install her and look at her. She looks so good anyway time to install i'm just gon na go in with my foundation, rub that on the lace y'all know my little trick or whatever i ain't even got ta say nothing. You already know what it is spray it with. Some got to be spray to make sure it stays, and now i'm gon na go ahead and put on my ball cap. Now we're gon na go ahead and do my baby hairs. I love doing baby hairs on curly hair because you can really make the baby hairs like super, exaggerated and fun, and for this i did make it a little basic. But actually i had this install for a good like three weeks, two or three weeks. So i was able to like play around with the baby hairs a couple times. I did go ahead and like switch it up yeah. This was cute for now, but i did switch it up. Okay, i'm not that basic. You know it was just basic for the second. I was really trying to do like the arrogant baby hairs like y'all know how he does his baby hairs like he'd, be making them like really pretty and like thick and like really swooped i'll, put a picture up of what i mean. That'S what i was going for, but i'm gon na, have to do another video, where i really really like try to do the air against a baby hair, and i have the perfect picture of what i want the baby hairs to look like too. I'M doing another little time lapse of me, showing y'all my hair drying, because i love how the color just changes as the hair gets dry. It'S so pretty as y'all can see, the curls are still there. Everything is bouncing. Everything is shaking. Everything is doing. Quick right. I love this wig. I hope i was able to answer all your questions and clear up any confusion from the last video. I hope you guys enjoyed this video like comment subscribe all that good stuff and i'll see you guys in my next one bye. You


Comments
Oré Otun: I promise if you watch the whole video, all your questions will be answered. I made sure to be super detailed in the video and most of the questions i’m being asked are answered in the video!
Rosemarie’s Corner: This is so pretty !
Dear Amira: I’ve been waiting for this video your look absolutely stunning ❤️
Katlego Mhlauli: How long do you wait after applying developer for the color to change?
Ciarra Bulgar: Do you bleach the knots before or after doing this method ?
Sammy Da Goat: I've Been Waiting For This You One Of The Most Beautiful Gorgeous And Prettiest Woman Youtubers You Deserve All The Love And Support Keep Up The Good Work Don't Let Anything Get In Your Way To Success
Cåt ll: That turned out pretty good! What if I want to lighten a jet black weave just or 2 tones, leave in in a brownish shade?
divairl: so pretty! i love brown hair
Meaux Monáe: Going to try the brushing tip thanks!!
April Banks: 40v will process faster than the 30. I would use 30 at the bottom then 40 at the top for even color
Caroline Green: Love the hair
Kaylee Clarke: What volume developer did you use for the bleach
West Kiss Hair: respectfully, you’re gorgeous !!
FlightGang 247: Beautiful ✨✨✨
Lulu Shodeko: I love ur videos!!!!
jessica lomax: Can we get an updated makeup tutorial pls high end and drug store I still go off your tutorial from 2 years ago and I see it changed I’m a beginner and it’s hard finding someone my shade
High priestess: You could literally be a model
ashley williams: Hey love, is that shampoo and conditioner good for colored hair?
Beane Shaw: Thanks for your video!
Bailey White: Thanks for sharing, I like your video
Caroline: in love
Niyah UncutTM: Can you or do you have a video up of everything you need to install a wig and pluck a lace, bleach, install all that lol and the prices for everything cuz whew I wanna do a fresh wig on myself, but don’t wanna mess it up
chang bella: ❤️❤️❤️❤️
Dee Luther: Another Great Video queeN Stunning thumbnail tho Beyond Gorgeous u Are Ur Makeup so Nice Happy Wonderful Week Too Stay safe n Be Bless always
反正什么都可以 🌈: ❤️❤️❤️❤️❤️
Shu Danielle: How do you know if the wig will fit your head when you buy it? I have a big head. So how will that work for me?
Patricia Hogans: Wow
Lynnazia Davis:
Temisan Ebireri: Please will this technique work on jet black bundles?
FalineEmpress O: Almost at 40k babyyyy
Wirekoah Opoku: I guess the kitchen scissors works best for u Girl don’t mind me and do you.. I’m just dumb Btw, what was foundation shade?
FlightGang 247: I think I had a dream about you last night
Jiamesha Cavers: What dyi