Lace Front Wig Install For Beginners | Step By Step Frontal Wig Install | Wiggins Hair
- Posted on 02 June, 2021
- Lace Front Wig
- By Anonymous
════════დ #WigginsHair დ═══════
Get $8 off with coupon code”You ” !!
❤Direct Link➤https://bit.ly/3dYnyT4
Hair details: Body wave lace frontal wig 180% density 28 inches
Hot selling #lacefrontalwig➤https://bit.ly/32Xo8KB
You may also like:
1. Invisible skin melt #hdlacewig ➤https://bit.ly/3nttpmH
2. Premade colored wig➤https://bit.ly/3gNpXSo
3. Lazy girl approved headband wig➤https://bit.ly/3dZbwZC
Follow @wigginshair on instagram:https://bit.ly/3dYae1c
Tiktok@wigginshairbest
Facebook @wigginshair:https://bit.ly/3e3szKm
Email: [email protected]
WhatsApp Wholesale: 0086 1513643857
2.Could you please add our direct wig link on tye top of your comment section and bio ?
Direct wig link: https://bit.ly/3nsLmBO
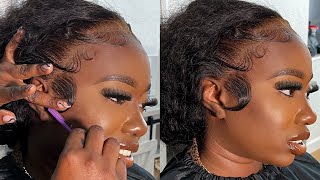
So what is up africana fam? It'S your girl, young africana, back at it again with another video today i'll, be showing you guys how to do a half up half down but, most importantly, how to get the most skin melted lace ever mind you. This is not hd lace. This is regular medium brown lace. So if you guys want to see how i finesse and slayed this lace to look like my scalp, then keep on watching i'll, be showing you guys updated tips and tricks that i have learned that really changed my lace game for the better. You guys no more cakey lace. So if you want to see how i achieve this look then keep on watching all right. You guys so first things. First, i'm going to go ahead and cut out my ear tabs. This hair is sponsored by wiggins hair. I have their 28 inch, 180 13 by 4 lace, frontal wig and the lace came in a medium brown lace. So right now, what i'm doing is i'm just going to go ahead and just quickly show you guys how i style my hair. I'Ve shown numerous times of how i curl my hair. I went ahead and took my garnier fructis, anti-frizz serum and i'm going to go ahead in sections. I took about three tracks per section and i'm going to go ahead and saturate the hair with the serum and then start curling, my hair and i'm using my babyliss one and one half inch curling iron to curl this hair and again, whenever i'm picking out the Hair to curl, i want to make sure that the hair is about an inch wide just so that it's not too much hair for me to curl and everything curls evenly. So right now i went ahead and just combed out my hair make sure that all the kinks are out and then i'm going to go ahead and curl the hair away from my face and when i'm doing this i don't style the front tool because we're doing A half up half down - and i haven't you know necessarily you know, sculpt it out or parted out where exactly where my half a path down to be at. I just like to curl the front tool. First, just so, i don't mess up any of like my good work or my good curls, while i'm parting out the hair for um, my half up half down so yeah, i'm just going to go ahead and curl. My hair hold that in my hand, for about 15 to 20 seconds and then let it drop, and this is how you get the most perfect and seamless curls. I definitely wanted big and bouncy kim k, voluminous uh bombshell type of curls, so i went for the bigger barrel this time and i'm just doing this all the way until i reach the top of my tracks like right, where the frontal is so. I had about two more tracks up at the top to curl. So what i'm doing right now is i'm now going to go ahead and start parting, a horizontal part in the frontal i'm about a half an inch of the front. So i'm going to be cutting out all from ear to ear. Just so i can hide the tracks in the back as you're doing a half up half down, you want to make sure that all the tracks are covered just so you can have a seamless look because nobody wants to have a half a path down and your Tracks are showing like that's not it, so i just went ahead and just went ear to ear and cut out some of the hair from the frontal and i'm using my carry care wax, stick just to have the hair in place and to get rid of any Flyaways and to tame and train the hair into its place, it needs to be laid okay mamita. We need to have a laid and slayed, so i'm going to go ahead and use my hot comb on the hottest setting just press that hair down and then afterwards, i'm just going to go ahead and curl the rest of the tracks that i have remaining from The tracks and the frontal, and i'm just doing the same exact thing on the other side. Again, i'm just using my anti frizz serum. It'S going to go ahead and just do about two pumps of my hand and then just saturate the rest of the hair with it, and then i'm going to go ahead and curl, and this just protects the hair from any heat damage and overall give it a Soft and sleek look and overall, these are the finished results when it comes to curling and prepping your hair. I love to curl and prep my hair on the mannequin head, because i'm a big perfectionist, you guys - and i just want to make sure i didn't miss any spots but now on to the frontal install. So i already have my ball cap method done and i have my forehead cleaned with 91 alcohol, and i just went in with my erica j skin guard and sprayed it around my perimeter. Let it dry and narrow onto the adhesive and i'm using erica j, watermelon hobie down adhesive, and i'm going to go ahead and use two layers of this around my hairline and i like to place the glue directly where the wig cap starts at or ends at. However, you're looking at it um and yeah, i like to do that just because um i don't know you want to make sure that you have a wide width when it comes to your wig cap and the wig cap, we're not your wig cap. You want to make sure you have a wide width when it comes to your adhesive and the wig cap kind of serves as a replacement for skin, because, again glue is not supposed to go on your hair. It'S supposed to go on your skin, so the ball cap is not only to protect your hair, but to kind of play as skin, because it doesn't produce oils, and this is how your install lasts long. You'Re welcome on the science of that i kind of just you know summed that up myself a little bit um but yeah it's supposed to protect and also serve as like a replacement for skin since lace. Frontals are hair replacements for a lot of people, especially when they have alopecia or just hair loss in general. So again, you want to make sure you have a nice wide width and make sure it's nice and clear before you go ahead and apply the next layer, and you just want to make sure that you're applying thin layers. You don't want the hair or the glue to be too bulky and too thick that causes air bubbles and overall, your frontal install, will not last - and i have this baby hair comb that has like a metal tip and i'm just using that to smear my glue Again, as you guys can see, the width of the glue i have is about an inch wide, and this is just to help. The lace adhere better and you want to make sure you get some on that wig cap. I promise you guys. It won't seep to your hair. You will not lose your edges. I have all my edges so now that it's nice and clear i'm going to go ahead and place. My frontal right in the front, and i forgot to cut out slits, i like to cut out slits, because it's more easier to kind of manipulate with the lace and kind of pull and tug how you want it to so again. You want to make sure that your lace is in place before you go ahead and really just push it down into the adhesive. And again, you want to make sure that your wig is in front of the glue not right on the glue, because the goal is to add any glue where you missed it at versus cleaning off glue, because cleaning off glue is a headache, especially if you're cleaning Off blue prematurely, you just add it on it's a headache. You don't want to do that. So i went ahead and just put you know, place my hair wherever the glue is at a little bit in front of the glue and i'm going to go ahead and kind of press it down. My palm. Please make sure your palms is nice and you know dry, and you know free of oils before you go ahead and do this. But now i'm going to go into sections and i'm using the middle section first and i'm using my eyebrow razor to cut off the lace and i like to cut off my lace in a jagged motion and the eyebrow razor kind of helps. You do that automatically by the way you guys. I already have my lace tinted. I tinted it with the amazleyo base, smeared lace, tint in the color mocha, and i did only one actually not lied. I did two layers of it. You guys now that i'm done with the middle section, i'm gon na go ahead and go on to one of the sides and start cutting in a jagged motion. You know regular deglare. Now i like to call this part detailing so now that i have my lace cut. I kind of have like an outline of where i should put some glue at in places that need some glue, so i'm just carefully outlining where the lace ends at and then placing the glue right there and again, i'm i'm adding two layers. I want to make sure the first layer dries completely before i add the second layer and i'm going to go ahead and just push that lace down and smear it out with my um metal tail. It'S not a comb, you guys it's a baby hair comb. I was going to take rat tail comb, but it's not i'm going to use the middle tail of my baby, hair comb and then just smear out the glue and then just push the lace into the glue. Once it's completely clear and i couldn't find my regular rat tail comb, so i'm just using the back end of this cone and just pushing the lace into the glue and as you guys can see, it's already looking pretty melted and now i'm just going to go Ahead and do the same thing on the other side and just keep on repeating the process until you're completely done now that we're done gluing down all sides, i'm gon na go ahead and prepare my hair for my half up half down so the way to achieve A flawless half a path down is to have some type of hair um. You know out, so i'm just kind of parting out where i'm going to put the hair in a ponytail versus where i keep down and the hairs that i keep down is pretty minimal. But now i'm going gon na go in and start carving out my baby hairs and once i'm done with that, i'm just going to go ahead and kind of tie up the ponytail piece into place and i'm going back in with the i'm a slayo bay smeared. In the color mocha, i'm going to spray that around my hairline and then wrap up my hair, just because i feel like the lace is a little bit too light and again this will not lift it up. You want to make sure you work kind of fast with this and you know just tie it down immediately afterwards and i'm using my elastic band. I got this roll of elastic band from amazon. You can go ahead and find that from amazon or your local beauty supply store as well. I was going to go ahead and wrap that around my hair and wait for about 15 minutes. As you guys can see, my hair is looking late, okay, but to further melt this, i'm gon na go in with my fantasia spritz and i'm gon na spray that all around the perimeter before i used to use gossipy the weld the spray. As i say, glue i'm going to use, i used to use the gossip um spray, but i switched over to the fantasia because i feel like the fantasia holds a lot better and melts a lot better. In my personal opinion, you could go ahead and test it out. You know different folks, different strokes but yeah. I use the fantasia and i i wrap my hair with my elastic band and then blow dry, my hair on medium heat, and let that sit for about five minutes. As you guys can see, my hair is looking late and slayed, but now on to the ponytail y'all, this ponytail is stressing me out but hear me out. Here'S the process so we're gon na go ahead and just you know, train the hair as much as we can make sure we get a nice and flat for our ponytail and i'm using my hot comb on the hottest setting and to even train your hair. Even more go in with your wax stick, i'm using my carry care wax. Stick, i'm just kind of training, the hair making sure everything is nice and late and slayed. You know the the perfectionist enemy love everything just to look nice and uniform. So i i go. The extra mile y'all camera care uh the the gots to be spray everything; okay, so again we're just training the hair upwards or. However, you want your ponytail to go in and i'm doing that on each side, all right. So now that i'm done with that, i'm gon na go ahead and carve out my little um alien antennas. I don't know how to call those but um. I guess, like my my long little bangs, i don't know how to call them, but i'm just going to go ahead and carve that out, i'm carving out like a nice little rectangle for them right in the middle. That'S why i didn't take out any baby hairs from there, because we're not going to do baby hairs in that section and then i'm just going to go ahead and train that hair downwards. So i don't mix it up with my ponytail and again we're going to go ahead and use the how come again and start training it's going to be a lot of training. You know my my frontal is my cadet right now, i'm training it to act proper and it wasn't acting proper because this ponytail took me forever, but we're not even gon na go into that um. This tutorial was supposed to make it look easy, even though i was struggling so listen, it happens to the best of us uh, and i think it was more so because of my nails too. My nose is pretty long for me to put my hair in a ponytail, so yeah, don't judge me right now, i'm just going to go ahead and start putting my hair in a ponytail and in this clip you're going to see me use a rubber band um, Like a regular hair tie, but i actually went in with um small rubber bands, she would like use on my children's hair instead um just because um, when you're wrapping the hair around you're gon na see why i use the smaller ones. Instead it just this one. Didn'T work out for me, but i'm just showing you guys the process of how it look, because i gave up recording because i don't want to waste any memory and um yeah. So this is how it's supposed to look just minus the big hair tie. We'Re going to use a small hair tie you're going to see that in the next clip and boom. You see it in the next clip yo. I use the small one um, but now that the ponytail is nice and sleek, i'm gon na go in with my gossipy spray and i'm going to train the hair upwards just to get it nice and flat, and i like to kind of smooth the hair. After i use my gossame spray and then kind of um, you know use my blow dryer on medium heat. Just to have it um. I don't have to explain it. You want to smooth it out we're smoothing out the ponytail, because it's not as flat as you want it to be, so i'm using that plus my baby hair brush, i'm just smoothing it all the way into the ponytail and then using my blow dryer to set It in place and i'm doing that all around the ponytail and i just went ahead and wrapped it around again with rubber band just to i guess, make it look tighter and that's how i got my ponytail, you guys all right now. I went ahead and took a little piece of hair from the back of my ponytail, and now i'm going to go ahead and wrap it around and each time that i wrap it around i'm going to go in with my gossipy spray and spray the front of It and you just want to keep on wrapping it around, and you want to make sure that that piece of hair is combed out and straightened as well. Just so it looks nice and sleek. Do not forget to do that so again, each time i'm going around i'm going to go ahead and spray. It smooth with my fingertip make sure that there's no flyaways and then repeat the process you're just going to keep on doing this until it disappears pretty much you're going to wrap it into itself. Now that we tucked in the last piece i'm gon na, go in with my blow dryer on medium heat and just you know, set that into place and again you want to use your fingers to smooth it out, make sure everything is nice and light and boom. We got our ponytail popping y'all all right, but now on to the baby hairs, i'm going to go into my razor um, my eyebrow raisin. I'M going to cut my baby hairs about an inch long and we're going to do arrogant, hay baby hairs, slash the vivian way of baby hairs. You want to mix the two because i definitely miss using mousse and i promise you guys. This is kind of foolproof. As well too, so i'm gon na go in with my bed head flat iron. I believe this is in the um 3 4 of an inch and i'm going to go ahead and just curl those baby hairs inwards. Of course, my camera is not focused, of course, but i'm just going to go ahead and curl those baby hairs in words. Please do not burn yourself make sure you have this on a pretty um low setting but low enough, where it's still curlable and again, i'm just curling it all the way around and now i'm gon na go ahead and use my nairobi setting lotion. I get this from my beauty supply store and you could definitely get it from yours as well, and i just pumped it on my um forearm and i'm just using a bit of it and i'm just kind of forming my baby hairs and i feel like this Is the most effective way of getting your baby hairs, because not only does your baby hairs lay flat because of the nairobi setting lotion it's just easier to just form them, because it's already curled, so the arrogant, tay ex vivian way. Oh sorry, i just said my whole government. The arrogant tax young africana way definitely goes a long way darlings and try it out. You guys so i'm just kind of curling it into the hair and don't mind it if it's a little bit long um. What i just kind of did that's kind of formed, how i want my baby hairs to be, and it's kind of left that one hanging until it dries and then i'm going to go ahead and cut off the excess hairs that are a bit too long. I'M just going to go ahead and do that all over. So usually i will wrap my baby hairs, but i didn't because they dry pretty fast. I didn't use that much mousse so right now i just went let it dry and i'm gon na go ahead and comb out the baby hairs and then i'm gon na cut them um, as is you know, you just you're, just gon na you just kind of Know where you're gon na cut at just because it just kind of lays you know so, i'm just gon na go ahead and cut it, and then i use my gossame spray. I spray on the brush part of my baby hair and i just kind of form the baby hair in to the ponytail, so everything just looks cohesive, you're to see what i'm talking about once i do it so again just come out those baby hairs. Please come out those baby hairs because i don't know why i like crunchy baby hairs. That'S not my thing, but you know to each its own to each its own. Like i said before, different folks, different strokes cut those baby hairs, and this is kind of smooth upwards and i feel like this makes it look so natural in my offense and i'm just kind of curling up where, like the ponytail goes up just so that the Baby hairs, don't look out of place or you know just you know it looks crazy. Now we're not trying to go for crazy baby hairs. You just want to play around with that until you get your desired look now after that, i was done with this part. I went off camera and i curled you know my little antenna pieces away from my face as well as my ponytail. I cut my ponytail to two well, you know parted it into two like how, like you know, lay on my head and curled it away from my face, and these are the finished results you guys. I hope you guys enjoyed this video on how to melt your lace. Effortlessly um subscribe like comment down below. If you think this tutorial was very helpful and comment down below some video ideas, you want to see me do and i'll get to them as soon as possible, but until then i'll see you guys in the next video later you

Comments
Young Africana: Hey Africana Fam ‼️ Comment Some “” If You’re Feeling This Look, And What Videos Would You Like To See From Me
Nicole • 10 years ago: girllll you ate this look literally looks so perfect
Meggans POETICAL Breeze: Now if I didn't watch you install this I would swear that it's growing from your scalp... EVERYTHING about this install is on point...
Winner Winner: Gorgeous thank you for this... you're so thorough with your steps can you please do a tutorial for a low sleek middle part frontal ponytail xxx
DreaMsFabulous: OMG!!! I’m a Huge fan after this video!! I love your technique and the way you explained everything in great detail! I would hop on a plane and fly to you just for you to do my hair!!
Mari.lina07: I needed this!! Thank you for sharing. ♥️ absolutely beautiful.
Mariah Mosley: The fact that I didn’t realize you could comb out the baby hairs Omgggg . It looks so smooth
Shquille Armstrong: You should try using a blow dryer with a concentrated nozzle instead of a straightening comb. It works faster and better
charlie Remi: You look amazing as always so pretty thanks for sharing your tips well done I never knew u could curl baby hairs I will try this out God bless u
Miss Sincere: this is an art I'm still trying to master lol XD
Cordie Foreman: I love your skin color! Really reppin' for the chocolate queens of the world and we appreciate it!
Wiggins Hair: Scalp!Flawless melt !Such a wonderful job!
Janee Justiniano: I always have issues with cutting around the ear. If I don’t cut it right, I’m in pain and how do you get around it when you wear glasses?
Cynthia Greway: Looks beautiful looks so real love it
Cynthia Patton: So very pretty!! What was the name of the lace tint again? Thank you!
daiya: what type of curling iron do you use?
Lovely Scorpion__: I want to post my YouTube video on how I do my installs but I don’t do the glue . It’s too messy for me but I’m trying other alternatives also . Btw I love your page
She’s Cheryl Nicole: Honey you laid this wig. I can't wait to learn.
MsHunne: At this point I'm not even caring about the curls but if I could get it on my head to look even close to yours i would be happy. Hey I have an Idea, why not you come and do it for me...lol You do a great job and I love it, wish I could do it myself.
Star Mocha: Yeesssss I needed this
Jordyn TV: Aye back at it againn
Trezzyannah Windley: Where do you get your nails done at
Jenny Barbie: Sooo gorgeous sis wowww
Precious Mcclinton: yassss was waiting for this
Asia Blu: What lace glue and spray do you use?
Simita: amazing!
Shamia Young: What’s the name of the lace tint you used ?
Kat F: Can I ask which hold glue did you to get the lace to melt that easy
Shadai Reed: The best tutorial ty
Ethereal Auralite: !!! She’s gorgeous
Reane: I hope you know, you’re convincing me to buy wigs to install and slay, like i have money to do so........shame on you ❤️✨
MoLoves UBaby: ❤️
Dee Luther: Great Video as always Road To 300k Super cute thumbnail tho You Looking Hella Gorgeous Makeup always Bomb EnJoy the rest of your Wonderful Week Happy Fabulous Weekend ahead Stay Bless n Be safe always
Olivia M: You SNAPPED
Kristina Smith: gorgeous as per usual.
Desneia Byrd: You So Raw !
Denise Thompson: Looking great
Keepin Up With Reign: You should try the coi leray braids on a lace front
Luke Li: wow, your baby hair is very good.
Naomi Ade: needed this!!
Skiitchi ._.: Fabulous,
Nessa A:
Liana Jonette:
Tia Frazier:
D&B Nation For Life: What makeup did you use on the lace?
Kasee E: my favorite youtuber
Jaida M.:
LawMedia Inc: You are sooo gorgeous
Sahure Bey: Young Africana do you have a shop where you do hair and where.
Nizzy Mac: It’s very much giving
Queenshana Morgan: Hotttttt
GoodasAvia: Cute
MEELIY: Arrogant who ?
Sammy Da Goat: Makeup Is 300x Perfection You Are Very Charming And Very Attractive Keep Up The Outstanding Content
ASTERIA HAIR: Lace where?
Zainab Jimoh: Road to 300k
Jantasia Shealey: here