Luvme Hair U-Part Wig Unboxing |Kinky Straight 16”| 2020
- Posted on 08 August, 2020
- U Part Wig
- By Anonymous
Welcome back to my channel you guys. I’m doing a hair review on the amazing LUVME HAIR..
Details on hair:
Kinky Straight 16”
Medium cap size
#luvmehairreview #luvmehairkinkystraight
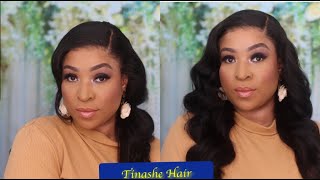
Wig, where all right you guys so, let's get into it so here is the box comes in a pretty royal purple, which is my favorite color, and i know i'm looking crazy right now with the hair, but we'll get to that. So in the package that it comes with the hair, obviously, and this cute little net bag here, a pair of flat irons, you guys wow, that's that's freaking, awesome, yeah, very, very cute, flat, irons, um. It looks like the temperature goes up to 220 celsius. I don't know what that will be in degrees, but i'm thinking maybe 300 um wow. It also comes with a wig cap. It comes with some other goodies wow, let's see what's in here, um, it looks like it comes with. Look like it looks like a scarf. Like kind to lay your edges down, so it comes with that um. A cute comb looks like some bobby pins uh. It looks like an extra latch to put on the um your wig. If it's like, too loose or too uh too loose, you can just tighten it up with that. Oh cute, and it looks like a little uh clip that says. Love me. Oh that's, cute real cute! Let'S get to the actual um thing, which is the wig. So, let's get to the way, but yeah you guys. So here is the u-part wig here um it's actually it's a 16-inch kinky straight um. So this is how it looks um now, as you can see in the color, the color is jet black. You can see this is jet black, but i'm going to post a picture here or here the color was like a natural black, so it had little specks of brown in it, which would not have matched with my hair, because my hair, i dyed my hair jet Black, so i dyed the wig jet black and i used cream of nature. I used two boxes of these to dye it black on yesterday um but yeah. So like i said this is a natural black um. The cap size for this wig is a medium as far as what i paid so the initial price was 167.60 and they had some type of uh promotion code, which was it was st 30. I believe so. It brought the price down to 129.06 um. So it comes with this little little string here that you basically is going to tear off to put the wig on and also it comes with clips. So these will be the clips that you are going to clip on your hair here there there. So there's one two three there's three clips: oh you guys also it looks like it came with a pair of tweezers, so that is really awesome as well all right so, like i said we are going to cut this off. Basically, just cut it off just like that, one there and one on this side be careful, so you don't cut the hair all right. So that's off all right now. As far as your hair same time, you guys can see my hair looks a mess when you're using a u-part wig. You need to make sure that you have the braids in a way that the clips don't go on. So basically, i have braids going to the back and i have them clipped up with bobby pins, and i have leave out here here and then my leave out here at the top all right. So that's basically how my pattern is, as for my braids, all right. So what i'm going to do here is i'm going to start here and what i'm going to do. I'M going to start with the clip in the middle i'm going to clip that one on first um. So we're going to clip that one on first so get a nice grip and push it in clip and then the last part, as far as the front clip this one on this anchor braid will hit this anchor braid and make sure it clamps down there. We go all right and then make sure you tighten the wand in the back. So now we're going to get into the what i'm going to do. I'M going to try to straighten this hair a little bit more because it's a little like um thick and i want to see if i can get it flat. So all right, you guys so for the sake of the video i just switched to my baby bliss flat irons, because for some reason i was just not understanding how to turn that flat iron on it said push button. It wasn't turning on blah blah blah. I'M like i don't got time for this, so i just changed to my baby, bliss flat iron. So let us start to flat on this hair so, like i said, i'm just going for more of a straight look: i'm not trying to put any curls in it today, but you know i just want to kind of see how this and the hair is. So soft you guys, like it's crazy, wow, oh yeah flex, oh my gosh, a flat top flat flat irons. Very, very, very well! You guys so, like i said, i'm not trying to get it like bone bone straight. I still want to see texture in the hair, but just you know just wanted to kind of see how it does with flat ironing with heat on it all right all right. So that looks good enough for me. I think that look good. That looks good enough for me, so what we're going to do now is we're going to move to the leave out part right here, all right, so first, what you want to do is you want to part it. So i'm going to use your comb, you want to part it down the middle, so i'm going to start with my part in the back all right, you guys so once you flatten it down, i want to take like a hard bristle brush and just kind of Brush and blend everything, and together so after you're done just brush to blend everything together, like so y'all. Look how real this looks like are. You kidding me like? I cannot believe this so after everything is brushed together and blended. What i'm gon na do? I'M gon na take some edge booster, any or any type of edge control of your choice. I'M going to kind of lay some edges down a little bit, not a lot of this stuff, because i found that edge booster leaves like a white residue, and i don't like that. So not a lot. Just a little bit, i'm going to get my little brush and then just put a little bit a little soap in it all right, you guys. So this is basically the final look um. I am very, very, very happy about this purchase like i said. I definitely i'm definitely gon na be rocking this. This is something that's so quick and easy, like this whole process, i'm for camera. Of course it takes longer but like if i was just doing this and not recording myself. This whole process will probably take me about 10 minutes like seriously it's that easy, but um. This is the final look. The hair is gorgeous. I love it, love it love it, but yeah. You guys comment down below. If you have any questions for me about this hair, like i said it's definitely a goodbye love me hair. I love this hair. I'M definitely probably going to be purchasing some other products from them. Also more, you part wigs because they have a longer hair. They have bobs all of that, so i'm definitely probably going to be purchasing more from them, but uh yeah. You guys


Comments
BeautifulStruggleLove Swappy: Awesome I actually love the packaging
Rose Jackson: I ordered me a Luvme braided lace front wig. I'm waiting on it to come. Did it take long for your wig to come?
Jennifer Williams: Hey beautiful great video... Best of luck to you