Kinky Curly U- Part Wig Install Tutorial | Myfirstwig
- Posted on 22 September, 2020
- U Part Wig
- By Anonymous
#upartwig #myfirstwig #kinkycurlyupartwig
Social Media
* Facebook : londoncurlstyles
* Instagram: @thelondontayy
* Business only email : [email protected]
Location: US -Columbia, SC
****Most used products ::
Lotta body mousse Https://amzn.to/3gXFI5Y
Shine n jam : https://amzn.to/304oKw9
Braiding rack : https://amzn.to/30G50PR
—————
❤️RELATED VIDEOS
—————
U Part Wig In The Video Is:
https://www.myfirstwig.com/kim-long-cu...
------ KIM - LONG CURLY UPART WIG WITH MIDDLE PART- UPC003
Hair Length - 16 Inch
Hair Texture - Silky
Adjustable Elastic Band - Yes
------
U part Wig Link: https://www.myfirstwig.com/kim-long-cu...
More Styles: https://www.myfirstwig.com/u-part-wig-...
* Protective Styles For Wig Beginners *
Website Link: https://www.myfirstwig.com
Instagram: https://www.instagram.com/myfirstwig_c...
Facebook: https://www.facebook.com/myfirstwig
Keywords
u part wig,upart wig,u-part wig,upart wig install,u-part wig install,upart wig too big,upart wig with leave out natural hair,how to install u part wig,natural upart wig,curly upart wig,u-part wig with clips,u part wig curly hair,coily u part wig,how to blend upart wig,curly u part wig tutorial,curly upart wig with leave out,how to install a curly u part wig,how to install u part wig with clips,how to put on a u part wig with clips
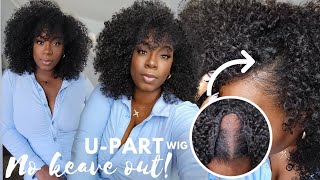
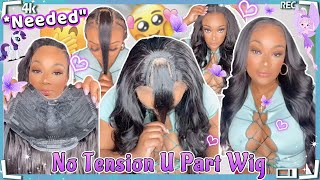
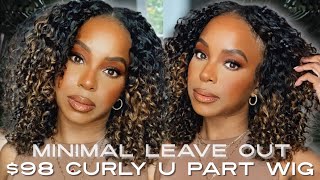
Wow this is so freaking cute y'all. I love this wig, hey guys. What'S up welcome back to my channel, this is london tay coming to you today with another video in today's video, i'm going to show you guys, okay, how to go from this to this baby. Okay - and i literally filmed this tutorial in 10 minutes with like two or three steps: y'all super quick, super convenient super easy and it looks super natural. Okay looks so good. It looks so natural if you guys don't already know. My name is london tay, but my real name is taylor. If you're an og subscriber, hey girl, hey, what's up how you been girl, hey you see me. I see you girl, we here we here um and if you are new here, i hope you guys do subscribe. I hope you guys enjoy this content. I am a hair stylist, so i do a lot of hair content and i also do hair content on myself. So, if you guys are interested in that type of videos, then go ahead and hit that subscribe button. Also, we do give hugs around here. Okay, i believe in hugs, i believe, in getting acquainted if y'all are interested in the same thing then join the fam. I'M gon na go ahead and give you guys a hug, so we can get acquainted and we're gon na jump into this video. If you don't already know, we do give hugs around this mug. Okay, we're just gon na go ahead and jump into this tutorial, and i will talk to you guys in the next video bye, guys, hey all! What'S up, welcome back! Welcome back to my channel! So today i am doing a tutorial on a u-part wig. It is a kinky curly, you part wig, so my hair, i have kinky curly hair more so, like 3c type, however, my hair was like in two braids, so it's not in like a kinky curly type of look, so i'm going to figure out how to get My hair to either match this texture or to get this texture to match my hair. Whichever is easiest, i see that i'm going to do so yeah, so this wig is from my first wig. It'S a you part wig. All the details of the hair will be in the description box below. I may can just dug it out with my hair like this. Hopefully we can do that and the same for you guys, tear if you're using your hair in the natural state. If you are able to just press some gel, which i'm pretty sure that's what you can do - press some gel and some type of leave-in conditioner and comb, it real good and make sure you know the edges and the i mean and make sure your roots are Flat and you'll probably be able to brush it into the hair, and nobody will ever be able to notice and just lay your edges. You should be okay, um, yes, so it comes with like a elastic strap to make it glueless. Even though it's going to be glueless anyway, because it's a u-part wig, but i guess it just provides some security for it um and it comes with the combs on the side. In the front that way, you can lay a u-part wig on the edges, which i'm so happy for that, because i've had a few u-part wigs and they have combs on the side of the part but they're not in the very front which does not make any Sense, y'all um and it's pretty pretty good, it's pretty structured. Well, it has a comb at the back. So that way you know you can just kind of lay the wig, and this is how it's structured inside okey dokey. So let's get it started. I am thinking. I'M thinking just to put it in the middle because my hair, it's already parted in the middle, it does got a little bit of gel on it, but we should be good just a little slither. Okay here we go so i hope that is enough. Now you can choose to put a cap on the other part of your hair, just to lay the hair down. I'M just going to take some space out with my edges and, honestly, you guys y'all can do the same exact thing like no matter what texture your hair is. You should be able to prep it the same way like if you put gel and something on your hair like put gel in your edges and then tie your hair in like two flats, and you know, wet your hair, make sure your hair is wet. It doesn't have to be soaked down and then apply that gel and then tie a scarf around your edges tight and like. Let it sleep overnight. Let it like you know, do what it do overnight. Y'All should be able to do the exact same thing. You should have laid edges honestly. I think some people make you know doing their natural hair so much more difficult than what it really is, and no i'm not saying that because of my texture of my hair, because i'm a hair stylist. So i work with so many different textures of hair. I think a lot of people just tend to, like i don't know, think it's harder than what it is, or maybe you don't want to take the time out now, if you're braiding, your hair, make sure you always put something on the ends, i'm going to put Some type of oil on the ends. Well, i'm going to put some um some hair and scalp conditioner by sofie on my ends, just to make sure my ends are not dry y'all. This is very, very important for retaining length. You don't want to just be ripping through your dry hair. I do sometimes, though, don't get me wrong. I'M not perfect myself, but i try to make sure that my ends stay moisturized. If nothing else, you know that's the oldest part of your hair. So - and this is the same product i used on my client before, like i do braid because, like i said it just like moisturizes the hair okay, so now that that is good, i am going to apply this wig okay, so i am going to i'm going To put a cap on only because my hair is pretty long and it gets in the way a lot. So i'm just going to flip my braids on the opposite sides of each other and just kind of you know just kind of do that you're going to have to slide it back, though, and just to kind of, contain, contain my hair. That step is optional y'all. So now i am going to put this wig on. This is the spot that you're going to want to cut so okay. Here we go so now you have this part, this section, where it's going to be the part you're going to fold this band back over and yeah. So this is how it looks now it looks pretty pretty good, and this is how the hair looks. Alright, let's go apply this band first flip this over and then just go where i'm going to put the wig. Now, if you want to super secure, you can braid your hair down like a little braids around the center around the rim. If you want to wear your wig, if you want it to feel more secure, you have the combs on the side too. You are in the game. Y'All now am i you part wig, especially if i'm going to wear them. Sometimes i do sew additional combs just to feel more secure. That is how it is. It already looks really really good y'all you either have one or two options. You can pull some more hair out right here or you can leave it like that. If you want to feel more secure, you can use bobby pins in addition to the clips make you feel more secure, so i'm going to put i'm going to bobby, pin this clip in place y'all like right here and slide it on so now. It feels way way way more secure. That'S it y'all super super simple. Now this feels very, very secure. If you want to just keep going, you can no one's going to see it. It'S curly hair, it's perfect for no heat. Yes, this is not going anywhere. So now that that is done, i have this piece right here that i need to blend. So this is how it basically looks so those with kinkier textures, like 4a 4b for c. Even this is the mousse that i'm using you can literally rock this because it's almost like fro - and this is literally popping everything out the box y'all like popping everything out the box - okay, so i'm literally literally just putting the moose on on the ends and scrunching. Okay, scrunching y'all, so perfect, y'all, perfect, look at this wig where's, this wig wear it basically blend it out. You guys can barely tell the difference, and i am three c curl pattern. Now. The front of my hair is a little looser, but for the most part it turned out so good, so freaking cute, yes, but the fact that i don't have to do anything to it and i get the fullness that i want because you guys know my hair Is like more on the finer side, and i have to wait days and days and days after wash day to make my hair look full and to make my hair look voluptuous like that, and i get that on day. One hair like this is so freaking cute. You still get the natural look without having to wait days and days and days after wash day, so it can start freezing up and start looking big and voluptuous like i freaking love it so freaking cute, you guys like yes, baby wow. This is so freaking cute y'all. I love this wig. The hair is so soft, as you guys can see. I didn't do anything to my hair without having to sew okay without no glue. Okay, so freaking convenient y'all. I applied this wig in literally what like 10 minutes like this is something you guys can do every day is the perfect everyday wig, and also doubt your edges are left out. So you don't have to feel insecure about lace showing having to blend any lace or anything you guys. It is so freaking, cute, y'all and y'all see how much hair i left out. I left out two fingers y'all. I left out two fingers our hair. That'S how i always do when i don't want a lot of leave out if you guys are interested in this wig. The link to this wig will be in the description box, be low. Okay, guys, here's another up, close look on this wig. This looks like my hair y'all, all right y'all. I hope you guys enjoyed this quick tutorial but, like i said, the link of this wig will be in the description box below and i do have a coupon code if you guys would like some coins off okay. So, let's get into it like, let's get let's get into the natural look baby, hello! Let'S get into this natural, this natural look! Okay, all right guys! I will talk to you guys in the next video bye, love, y'all,

Comments
Pretty Moe: Hold on can we talk about her natural hair though like
Amazon Beauty85: I mean can we all say together! YOUR HAIR IS ALREADY GORGEOUS
s g: if you 're someone who doesn't want the out the box manufactured curls, just co-wash and detangle with a denman-type brush
Elle Schaffer: Love it on you, definitely getting this so I can give my hair a rest.
London Tayy: Hey babe ! I love yal and thank you so much for watching ! I hope you are here to stay and subscribe to my channel and like this video ! Also...The density is 200% guys ! Also here are some time stamps to help you navigate through this video 01:57 tutorial starts 07:57 prep wig 08:57 applying the wig
Nataja Jackson: Lovely wig...I'd love to see you do a product review of Straight Silk by JuniorLabs. Definitely makes my hair silky straight
Karen Nichelle: Your natural hair is so much prettier than the wig js.
Niko Panther: Your hairstyle is beautiful and powerful!
Teeciya Curly: Love it so natural ♥️
Ms.CinnamonSpice: Very pretty wig on you, it looks so natural m, great review!
Thats Cute: thankk you for this ideaaaa! this looks so pretty on you
Awillii: Love your natural hair!! The wig looks nice.
Evelyn Nichel: Thank You for the bobby-pin trick
Junita Hughes: What density did you get?
Angela spearman: Love the look, buying for winter style
Mia Wilson: Can you get this hair wet and the curls stay defined?
Diamond Girl: Hello, what's the density on this hair?
s g: how beautiful is her natural hair tho....
Ta'kenya Moffett: Love the Wig, but girl you have beautiful natural hair.
O' yes I am Queen: 8:57 the wig finally gets applied
Sarah Moses: That's very nice and it fits your face shape. Girl you remind me of Monica .
Laquila Manning: What is the density that you have? They offer 130 or 200
NanaPearl pearl: Wait a minute!!! Her real hair is better then the wig.
Tameika Smith: wow this doesnt look like 16' at all
m3g0mia: Density !!?
Trish Chiyedza Nyakuhwa: How many inches is this hair. ?
EGG: Whaoooo! What is with the natural hair....why does one need a wig?
nyx: You already such naturally loose curls. Why the wig?