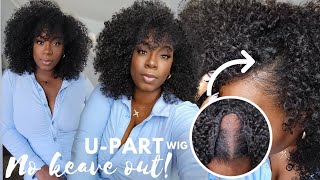
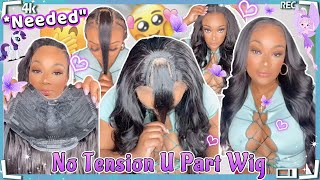
Middle Part U-Part Wig Tutorial No Sewing Under $40
- Posted on 23 February, 2016
- U Part Wig
- By Anonymous
In this video, I show you all how to construct a u-part unit without having to use needle and thread and in just about an hour! U-parts have become my favorite over sew-ins just because of how simple they are. Enjoy and let me know if you all would like to see my braiding pattern or technique for sewing on my u-part units. Thumbs up for more ❤️
TO PLACE AN ORDER FOR A WIG:
-OR-
INSTAGRAM: Instagram.com/BrianaTahari
FACEBOOK: Facebook.com/BrianaTahari
SNAPCHAT: BRITAHARI
W A N T M E T O R E V I E W Y O U R C O M P A N Y O R
P R O D U C T?:
email: [email protected]
In this video I'll be showing you all how I made my no, so you part unit first you're going to start with the. U part wig cap, which can be found at your local beauty, supply store. This one was made for middle parting. You'Ll also need a glue gun and hot glue gun sticks, which I got from my local craft store. This is the hair that I used by Isis. It'S one of those very inexpensive, all-in-one packs from the store this pack came with the ten twelve fourteen and sixteen inch along with a bang and a closure. I'M gon na go ahead and start at the bottom, with the sixteen inch for each individual track. I start by lining it up to see where I need to cut before I apply any glue. Next, I'm going to go ahead and apply the hot glue trying to make sure that I'm saying it as close to the top of the whip as possible. However, if you mess up like I did many times in this video, you can go ahead and pull it off once it cools. You'Ll see that when I lay a check, I start in the middle and then work my ways off to the sides make sure that you're really pressing down all over the track, but especially on the ends, because, if not, it will come up as time goes on. I'M laying the tracks really close together to make sure that my unit is nice and full after I lay this track, I'm gon na go ahead and speeded up some guys, because everything up until the very top is pretty self-explanatory. My brother's friends really wanted to say hi to you guys, so there they were [ Applause ]. Another thing to be mindful of is to make sure that you're stretching the cab, as you put your truck across this, make sure that they kept doesn't bunch up underneath and become soo small for you. You'Ll notice at this point that I'm still taking the trucks ear to ear, to make sure that I have that length all the way around and once this is filled in and we get to the very middle. I'M just going to start filling in the extra space, and this is how far I got with the first quote-unquote bundles now, moving on to the 14-inch, as you can see here, this particular truck did not lay right. So what I did was let the glue dry and then rip it right off and lay it all over again, and you can do that with no problem. Even if you need to reinforce, as I just said, it'll work out. Just fine, that's for this little flat. One, the cap, I did not glue any tracks once at that part. I start behind where that seam is and just keep taking my tracks one over here. You could really see the horseshoe pattern in which I've laid the tracks and I'm about to start filling in from the middle to the top, making our way right to the 12-inch, and I can't forget to mention those pushpins holding your cap on so the styrofoam head. Will be life-saving now that I've gone ahead and filled in that middle, I'm going back to taking the trucks all the way to the edges of the cap, and that's just to maintain that fullness see at this point I start spacing out the trifle a little more And honestly, I thought I was going to run out of hair. This pack came with a closure piece and a bang piece, both of which I did not expect to use, but I had to get innovative and you'll see what I mean in a second. So right here I'm adding the closure piece, because once again I just knew this hair was not gon na stretch. I went ahead and pinned the hair up on the closure, so it didn't get glue on it and then I just glued all over the lace. Now, I'm placing it firmly in the middle to make sure that it's nice and flat and that it just meshes with the rest of the trucks, and though I didn't expect to do this - this actually is a great fit for. If you want your unit to be really full and you want to use every bit of the hair - that's in the pack rather than facing it out for the remainder of the unit, I'm using the bang piece that came in and you'll see that it has a Little bump to it and we're going to get that straight in just a second, but this is really how I was able to fill in the rest of the cap and once again, as you go along, feel free to pick off that dry glue. So it's not comment through from underneath there leave out now, I'm just laying that last and final track as close as you can get to the top, so you don't have any gaps and taking off that extra glue, once more now you're going to cut the little String that holds the U part together and take off your pins now just taking a flatiron and going through a mission, the closure there being piece and the trucks together. So everything can be nice and seamless next you're just going to detach the unit from the styrofoam head and because the glucose are you gon na have to pull a little bit. Here'S my final product after breathing down my hair. So when they unit down and straighten in my weave - oh, I hope you'll enjoy this tutorial and if you want to see how I saw my unit down or blue, my leave up feel free to. Let me know in the comments below see you all in my next video


Comments
💎Emerald’s Honey Comb 10k 🍯: Yes !! I'm going to try this I would like to see how you braid it down and sow your unit on
xoxopeacebringer: They stingy with that hair I’m glad u worked it out. They know they can put more wefts in those packs, looks really good
Jasmine Airdelle: I LOVE it!
Kenton & Habiba: very cute. I think I am going to make a u part wig myself this weekend. I have been natural now for 1.5yrs and this would be a good protective style. lovely
Kaylia Williams: You can also put a plastic bag on top of the head so it does not get stuck once you take it off.
Beautiful Jalisa: Does it damage the tracks when you use the hot glue
Tamia: How long do these wigs last?
Skyylar Miller: hey bre bre it me skyylar