Step By Step U-Part Wig Installwig Where Beginner Friendly
- Posted on 16 May, 2021
- U Part Wig
- By Anonymous
This is the Best U-Part Wig Install. I Had the most amazing time filming this video. U-part Wigs are the best . I add clips to the wig for install.
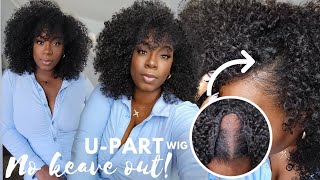
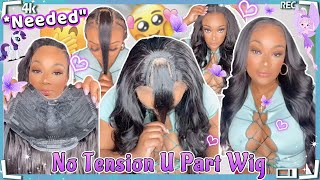
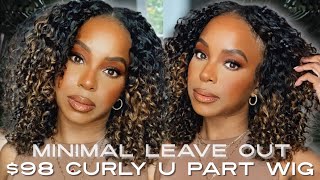
As i Install this u-part wig in center part, it can also be done with a side part.
As mentioned before u-part wigs are acessible and easy to install quick and easy u-part wig install
#U-Partwig#wigs#u-part
[ Applause ], what's up guys welcome back to my channel, it's your girl, shan's knight, and i am back with another video in this video. I will be showing you guys how i install my upart wig, you guys remember. I did i made this wig on my last video. I made this wig using only one bundle of hair one and a little bit of hair bundle. So no i'm going to show you guys how i install it. So if you guys missed that video, where i made this wig, you guys can go back and check out my last video, where i show you guys how i made this wig. As you can see, my hair is freshly washed and what i did i wrap it in the same pattern that i am going to lay my wig, so i already part out the the middle part, so i'm going to be doing middle part, so i am just Parting out my label, now, as you know, my hair is gross pixie. So it's no longer it's no longer around here. So this is my leave out that i am supposed to put the wig on. So i'm going to brush out a little hair right here then brush up a little here right here you do the same thing. On the other side and i'm going to create my ankle, you can create your ankle using braids. That'S a bottle to create the ankle. The part we're creating the anchor it doesn't have, it doesn't have to be straight. The parting doesn't have to be straight because it's not going to be showing so now i create an anchor for here, as you can see so now, i'm going to do the same thing over the other side. This is the end of the anchor. So i have the clip, so i put a clip here. I could right here and i think i use a comb right here and i use another comb over here and then i put a clip inside here. I don't normally like the clips, because i i rather the comb because sometimes the clips squeeze my squeeze my my my head. So now i'm going to install the way, so you put it like this and you use the comb and you put it in the anchor right here number one, and then you put the next one right here and then you put the next one here. So now you can see, and then you just pull it back so because my hair is so short what i'm going to do. I am going to put up put something to just close the the tracks to those clothes right here. I have one truck up here. I am going to i'm going to put it here so that when i brush down the hair, it does not look. Um like you can see where the hair starts, i'm going to use them in my bonding blue. It right here make sure that it's first in and then you carry it around. If you miss my video, where i show you guys how to remove um bonding glue, you guys enter for that video. As you can see, it's a bit longer than the bam, but we're gon na fix that we're gon na fix that we are going to fix that right here. Oh oh another, one fights with us! So won't! Okay! Please me! Yes! So guys! This is the wig! This is the install, i love it and it is very easy guys this is a friendly week. Your part wig is a friendly week. You don't have to you, don't need any glue, you don't need any frontal. I don't need any closure to make it all. You need is just here and you just cut it off, so thank you so much guys for watching this install if you guys enjoyed. Please remember to subscribe to like to share and to comment and also share it with your friends, family and let them see what time it is because i am loving this here and it is so flowy another one bites the dust. So, thank you so much guys for watching and bye.
Comments
Shanzii worldd: I love how you always take the timeout to explain everything and share you hair techniques. I love this install , you make it look so easy.
Life With Karisha: I have been wanting to try one of these wigs since forever, but wasn’t sure how to do it! I appreciate this tutorial, makes it easier.
kellebaby: Ooh. This came out so nice. I was waiting for you to install it. It looks amazing.
CestJackie: The wig looks so good on you~!! It looks so natural and like it’s your actual hair~!!
Downtown on 7th Avenue Handbag Adventures: You did an amazing job. I never seem to get my upart units right. TFS
Coach D's Planner Life: Thanks for sharing this tutorial. This looks is so sleek and beautiful. You make installation look effortless.
Dari Queen Truths: I’ve been looking for a shorter bob styled wig! This one looks very good!
Just Dropping Gemz TV: This hairstyle really suits you! I love it.
Chat With Audrey: You made this wig look so good! I love it
August Nicole: you make your tutorials look so easy
Adriana DosSantos: Love how the bob is looking in. You i need to get one of those wax sticks they look so convenient
August Nicole: makeup is beautiful, wig is bomb, you slay!!!!
C&C co.: Love. Your making me want a whole bob now! Love it.
Tiff with the Tea: New subbie here from Facebook for GENUINE support! This install is FLAWLESS. Great editing too
By Nia Cuisine: I am going to look how you made this u part wig. I did one once but it was too big need to check what is the proper way to size the cap. The wig is flawless
Desreen Taylor: You made it look very easy great job
August Nicole: ok body!!!!look at that bounce