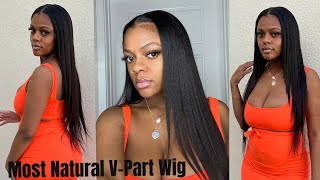
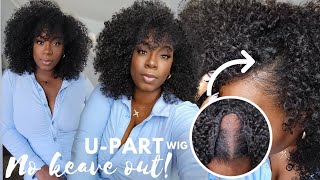
How I Sew A U-Part Wig On A Dome Cap W/ Clips
- Posted on 28 January, 2015
- U Part Wig
- By Anonymous
Thank you enormously for watching!! Please Subscribe and Share the video!
Watch my previous video here → http://youtu.be/LEXDfoAZ3cI
SUBSCRIBE by clicking here → https://www.youtube.com/mamyndiaye88
ALL THE PRODUCTS USED ARE BELOW
Dome cap- http://www.sallybeauty.com/Get-N-Waves...
Needles- http://www.sallybeauty.com/donna-needl...
Thread- http://www.sallybeauty.com/weaving-thr...
Mannequin head- http://www.sallybeauty.com/Styrofoam-H...
Wig stand- http://www.sallybeauty.com/on/demandwa...
T-pins- http://www.sallybeauty.com/wig-pins/SB...
AND Scissors
SOCIAL NETWORKS:
Instagram: www.instagram.com/mia_unlimited
Facebook: www.facebook.com/miaunlimited1
THANK YOU SO MUCH FOR WATCHING!
PLEASE SUBSCRIBE AND SHARE!!! ☺
Hey girls welcome back to my channel so today I want to show you guys how I make a very simple, straightforward, u-part wig, the wig, I'm showing you right now it is what we're going for, and this is my wig and it says very straightforward - human hair U-Part wig the things you're gon na need our t-bar pins, a dome cap or leaving cap needles and, of course, your thread you're also gon na need scissors and with clips of course. Lastly, and most importantly, you're gon na need your hair. This is my clients, hair, and it is, I think, so many hair Brazilian something like that. It'S very good hair, alright! So let's get started so I'm placing my dome cap on my mannequin head, making sure that I have it straight and I'm gon na go ahead and mark the middle part of the cap on to sewing on the first track. So on the extremities of any tracks. That I'm gon na start, I'm gon na make sure to have the thread very, very secure. So I'm gon na go over probably three times to make sure that it's secure. I made the mistake of having my thread way too long and that's what I'm battling with right now so make sure to have it at a normal length, a manageable length and just sew around the West, not through the web. [ Applause, ], [ Applause ]. My first track of hair is done, so I still have some more hair left, so, instead of cutting it off, what I'm gon na do is flip over the hair and continue sewing on the second track over here yeah about three tracks in so I just want To show you my sewing pattern, what I do is I go through the hair, one like so loop it around and then go through the same spot, a second time to secure the track. You want and loop again to secure the track, and these T pins are great to hold your hair in place and make sure you don't have a cricket track. What I do is just you know, lay down on the cap as I would fill it and just secure it with the t-bar. That'S why I use the t-bar is to secure the hair and the cap in place. It makes it a lot easier and you go by a lot faster. So as we advance up the cap, you're gon na start to sew in a horseshoe pattern. That means that you're gon na create the you. Hence the. U part wig you're gon na start showing into a u-shape, and I'm gon na show you what that looks. Like [ Applause ], you all right. So after you stone into a u-shape. This is what your look your wig is supposed to look like, and I have my little part in the middle as you can tell, and I'm gon na start sewing across and start closing in my wig you almost at the end. I'M just finishing my my part. I wanted a little bit tighter, so I'm going to go ahead and add two tracks, and these two are the last tracks that I'm going to add on hold the way. So now we are all done with the wig. All that is left to do is cut the middle of the cap. I'M gon na go ahead and do that not too close to the to the tracks or we're gon na mess up the whole wig. So, just carefully cut little by little and from there you can add your clips or your calls to each side of the you. So that's it for this tutorial. I hope you learned something from this video, so my first time making a how to hair type of video with the wig involved and stuff. So I hope it came out alright for you guys, I'm not a professional. I just do my own hair and a few clients that, like my hair and want me to do their hair, so I hope you liked it on the left and you learn something if you did please thumbs it up and subscribe to my channel for more videos And leave me a comment of how you think I did alright. Thank you. So much for watching and I'll see you in my next one right.


Comments
Dk_yea: This was the most straightforward and easiest video I've seen on YouTube for making a u part. Thanks.
Ms. S L: I agree with the other young lady this was by far the best straight to the point tutorial on how to make a u part wig. thanks a million!!!
MsCarter90: It looks so good! Thanks for posting
Real Deal TV: great video, love it, i subbed too
The Dance HALL: Girl you are very PATIENT :o