How To Blend A Curly U-Part Wig With Natural Hair| Step-By-Step Instructions Ft. Asteria Hair
- Posted on 28 April, 2022
- U Part Wig
- By Anonymous
In this video I'm showing you step by step, in detail how to blend your natural hair with a curly U-Part wig.
❤️❤️❤️❤️❤️❤️❤️❤️❤️❤️❤️❤️❤️❤️❤️❤️❤️❤️❤️❤️❤️❤️❤️❤️❤️
Link To Hair➤https://bit.ly/3EIlrOW
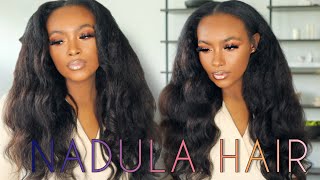
Hair Info: 22inch water wave U part wig 180%density
Buy One Get One Free Wig➤https://bit.ly/3EMVZYW
❤#AsteriaHair Official Website➤https://bit.ly/3LenFs1
Asteria Hot Selling Hair★ ★ ★ ★ ★
Top1 #asteriawaterwave Lace Wig➤https://bit.ly/3EGKUZ6
*Invisible Skin Melt HD Lace Wigs➤https://bit.ly/3KamMz9
Affordable 5*5 Closure Wigs➤https://bit.ly/38hfmNq
✨Win Free Wig In Facebook Group!Join Now➤https://bit.ly/3pcfZOo
#asteriahair30inches #asteriawig30inches
Wholesale or promotion? Contact Asteria Hair:
WhatsApp: +86 15238065852 Email: [email protected]
Instagram @Asteria__hair https://bit.ly/3Lobbxq
YouTube @Asteria Hair https://bit.ly/3m5EBoA
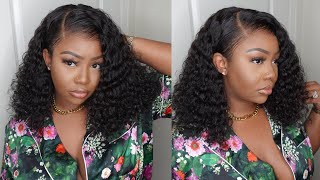
Hello, this video, i'm going to show you all how install my u-part wigs. I know i have other like u-part wig videos on my channel, but this is another one thanks so much for watching. So the hair that i'm installing today is from asteria all of their information, of course, will be in the description box below per usual. So this is a 22 inch, i believe either water, wave or curly. I'M not sure the curl pattern, that's embarrassing, but i'm going to put it right here on the screen because i forgot sorry um, but this is what it looks like it's a real. It looks a little water wavish. This is the curl pattern, a little water wave. So we're gon na go with that again. This is the! U part wig, but what i like about this u-part wig in particular. Is it? Has the snap combs right here? Some you part wigs just have like the basic combs that just like you know like like comb into your your hair. You know what i mean the ones that don't snap um, i don't like those because they slide out really easily. But with these you can just snap and go: these are a little more secure, so you have two little snaps on the sides: um snaps right here and then snap in the back. So the first thing that you would do if your hair is like not already prepped, then you would go ahead and like either braid it back. I'Ve seen some people, you can like slick it back into a ponytail and do a little ponytail. The only thing about that is, it may be a little lumpy in the back, that's kind of why i prefer braids. I made one part here: gon na do another part on this side. I really don't need my anchor braids to be like super thick either they can be relatively thin, but just something that the hair can grab onto i'm going to be doing a little twist type motion or i'm just like a two strand flat twist and just like Twist it to my scalp, so there's one little flat twist. You can't really tell my hair is dirty sorry about that um, but yeah one little flat twist right here. I'M gon na do the same thing on the other side and i'm just tucking the ends of these twists. I have already have bobby pins in the back of my hair to hold up my braid, so i'm just like tucking it in to one of those bobby pins and pretty much that's the only prep that you need to install a u-part wig. These are so simple. Um so now i'm going to go ahead and cut this little string off of here now, as you can see, the little mouth is a little wider, go ahead and flip this on. So the first thing that i'm doing is putting this clip in the back. In so, i'm gon na slide this into the little anchor twist and i'm not going to snap it down just yet. I just want to make sure everything is sitting how supposed to before. I unlock it put this one over here and there's also two on the side. So now i'm gon na start snapping everything in place. Okay, um next thing, i'm gon na do is deal with this leave out situation going on at the top here. So the only issue is like this: hair is like curly and my hair is not so i brought a couple of tools to kind of help myself blend it. I have my flat iron and then i also have my curling rod right here. Um i'll probably use my flat iron just to like smooth out my hair, because it just looks a little rough. I definitely should have used heat protectant. This is exactly why my hair is broken off in the front. It'S not funny like i'm laughing through pain. Now i'm gon na go ahead and do my edges before trying to blend my leave out and for my edges, i'm using edge booster, the red one. So while my edges are sitting and laying down now before i jump into blending the top, i'm just going to spruce up these curls a little bit um all right now we are ready to try and blend this top um. So i went ahead and flat ironed. My leave out a little bit, but it's actually a little piece over here that i need to go ahead and get it's important to make sure, especially when trying to blend natural hair with curly hair. To make sure that your texture that you're leaving out matches as close as possible to the texture that you're blending it with so i know it's not going to be perfect because i mean two different hair textures here, but i'm gon na do the absolute best that I can to make it look as good as possible. Okay, so, as you can see like, even though i've flat ironed, my hair, like it's still like a little frizzy at the end, so i'm gon na use my wax stick to kind of like smooth it down. So it's flat and brush it in this side, i'm going to take this and smooth it down. I need this to be as smooth as possible. Okay, ouch all right and now that that's flat, i'm just gon na, take my curling iron and like curl, my natural hair and in with the curls of this. If that makes sense - and i'm gon na start in the front just to make sure because the front is the most finicky and i feel like smaller sections - just work better like take your time and do smaller pieces as opposed to a bunch of big pieces because It'Ll, just look better overall, so you see my leave out in the front is very short, so what i want to do is just see how there's already a curl, i'm not going to curl it again, but what i'm going to do is just make sure it's Tucked under that curl and i want to like pull out the curls just so it looks not so uniform. So this is what it looks like blend it in also something else that i like to do. Um, like especially like, since my pieces are very short in the front, is i like to just twist it together, which just completely optional and just like, create like a little style with it. You know like take some pieces and like pull it back. I just feel like for me: it helps it blend better and you don't see, like you know too harshly, anyways the difference, differences between your natural hair and the wig. So i would just like curl it back and use a little bobby, pin and like seal it in place and there you have it. That is how you blend natural hair with a curly you bar wig, once you like get down like how to do it, then it's easy, but now it's cute because at first i was a little nervous, not gon na lie. It looks a little shiny right now because of this all these bright lights right here, but it's doing what it needs to do you guys, thank you so much for watching this video, like i said all the information for this hair will be in the description box Below, if you have any questions or anything like that, uh leave it in the comment section i'll make sure to get back to you. But thank you all so much for watching this video adios until next time.
Comments
Dee Marie: I like it a lot
Dee Luther: Good Video as Usual Very Cute Thumbnail Tho Beyond Pretty you are Nice Cheeks Structure GoodmorninG EnJoy your Wonderful Day Too Happy Amazing Weekend ahead Be Bless n Stay safe always