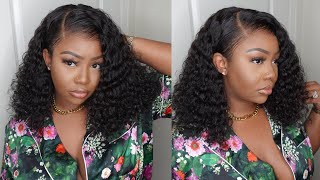
No Lace! No Glue! No Leave Out! Kinky Curly U-Part | Install + Removal | Ywigs
- Posted on 24 June, 2021
- U Part Wig
- By Anonymous
NO LACE! NO GLUE! NO LEAVE OUT! Kinky Curly U-Part | Install + Removal | YWigs
The wig I received is from www.ywigs.com
Use my code "Key15" for $$$ off when checking out.
Direct link to the wig:
https://www.ywigs.com/products/brazili...
Wig SKU: AU15
Hair Length: 18 inch
Hair Density: 180%
Cap Size: Large
Hair Color: Natural Color
Connect with Ywigs:
http://www.instagram.com/ywigs_officia...
https://www.facebook.com/Ywigstore/
Snapchat: Ywigs Hair
Hey: what's up y'all, it's your girl, the kids me and i am back again with another video. As you can tell from the title and the slate in the thumbnail, we are going to be doing a another curly. You part wig. The wig that i receive is from y wigs. I like to just go ahead and show you the unboxing of the hair. So you can see exactly what came in my package. This is going to be a 18 inch. Kinky curly. U part wig! I am just gon na go ahead and show you the construction of the wigs. It comes with the standard combs around the unit, as well as the clip in pieces around the. U part, i did get this. U part in a right side part, so you can only wear it in the side parting that you decide to choose on their site. Now, with this, you can go ahead and wear your natural hair out with this, because they do give you extra elastic bands to make sure your wig is secure. But i want to go ahead and do the no leave out method so you'll see here me popping the wing on towards the right side. I do have my hair. Just braided back gon na go, go ahead and clip the actual clip in pieces in two on on the side, one in the middle and then two on the other side of the part, i'm going to go ahead and feel for the first width of the hair. You want to make sure you're going in with just the first width of the hair you're going to separate that from the rest of the wig, and this is where we're going to do the crochet method technique. Now, if you're not new to uh this method, uh, then this is going to be a repeat for you. But if you are new to this method, i am going to link some other videos down below. So you can see this done, but i'm pretty much just going to go ahead and leave the actual you part wig under my braids. That'S it you're not going to tie the hair you're not going to do anything else. All you're doing is weaving it under your natural hair. You want to make sure uh you want to make sure your latch hook is pointing in the direction to where you want the hair to be pulled from, and that's it just say easy. Just that simple, i'm just going to show you exactly what i'm doing, i'm going to give you a full review on this unit and then, of course, i'm also going to show you how to take this out. It'S really easy, really simple, but i know a lot of people have a lot of questions on how you take down this method. So i will be showing you that, towards the end of this video so make sure you stay so all right. So, as you can see, this is going to be the finished look. I would say that this hair is about 90 percent dry. It'S not all the way dry, but i did go in after i took my scarf off because you definitely want to put on a scarf to go ahead and lay the top part of your hair down. I did go ahead and i took a pic and i picked the hair out. I always like to go in and fluff my hair out. I just pretty much just take it like this and fluff the roots, just to give the hair a little bit of volume and a little bit of height, but this was what we are working with y'all. I absolutely love saw that i showed y'all the crochet method and how i actually uh put this wig on. This is my second time uh doing this method on a u-part wig, and i just wanted to show y'all a another unit doing this method. This unit is going to be on an affordable side right now on their website. I'M looking right now and their u-part wigs are actually on sale before the sale. It was 300, but with the sale it is half off which is actually really really good, and it's gon na run you at 150, i'm not sure how long the sale is going to be on. But, of course, if they give me a coupon code, i will go ahead and put the coupon code down in the description box below for you now. One thing i love about on their site as well is that you can choose. If you want a middle part, you part wig or a left side, part wig as well as the right side. As you see that i have. I definitely think this is going to be one that you can have in your wig closet for a while. I mean it mimics uh that coily natural hair, textures kind of giving me that afro kinky curly look and, as you can see, you can get a no leave out. Look with this unit. Love it love it. I love it. I love it so right now, i'm just going to go ahead because i know this is the part that everybody is like. Okay, i see how you put it in, but how do you take it out? So i'm going to show you exactly how to take it out. If you did the method that i showed you, you shouldn't have any problems so just stay tuned, i'm going to show you that you already know i'm going to put all the information down in the description box below. Thank you so much for tuning into this video. If you could, please like comment, subscribe and share, and i look forward to seeing you in my next video all right so first i just like to go ahead and start unloosening. The wig um in the back with the combs first um, there's a few combs on the side, so i just go ahead and do that then. What i like to do is i kind of like to stick my hand underneath uh and start unsnapping, the actual um, the actual clips that the clipping pieces that are attached to you part. I just go ahead and unsnap those that way. You know that the combs are already detached from your hair, so i'm just going to go ahead and do that and what i'm gon na do is, as you can see, i'm just gon na go ahead and separate the hair that i actually crocheted right here. You'Ll see my braid, so you can see the separation from the wig and then you can see the other separation from the actual piece that i crochet and look how it's just moving see how just easily i'm easily able to move it. That'S because we did not tie it, so i'm just going to take it i'm going to drag it as such then boom. That'S one piece, that's done and we're just going to keep doing that going piece by piece. Another piece another piece y'all see how i'm just dragging it. Nothing is i'm not yanking at anything. Nothing is getting a tangle with my natural hair because it wasn't attached. All i did was take the crochet needle and just weave it under my natural hair. Just to flip it over to give me that invisible look, that's it nothing more! Nothing less! Really easy! That'S why i love this method. Okay, so now that i got that one i'm going to unhook the second clip, as you can see right there, then, when i unlock unhook, that clip here is the rest of the hair. That'S on that portion. I'M just going to go ahead and take that out and, as you can see, look at the hair, it's just gliding right out, i'm not damaging the wig, i'm not damaging my natural hair. That'S what i love so much about this method as well. Here'S another clip! That'S on this side here we are y'all, look half the wig is already off and it's only been a few minutes, so we're going to go ahead and do the same to the other side. As you can see right here, i can kind of see where my braid is and i can see where the wig is and, as you can see, i can pull this out. No issues pull this out, no issues, i'm telling you i do know that. Of course, i literally just did this style um an hour ago and then i'm taking it out within the same hour or two, but i'm telling you if you were to wear this style for a week or week and a half all you want to do. If your hair is stuck together, all you want to do is find the piece where you actually um, crochet it in and flip it over and just run your hands through it and make sure you have hair on the left side here on the right side and All you have to do is make sure it's detangled and then it should slide right through your braids. I promise you it's not going to hurt your hair and you're not going to damage the wig. It'S really just that easy, and it's really just that simple. I love it, i love it all right, so we got that down now. All we have to do is do the back side. The back side is the last piece we have left. Let'S see at this point, i could just pull this up just to see where this hair is and go ahead and pull that through go ahead and pull that through go ahead and pull that through and it looks like we got one more piece: go ahead and Pull that through boom there, it is hair, is still intact. Hair is still looking good. Everything is still good. This is the unit. This is the! U part of the unit everything is just like it was before we put the hair in so boom. That'S it that's! How you do it try this method? I promise you won't be disappointed. You

Comments
CurlsNCoils: I’m loving this technique. And congratulations bc you’re about to hit 100k
Pyt G: This unit is beautiful! that you showcased it with this technique. So naturally pretty!!
Rubi: Amazing video! I’ll try it right now
chiquita s: I love it!! I gotta try
Orka able: Innovative technique ! Good Job
lady dulayne: I just saw an ad for this on FB and ran over here. Did she just crochet the hair into her braid????? Mindblown!!! Aint ever seen this technique before. PLease do a seperate tutorial on this!!!!
Pamela Gordon: Beautiful wig ❤❤❤
QueenP K: You are a genius
Carla Peterson: I love this technique.
steffylvmk89: Great tip thank you
Manisha Farris: I love this!
Gaylen Henderson: Omg! This is AWESOME!
Laniska Thompson: What did you use on the hair?
Nadeeru Love: Can you sleep in this and do the combs eventually cause breakage?
T: It may work better if u put the tracks a bit closer to each other so it falls better also does it work on straight hair ?
SHANIQUA MATTHEWS-MCCLAM: I want to order the same length you have. It seems short for 18in. Did you cut it?
Ghanaian Queen: Sisssss where you located!!? Can you do my hair ! Lol this amaxing and looks natrual
Molly Moll: I need this
shabop shebop: This is 18 inch?