Diy Upart Wig For Beginners! | Lex Sinclair
- Posted on 23 May, 2019
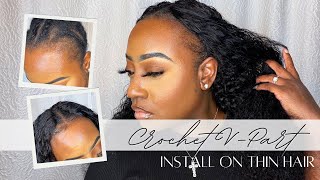
- U Part Wig
- By Anonymous
❤️ Open for more info!
#EASYWIG #BEGINNERWIG #UPART Thanks for watching! Don’t forget to like, share and subscribe, xoxo
♡ NEW VIDEOS EVERY WEEK ♡
Intro, outro, header: @300shotta on Instagram or www.300kja.com
Illustration: @wuckingfierd on Instagram
CONNECT WITH ME:
Instagram: lexsnclr
Twitter: @lexsnclr
Snapchat: morowa
Link to combs: https://www.amazon.com/Combs-Black-Sta...
SHOP WITH ME AT
@HairSnstn on Instagram
Hey guys welcome onto my channel it's Lex and real quick, I'm just gon na show you guys how I made this. You part wait it's my first time I hey guy you part week, so it's kinda messy, but you know it works, and this is made with three bundles, I think, of hair sensation, Caribbean curly. I will leave the ID name in the description box down below taking this spandex dome cap. I'M just gon na put it on over my hair and Mark out where I want to leave or how much hair I want to leave our base color. So I make it pretty thin, but I don't know I just Marcos how much I think I wanted you vote that part's pretty. You know it's self-explanatory and it's whatever you want to do. Basically, you can also do it at the side. It can just spin it around whatever, so that just puts it on my wig head and I'm just kind of playing around with options. I guess for how far back I wanted to go, but I do originally stick to that. First line that I drew okay, so first thing I'm going to do - is I'm going to sew the first track on the underside of the wake up, so I'm pinning the another truck to that will where the line starts, where my level would start. Basically, then, I'm going to flip it over, pin it down and then I'm putting the cap inside out then I'm going to use another pin to just mark where the other side is so it's basically just showing me where I drew those lines. This is just easier than like having to like show it inside without the cap being turned inside out. That was pin it around the perimeter of the cap. I guess and then I'm going to sew it down. So I'm not the end of my third and then I just pull the needle or the third through the whiffed and through the cap. Then for my second stitch, I'm going to go through the weft again and then I'm going to wrap the thread a row. The needle like two or three times and pull it through, and this is just going to knot - it twice so have a knot in the third and then I have a knot like in the stitching. I guess - and this is making sure that it's really secure and it doesn't go anywhere, and sometimes when I do this like it doesn't pull all the way through also have to go back with the needle and loosen. It then pull it again, just to make sure that it's nice and flat, okay and then I just do other so the track down, but I'm instead of going through the weft I so under the weft and I'm doing blanket stitches. So I'm going to push the needle under the weft and then I put the thread behind the needle I'm going to do it a couple times so the video, so you can see properly. But this is just how I do the blanket stitches and that's how it looks once I do them, and I'm just going to do this right, our own until I get to the other side and then I'm going to pull it, I'm going to knot it again. So I'm going to pull it through the weft first and then I'm going to go through the weft again wrap the knees around the third two or three times and pull it through to knot it. And then I cut it off and move on, and this is how your blanket stitches should be look nice and flat. Then I'm going to flip the cap back over right side or whatever this is ho. This is why I sewed it on the underside of the cap so like. If I put my hair up, I won't have any shock showing and I don't have to leave us and your hair at the back. Okay, so for the rest of the week, I'm just going to sew her mouth. I'M going to pin the tracks right around from the right side or firmly vote is to the left side, basically, where those pink lines are and then I'm going to sew it down. Sort of starts its again. I go through the left with the knot at the end of my thread and then I'm going to go through the weft and the cap one more time, but I'm going to wrap a needle around the third two to three times and then pull it through two Notches so I basically have two knots at the beginning and at the end of each bundle, and also do this if I get five runners at third during a bundle, so I not it, I run I go through the wave twice knot it and close it. Then I go through the weft twice again when I'm staring at my new dirt. So this is how I do the blanket stitches. I push your needle through wrap the thread behind the needle and pull it all the way through and just do that for that entire track. So this pattern is also different from what I've seen other people do for their your parts, but I'm basically doing it. So I would do a closure wig and the closure would basically be where my devotees. So when I get to the end, when I get to the pink line on the other side, I'm going to flip it over and to flip it over. I just go through the weft like three times just to make sure it's a stone. Then I flip it over and go through the weft about two or three times again. Then I continue doing my blanket stitches under the way. If you don't understand, then I'm doing it right here, so you can see and when you flip is over, you want to make sure that it lays flat when you flip it so flip it over and then kind of press it down with your fingers to make Sure it lays flat like there's no space between it, and then you can go through the way three times two times and then continue with your blanket stitches. You also don't have to do blanket. Stitches is just how I learned it and how I stitch, but really and truly any sticks, any type of whatever works, as you can see, it lays flat. This is how you get your hair or your wigs or whatever, to lay flat without having to cut your bundles. You just flip it over and sew it down that do do it and I'm just going to pin right around to the other side and sew that down like I did just for the first line on the hair, looks pretty bad here, because I believe state that It on that and didn't condition it so way, I'm going to sew that down and I'm going to continue to just go from side to side stopping at the part all the way up, and this is how it should look once you get to the top part. It kind of starts forming like a circle or kind of like a little square like a boxy circle at the top, and I'm just going to continue sewing, and this is this part - gets a little complicated. So I'm going to try my best to explain what I'm doing, and hopefully you can understand and recreate it if you want to okay, so I'm going to sew down the end here and flip it over, like I did for all the other times when I switch Over the track, as you can see here, I'm kind of aiming to create, like parallel lines, from the lines that I drew for my level. So I wanted the tracks to just follow in a parallel line going up from where I just put my finger while ago to straight back. Okay, so on the right side, you can see it's a straight line going down and then I'm going to do the same on the other side. So I'm going to show all of this part down right around and then, when I get to this side here, I'm going to flip it over and then it will make a parallel line on that side coming straight down. So how basically like one straight rectangle from my leave out coming straight back, you'll see better in a second. If you don't understand, hopefully you do okay, so this is how it looks, and this is how the back looks - and this is the parallel rectangle thing that I'm talking about so what I'm doing is closing up all of that space. So I'm going to do lines filling up all of this space, going straight up to the line that I drew for my level, which is that lighter pink one right at the front, I'm going to sew to the left side, a rectangle, then I'm going to flip Over and sew to the right side of rectangle, just going straight up until I reach that line that I drew for my level and you can just see what I'm doing here and again each time I flip I go through the way two times, then I do Blanket stitches and repeat: okay, so once I get to the live outline where I'm going to show my last truck, I saw through the way for all of that line and then on my last stitch, I knot the thread by wrapping the needle around the thread around The needle two to three times pulling it through and then I cut the weft off first just so I can make sure that the stitch is secure and then once I pull it and I realized it's fine, then I cut it there. So last thing you want to do is, of course, cut hold the space cellular freely, volt and add some cones. This is where I added mine and how many I did you can do whatever you want, whatever works best for you, I also leave the link for the columns in the description box. Oh yeah, this is my new part. Hopefully you guys like this video. Tell me if you want to see more awake videos - and I also post when I put this on. Thank you guys so much for watching. Please subscribe. If you haven't already and I'll see you guys in my next one


Comments
Lex Sinclair: HOW I INSTALL MY U-PART WIG - https://youtu.be/Sqo9BMwKxjk
Shekayla xo: Thanks for this, super helpful xo
Asheika kirlew: Thanks for this
Awillii: Beautiful! Do you have a video of you with the wig on?
PG Blake Goddess: I love how taking over
Lloydann Daley: Hey were you from? Caribbean. Jamaica in the building for me and the nails look nice.
JORDYN: where is the hair from ?