U-Part Wig Tutorial Brazilian Curly
- Posted on 15 September, 2015
- U Part Wig
- By Anonymous
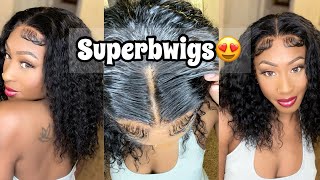
Hair: Her Hair Company Brazilian Curly
Inches: 18, 20, 22, 24
Lip: Mac "Diva" and Mac "Nightmoth" liner
FOLLOW ME:
Instagram kandi_k_mua
Snapchat kandi.k.
www.facebook.com/makemeupkandik
Hi youtubers, so today we are going to talk about this hair. This is the brazilian curly hair from her hair company that i did the unboxing video 1 and i told you i promise you that i was going to come back with an install video, so i did my absolute best. You guys, i actually didn't end up showing this on to my scalp. I ended up making a unit out of it, so i just feel like it's so much more convenient to have a unit. I can remove it and then, when it's time for me to put the hair back in my head, i don't have to worry about sitting there for so long having to sew the hair onto my braids. I could just plop it right on, but anyway this my hair is not actually styled right now. I actually just got back from work, so this is like all day makeup that you're, seeing in all day hair. I washed it like two days ago, so I didn't like define my curls or anything today. This was just me um putting a scarf over my head at nighttime um waking up going like this and walking up the door so right now, I just have to twist flat twist braids in my hair, and I just had a bug pins in the back um, Because I can't wear it out in front of my face for work but um anyway, I tried my best to do this, video, you all um. I couldn't capture everything, but I think it's enough that you can kind of see exactly how i made it. I ended up doing a: u part wig and yeah, i mean so far. I like this hair. I had a little trouble like trying to blend my natural hair with the hair at first, because my hair, my curl pattern, is so much tighter than this curl, but once I got the hang of that, you know it's pretty simple. I really like it. It'S soft. It'S it's! It'S good hair, it's definitely good hair. I like it so my best you guys to do this video. It was not easy for sure. There'S like a clip that you can put on your table and stick the mannequin head on so that it doesn't move around and I didn't have that it. I have it now, but it wasn't. I didn't have it when I did the video, so it was really hard to do this because the mannequin head kept falling. Then I would have to stop the video and there were some parts where I had to kind of just do it off camera and then come back to the camera and show you you got. My dog is like so wanting attention right now, I'm sorry hold on. Does she want to say hi I had to keep on like stopping the video, and I would have to do it off camera because it was just too hard to like so one to the unit and make sure that you guys could see what my hands were Doing - and it was just - it was just a lot of work, so I try my best. So if you want to see how I custom made this unit using her hair companies, brazilian curly hair click that subscribe button in the bottom and keep watching first you're going to need scissors needle thread, some pins, a mannequin head, wig cap and, of course, your hair. I decided to go with the side part for this look, so that's why my you part is off to the side. My outline next thing, I'm going to do is just grab my pins and stick those needles into the mannequin foam head itself, so that my cap does not move while I'm trying to install the hair. Now you want to take your needle and thread and thread your string through your needle, like you just saw me, do pull it as long as you can take or I'll sometimes just do arm's length and tie an act at the end. Now I'm just taking the hair and using my needles to secure the hair in place so that it doesn't move while I'm trying to so the hair onto the cap, and I'm just going to do that in three places. Next to the ears and in the back. When I begin this process, I always go through the weft first loop, it twice and then pull through after the first time going through the weft. I continued by just going around the track so not actually penetrating the weft, the more you cut the weft and things like that, the more shedding you are going to receive. So I'm just going to go ahead and continue to go around the left and pull it through that time. I didn't loop it, but, as I continued through the hair, I'm going to continue the same pattern of going around the weft looping it and pulling it through, and it's going to give you a pattern like the one on the side like such once. I'Ve sewn my first row, I'm going to continue by using the fold-over method and then I'm going to secure my webs once again using my needle just so that just to keep my hair in place. While I sew on to the cap, so you're just going to see me repeat the same process, I pinned it in the back and then I pinned it again next to the ear. Now i'm going to go to the other side and continue my process of sewing. Take in my needle I'm going again around the web, I'm not penetrating the weft, I'm looping it and I'm going to pull through so once again showing you i'm going around the left and looping it and i'm going to pull through. I was having a hard time with this mannequin hit it kept falling over around the weft loop. It closer I'm just going to continue to repeat this same process just like I did with the first row until I get to the other side and I'm just going to continue the same process moving up the head, you you once you get to the other side Of your row, I'm just going to remove that. Pin that was securing my wept in place and I'm going to continue sewing going around the web. Couldn'T get it in that time, looping it and pulling through I'm going to then once again use the fold-over method. Like so just going to fold it over, I'm going to grab those pins again secure my weft in place so that it does not move off of these cap and I'm going to continue to soak in that same pattern going around the weft looping it and pulling It through I'm, going to repeat this process all the way up, the head you're going to get something like this after you continue the process. As you can see, it's the same pattern and this this time that last row I brought it up the cap just a little to bring their hair more towards my face because I'm starting with the brand new pack of hair, I'm going to do what you saw Me do in the very first, the beginning of the video I'm going to penetrate the weft. Stick that through the cap loop it and pull through after that first time penetrating through the left, I'm going to keep doing the same pattern. You saw before I'm going to go around the weft, not penetrating loop, it and I'm going to pull through same thing up here around loop pull through because we're at the top. I want to make sure that the hair is very flat. I don't want it to be bulky and I want it to look as natural as possible. So this is the last row that I will use the fold-over method. I'M going to be I'm going to then cut the the weft here, because I want to ensure that my hair lays flat and looks as natural as possible you starting a new row you're, going to see the exact same process that I've done throughout the entire head. I'M going to lay down my left, secure it with a pin and then I'm going to begin to sew using the same same method same routine, first penetrating through the left, because it's a brand new row that was not using the fold-over method. And then I'm going to continue by going around the left, looping it and pulling through same process, you guys you're just doing the same thing. Moving up throughout the head, nothing changes once you get to the top of the head. You'Ve completed, all your Rose, slowing down. All of your web, so you're going to get a pattern just like what you saw in the back. This is your! U part, so what you see that's not sown is what you're going to cut out. I'M just going to take the pen out of the mannequin head, take the cap off of the mannequin head and then I'm going to use my scissors to cut the remaining pieces of the cap. That does not have hair sewn onto it. Going to have this opening. Here and your unit is going to look something like this, so where you see the cut out where your? U part actually is that's where you're going to pull your natural hair through the opening you're going to fold your hair over your weft to cover your tracks, and you are going to blend your natural hair with the brazilian curly hair. I hope you guys liked this video and i hope it was informative, don't forget to Like and subscribe bye


Comments
Tamara B: This looks so great!!
M. Williams: Love the video! I would like to see how you blend your hair with it.... Keep the videos coming :)
Destany Makel: did you sew on wig clips or did your cap already have them?