How To: Make Crochet Wig | Zury Bohemian Curl
- Posted on 27 September, 2019
- U Part Wig
- By Anonymous
H A I R
zury bohemian crochet hair v8910
1 pack | color 1b
♥️ LETS CONNECT
IG: @thekeyisme_
SC: thekeyisme
BUSINESS INQUIRIES
MUSIC
Lakey Inspired
https://www.youtube.com/channel/UCOmy8...
DISCLAIMER: I don't own the rights to the music.
FTC: This is not a sponsored video. The reviews are always 100 % of my own.
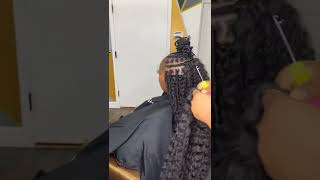
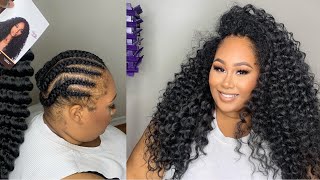
Hey: what's up y'all, it should girl. The key is me, and I am back again with a method. Video have I been missing my crochet videos. I know I know I'm gon na take up forever, but, as you can see, your girl is gon na show you how to create a crochet, u part, wig, and how to flawlessly blend it in alike. You see right here in this video right, so starting off with the hair that we're gon na be using. This is a crochet bundle where one pack is going to be enough. I promise you. It was almost kind of more than enough because I still have hair left over. So, as you can see, this is the Zuri curl sis in the style bohemian. They do have a lot of different styles, with the style that I did get is bohemian and it is in the color 1b. Then the crochet net that we're gon na be using is going to be from free choice, and I found this - and this is the oval part - crochet wheat cap. So it's already created and structured for you to be able to benefit from making a? U part wig, as you can see, it shows that it does have the three combs at the top, as well as the comb at the back, and it does have the opening as well for you to cut when you start constructing after you finish constructing the week. Hair does come in three different links, so it comes in a 10 inch 9 inch in a 8 inch. I did go ahead with the smallest length in the back and then worked my way up from to work my way up to the front. So, as you can see right here, this is pretty much what the hair is going to look like on the left. When you take it out of the pack, this hair is really thick. The curl is really compacted together. So what I did was, I went ahead and I separated the curls to give it more volume. So you can do that. You can put the hair in straight out of the pack like you see, on the left, or you can do like. I did and create more volume. More volume to me makes a fuller look and it gives it more of a natural look so that I'll be able to blend it in within my natural hair. So, as you can see with the smaller bands around before, I actually get into the actual neck on the cap, just gon na crochet it in regularly - and you want to make sure you're working your way around the entire band, including the side of the band as Well and then after this you're gon na see me transition into an actual technique that I like to use when I make my crochet week so as you can see, there's a lot of different spaces in the neck. You don't want to crochet in each space of the neck. What you want to do from here on out, you want to go up. Maybe 3x is inside of the neck crochet the hair through and then you can tie it one time or you can tie it twice. It'S really up to you with this type of hair tying at one time. It'S completely fine, but if you would like for extra security, you can tie it twice. As you can see, you don't want to go into each small little hole. You want to go through about three holes and crochet the hair in another. Another tip that you want to follow when making a crochet. We you want to make sure you ditch your spacing your crochet far apart from each other, so you want to jump like how you go through three or four spaces. You want to drop, maybe three or four spaces to the right or the left of whatever you just crochet it in, and then you want to jump three or four spaces above what you just crochet as well. You don't want to make the hair so packed together because, as you can see with you, making a wig this, the hair is going to stretch and expand because of the fact that it's on a week so just like you would do if you were braiding your Hair you're not packing all of the hair on top of each other on one braid, it kind of works in the same. It'S just different now, because you're using a netting cap in that actual braids. So I hope that's making see. Let me know if you got questions down below also another tip when you get to the front, the spacing won't be as wide as you were doing in the middle and in the back, so I did put them a little bit closer together. When I got to the front part of the you part week - and this is a finished look of the wig as you can see, I did not separate the hair at all. This is the hair coming straight out of the pack and me running my hands through it, like I explained before, so this is gon na be the result of the hair. As you can see, when I lift the hair up there, you are gon na be able to see different spaces in the wig. But of course my wig hair is a different color. So it's noticeable, but once you put it on your head, your hair is black. You won't really notice it or you can put on a wig cap, that's black, so you won't really notice the spaces in between. But this is the look that you pretty much want to go for and then we gon na move right along we'll be showing you how to put it in. So these are the products that I use on my natural hair. I pretty much just did a middle part down my hair and I took out some of my edges on the side for a more realistic look and I pushed the rest of my hair back into a ponytail. So, as you can see, it does come with three combs and then one comb in the back and you're just pretty much going to plop. That thing on, like there's nothing other way to explain it. Just plop it on make sure you put the comb inside of your hair for security to make sure that is secure. I definitely want to say that these clips are a little flimsy to me. I'Ve had been wearing wigs for a while, and these clips aren't as sturdy as most of them. So what I would definitely suggest is that you go and you you go and you put some hair pins inside of your hair for extra security. Don'T say I didn't warn you and as well as my natural hair, I went ahead and did a wash and go type of method, meaning I just put the products on my hair. I ran my demon brush to it, but if you have shorter hair and if you're not in a rush like I was, I would definitely suggest that you prep your hair and two strand twist your hair. I definitely think doing a two strand twist, a bunch of them with the leave out that you use it would blend in a lot better with this type of style, because of the way that the curl pattern is. But as you can see, I'm just gon na manipulate it to my liking. I'M gon na cut it and then imma stop talking right now, so that you can see the results all right so yeah. This is pretty much to finishing results. As you can see, I can whip my hair back and forth. In this thing, it's secure. Okay, the wig ain't going. Nowhere just make sure you secure yours as well. Now don't go flipping your hair and doing all this extravagant stuff that you get. We go flying off alright, so I'm just warning you now, but this is pretty much done. The results that I got absolutely love this. You can sleep in this if you would like, but for me I like to take my wigs off, so I would take this off at night as well as making sure that I prep my hair at night as well. So if you're gon na do the washing go method like I did, you still want to make sure you go ahead and twist your natural hair there down, so that when, when you wake up in the morning, your hair is more defined and you can go ahead And blend it in with your wig, you just kind of want to manipulate it yourself to make it match the actual crocheted hair. One thing that I can definitely say with this texture of the hair: you want to make sure you don't put too much product on the actual crochet hair, put the product on your natural hair, but just go ahead and manipulate it with your hands so that you're, Not putting too much product on the hair, and this can last you a long time so I hope y'all enjoyed this video make sure you like comment, subscribe and share and leave any comments you have down in the comment comments section below, and I look forward to Seeing you in my next video you

Comments
Monifa 360: I LOVE this hair!! I used it last summer as braids, super cute!! I got a lot of complements. I always replace the wig combs with clipin combs for extra security. This is so cute, natural looking & effortless
Farrah F: OMG You make it look so easy. I wanna try it but I'm not sure if I can make it right.
Laetitia Luvidi: Very nice vidéo. This will be my next hairstyle ! Thank you
Tracey Boyland: Super cute. Very very natural looking. You did a great job!
Jeanine: Like your hair video girl you got a good job it looks good looks natural thank you for sharing
Jerica M. Scott: I love it!
Dianne November Songbird: Gorgeous
Winnie Okuff: Beautiful
Dianne November Songbird: That wig cap is the bomb..
hayes Alexa2014: So beautiful but I just want to know why the haters what they jealous 3 thumbs down people need to be better than that.keep giving us great ideas
Erica M: Pretty!!
Supreme Goddess: That hair is niceeeeee!!!
Viclane Domnang: Did she lose some weight? You look beautiful