30Min. Removable Quick Weave Lace Frontal Wig | 28Inch Waterwave Hair Ft. @Ishow Hair
- Posted on 14 May, 2021
- Lace Closure
- By Anonymous
#ishowhair #28inch #perfectsummerhair
Check Out These Other Videos!:
Glueless Frontal Sew-in:
Review on This Hair:
My Go To Soft Glam Makeup: https://youtu.be/QPOZRY9kBOk
Don’t forget the thumbs up, comment, share! ❤️
⚠️BUSINESS INQUIRIES:⚠️
Email: [email protected]
✨Follow Me On Social Media
IG: infamousperry
Snapchat: kperry34
✨ Need A New Phone Case?
Use My Promo Code “krowned”
IG: https://instagram.com/stylicase?igshid...
********************************************
FAQs About Me
Ohio Girl
6'2
Leo
Pro Hooper
Favorite Color: Sparkle✨
Camera: iPhone 11 Pro
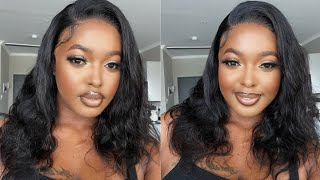
This is y'all the finished look. I went ahead and put it in this little half up half down cute little situation here. My teammates are walking around my house and i'm recording. So if it's loud, please excuse that they're having a party in the living room, praise god. This is the finished, look um! Yes, this is my hairline on a lace front. I just did some type of baby hair situation and in this cute little style. So i hope that you guys, like this video, make sure you give this video a big thumbs up. If you want to see more videos like this definitely leave it down in the comment section below i'm not going to yet too much. If you guys want to know a review on this hair, if you want to update a review, i would definitely do that for you. I do already have a review on this hair when i actually had it in my hair as a sewing. So if you guys want to see or hear an updated review or the hair has changed any type of way, let me know because i'll get that for ya: okay, anywho, i'm gon na go join the party or with us and maybe give you all some slow Moves if i haven't given to you already, but i love you guys so freaking much, and i can't wait to see the next one give me a kiss all right, my baby, so we gon na hop right into this video here, i'm just showing you guys how I have my hair and what i'm going to do with my wig cap as far as like putting my hair up, but let's get into the actual things that we're going to need. So we need a dome cap. We need i got to be glued, we love it. We need some hair glue, your choice, we need um. What is this called a shower cap, a clear cap, whatever we need two of those a blow dryer and, of course, your bundles. How can we forget those? Oh and also some scissors, so here's everything that we're going to need. Let'S get started, i'm putting on that plastic cap, and this is just to protect my hair. If you have protection underneath you don't need this, but this is how i'm protecting my hair. Normally, i would use a wig head, but baby don't have one so baby has to use what we have okay available for us all right. So i'm trying to measure up and fill and try to figure out where i want this frontal to lay and then that's where that white um little pencil or whatever. You have handy. That'S where that comes in play, because i'm just then gon na put where i actually want my little frontal to be. I'M marking it off and it's a lot easier to see on a mannequin head also, but i put glue along the perimeter sprayed my cap with some got to be glued and blow-dried the glue a little bit so that it could be a lot tacky when it Hits the cap okay, the got to be glued is just going to be used for like an extra kind of adhesive, and it's just going to add a little bit more um hold to that glue. Once i got that glue and all the hairspray on i'm just using my blow dryer to kind of glue it down all the way and secure it and then we're gon na go in with our bundles. Now. Y'All see me measuring exactly where i want my bundles to lay i'm starting out with, like smaller pieces towards the nape of my neck, and then i'm adding glue to the track add a little bit of that hairspray and then blow drying. It literally the same process. It'S real tedious to be honest with y'all like it's real simple, but it's real tedious, so you literally are just repeating the exact same thing over and over and over again, the most important part about the part that i'm going over now is that you want to Make sure that all of your tracks are laying flat flush to the um cap or whatever. It'S really easy to make this a bulky type of a look. So it's very important that you make each track have space in between once you add it and you know make sure everything is laying real flat and i would just like to say, as a disclaimer, i never cut my wefts okay. Unless i'm doing a quick, wig um, i think that cutting your wefts definitely like promotes shedding which we don't want all right at any cost um. But i think that adding the glue to the weft will kind of like hold the um hair in place on the track. If that makes sense, so i just wanted to get that out, because it's really honestly watching back this video is really bothering me that i'm cutting all these wefts honey, okay, just cutting along cutting mccutterton. If i have not said already, this is hair from. I show beauty hair, i believe that's the name or maybe it's just i show here um. I will leave the description to this hair in the box below so make sure you guys check that out. Here is the first bundle in actually this might either be one or two. I can't remember which one it is, but it's one or two bundles there that i just showed you and then i'm laying everything in. So if you guys are new here, um. First of all, snack break, i'm always eating. If it's one thing i'm gon na do, is it yeah, but back to what i was saying um if you're new here i love hair, i love big hair. I love long hair. I love wild hair. I love hair. Okay, the definition of me almost is hair, so i definitely squeeze that's not a word, but we're gon na pretend that it is four bundles into this wig, so um. This is completely optional and up to you, obviously, if you have a mannequin head, it's going to be a lot easier to see over if it's you're doing it on your actual head. But this is the option that i had since i didn't have a mannequin head in sweden with me, but i just wanted to let you guys know that i was going to squeeze all four of them bundles on this wig. Do you hear me so now that the wig is done dried and blown away child? We just want to take a baby off and we're going to pull out the piece. Do you hear me um right now, i'm just cutting off that excess dome cap in the front child and we're going to install this thing. Okay, it's real easy, real, simple, like it's literally, not hard at all, to make this quick wig, it's just a tedious process, like i said before, so i'm just going to apply this for y'all on camera, like we never applied a wig on this on this channel. Before, like we're going to just act like this, is our first time: okay, i'm using that meltdown glue, um. That is like a crowd favorite. At this point, i kind of really like it a lot but um. I have some other glues that i'm trying out y'all. I remember it was a time that i was terrified to use glue to install my wig and now i'm just glue me down anywho. So while i'm letting that glue dry, this company actually sent me this wig grip, and i just decided to try it out in this video. I have no idea how it works, but i just put it on any way i can um and by the way this is two layers of glue. Actually, no, i believe, that's one layer of glue because i didn't want to leave this wig on for too long. So i just put one layer of that glue on and i pulled it over. I pulled the lace over the glue and kind of pressed it down. This is actually my first time ever using like one layer of glue, so i was very interested in how it was going to um hold up and all that good jazz and it actually held for a few days like i wasn't expecting it to hold. As long as it did, it definitely was on there on there. Do you hear me so i'm trying to legit pull this wig over my head and kind of press it down into the glue. I want to make sure it gets nice and glued down. I did have a little issue on one of the sideburn pieces where it wasn't glued down all the way - and i was just saying like my head - was hurting already like snug tight. Is that you is that you? I am now laying down that lace, trying to melt it into my skin. This is the most important step honey. So this is current day now and i'm back dressed about to do my makeup, but i wanted to kind of do my hair in some type of way. I know this is not the place that we come for: baby hairs. Okay, this is not that, but i just would like to say i'm getting better. Okay, your girl is getting good all right. I remember i remember a time i remember a time um, so i'm just cutting off some excess hair and then trying to lay something down and some type of curve, something that mousse was not working. So i went in with my trusty got to be glued gel in the yellow bottle. That'S my trusty and i went ahead and did a couple swoops here: swoops there swoops everywhere um. Once i finished my little supianas or whatever i'm just gon na, go in with a little bit of powder and kind of this, what does it disguise? My lace girl, i was gon na, say: despised, disguise my lace a little bit and uh. You know make everything a little bit more seamless now i did go ahead and put my hair up in a half down a half up, half down situation, it's real sloppy, but i'm into the sloppy messy type of uh, what we doing - okay, um! So i'm just spraying a little bit of water on that hair and putting kind of defining those little waves in my ponytail. But here she is honey. Yes, come on come through. Oh, she loves it. This is the end of this video slash tutorial. If you liked it make sure you give it a big thumbs up, comment down below and don't forget to subscribe, i love you so much. I can't wait to see the next one. Give me a kiss


Comments
Xbliss: Gorgeous