How To Lay Your 4X4 Closure Wig Like A Frontal - Ft Hairsmarket
- Posted on 16 October, 2021
- Lace Closure
- By Anonymous
Save money with my discount code: YT6
Video Hair info: Natural color human hair 4X4 straight lace closure wig
Same Hair Shop Link: https://bit.ly/2YOtmtr
Website update promotion on Hairsmarket.com: https://bit.ly/3AQwaDL
13x4 Lace Frontal Wig: https://bit.ly/2YR7de4
4x4 Lace Closure Wig: https://bit.ly/2YR7ei8
Colored Lace Wig: https://bit.ly/3vdBShM
Transparent HD Lace Wigs: https://bit.ly/3vaACf1
Short Bob Wigs & Pixie Haircuts: https://bit.ly/2YL1ruP
Buy 3 Bundles Get Free Closure: https://bit.ly/3iZOfsM
Cheap Hairsmarket Wholesale Package Deals:
Package Deals: https://bit.ly/30jiioF
Wholesale hair Deals: https://bit.ly/30tMYnz
We Offer Drop-Shipping, Private Label For Wholesaler
Contact Hairsmarket For More Info:
WhatsApp: + 86 189 0374 7228
Email: [email protected]
Follow our social media to join our free hair giveaway
Instagram: http://bit.ly/HairsmarketIG
Facebook: http://bit.ly/HairsmarketFB
YouTube: https://bit.ly/HairsmarketYT
Twitter: http://bit.ly/hairsmarket-twitter
TikTok: http://bit.ly/hairsmarket-tiktok
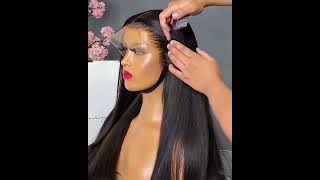
Hey guys welcome back to my channel, so for today's video, i will be showing you guys how i installed my lace closure wigs to make them look more natural and more kind of like a frontal look, you'll, be learning everything that you need to know to lay Down your lace, closure wig, so the hair i'm trying for you guys today is from this company called hairs market. This is my first time trying this company out, but so far so good i did get their straight lace front wig. It is a 4x4 and i also got it in online 26 inches also. I do sound kind of congested right now, i'm sort of sick kind of not really but yeah. So i sound hella congested and also when i did initially take the wig out of the box. I was noticing, like the lace, was a little grayish like honestly. It was like really light, so i did have to go with my foundation and just apply that all over the lace, which is what i did and then voila you guys can see. It definitely toned down that white grayishness that the lace had going on um after parting out the hair, i'm just taking my hot comb and flattening down the top. You want to make sure that it's flat as possible and then now i'm just going to go ahead and lay down the wig, i'm going to take some glue i did use about. I believe two layers of glue to lay this unit down i'm using the ghostbun glue one of my favorites. This is like probably the only glue that i like to use um. It doesn't really get on my hair or none of that. It'S really easy to come off as well, so definitely love the ghost barn glue. After applying two layers of the glue, i did let it air dry now that my wig is completely laid down. I'M just gon na go in with my tweezers and we're gon na. Do very minimal plucking, so i'm just plucking some hairs out of the front. You want to make the front look as spacey as possible. That way. It looks like it's coming up out of your scalp, but you don't want to over, pluck it so very minimal plucking. You need to do with this wig. I really did not have to do a lot and then i'm just hot covering back the front. You want to make sure that it's flat and smooth after after that we're going to go in and cut off the lace um. I'M just using the scissors and going right across it honestly, you guys this wig was really easy to lay down like i had no issues at all with laying it down like it was really easy to customize. It really easy to lay down. So i must say the lace on this wig itself was amazing and then i don't know why. But for some strange reason, my camera somehow miraculously just stopped recording when i started laying down the baby hairs. So this is me here, like literally looking dumb as hell, because i'm like i realized that it wasn't recorded and i already laid piece down and i'm like so then i eventually just like, took it back out just to show you guys how to lay it on Camera - that is how much i love you guys. I literally it was laid perfectly and i took it out just to show you guys so so to lay the baby hairs. I used some mousse. I did mix it with a little bit of the got to be gel, the one in the yellow, tube and yeah just keep sweeping until you have that desired suit. That you're going for and also you want to make sure that you cut it short enough to where to wear once you cut it, it can swoop directly into the pieces. That'S behind the lace, if you guys catch what i'm just trying to say. Um, like i said, i sound like right now to be honest, i'm so sorry but yeah just watch how i'm swooping my swooping techniques in and after laying the baby hairs, you want to make sure that you take an elastic band and wrap that hair up so That is what i'm doing right now and then here i'm just going to try to perfect my parting space. So i'm just taking my rat tail comb taking the end of a rat tail comb, you want to add some concealer to the end of it and just go up and down in that parting space. You want to make sure that your hand is steady and still when doing this method, and you want to also make sure that you place a rattle comb directly on the part and then i'm just taking some. This is some black eyeliner and filling in those empty gaps that you're seeing there, and that was pretty much about it and then let's go back over it with my hot comb and then we're just going to straighten out the hair and honestly you guys. That was pretty much it, so i did wear the hair for about. I would say two to three days after i took it off. Um the hair is great, did hold up really well. To be honest, i didn't get much shed and i did get a few like in the morning when i wake up and like brushing through the hair, i would get like a one two strand coming out, but in terms of like a lot of shedding like crazy, Shedding that didn't happen, it was like very minimal to shut in and also no tanglings at all was really impressed. There was no tangling. I did feel like the ends of this hair was a little tin to be honest, wanted a little thicker but um yeah. Overall, the hair was beautiful. It was really soft though, but i just feel like the ends of the hair could have been a little fuller um other than that. I had no issues with the hair. You guys absolutely none. The hair was really soft and silky did its thing. You know i did get a lot of compliments on the hair, so that was a plus and um yeah. This is what the hair looked like after i took off the elastic band. It is absolutely beautiful. You guys and also the lace, i'm really impressed with the quality of the lace. This is not a hd lace, it is a transparent lace, but it is bomb you guys, like so bomb it was so melted. I really loved it and um yeah. That was pretty much it on how i laid down this wig. That is how i lay my lace closure, wigs down. I hope you guys learned something from this honestly, it's really easy to do when i just started doing wigs. To be honest, i had a hard time laying lace closures, but over time you get the hang of it. You get the drift of it so so yeah. This is like honestly, the easiest way that i can show you guys how to install and lay down at least close, your wig, especially a 4x4, like people really struggle with laying down waist closures week. I don't know why, but sometimes it gets hard so yeah. This was a quick way of how to lay down your lace, closure wig. I hope you guys learned something new comment down below. Let me know if you learned any new techniques, whatever the case may be. I hope you guys enjoy this video. The hair is bomb. Definitely one recommends it um, yeah i'll, just see you guys in my next one. I love you guys, don't forget to give me a big thumbs up like comment share all of that and i'll catch. You guys in my next one bye,


Comments
Life with christol: What flat iron do you use? Hope to see more videos coming
Añuli: What eyeliner brush do you use?
Cherry Johnson: Loving the intro music….nice install
Lola Gunz: Is this real hair?
PrincessLeah187 xx: Cute.
sidney saundra: 6kpll1 #von.ngo