How To Fix Over Bleached Knots On A Lace Closure Or Frontal
- Posted on 16 June, 2018
- Lace Closure
- By Anonymous
How to Fix a botched Lace frontal
Coloring bowl
Loreal ColorSilk in Soft Black Color 11
Old mascara brush OR Spoolie
Suave Professions Almond and Shea Butter Conditioner
7 row Denman Brush
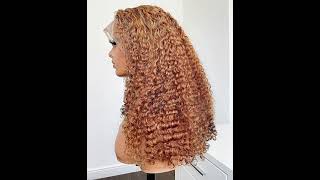
Hi guys welcome back to my channel. My name is Caroline welcome to my channel, Caroline Kate. So today, we're gon na be doing a quick video on basically how to fix a botched frontal, frontal wig. You can do this for before you attach your friends to away, but if it's already a front to look in the first place, so now, I'm the way that way was one that was from our line that I made or that I um had tried to bleep The front to a couple months ago - and you know practice, makes perfect and I was not paying attention. I made a super or I came more liquidy texture and it basically seeped through the lace and bleached about a centimeter of the hair on the front. So, on the frontal so guys as you can see, this is what the way to look like before I decided to go ahead and get started and fix the frontal. This can happen, maybe on your first time with a frontal trying to beat your frontal or closure. This happened when I stretch shouldn't reach my first closure, and this was actually the first one frontal and I tried to bleach as well, so it just was a big mess. Obviously I don't do this anymore, but I'm gon na go ahead and save this to show you guys how to correct a botched lace, closure or a Bosch one tool or botched full lace, wig. Basically, so you can see it's all brassy, it's like a centimeter into the hair itself. Today, you're gon na need a couple things. You'Re gon na need a mixing bowl your a choice of color. I chose the Revlon color silk soft black, which is the color 11, and it came with like a bottle with a spout, the color mix and conditioner. If you cannotice, I had a little spooley which isn't a mascara brush, I'm gon na be using, and I just basically mixed the color according to the instructions in the box, and when I did that I closed the little spout bottle. I guess, although we're gon na mix it up a little bit, it's also important to get you a wig in place before you get started and just so you're not sliding around and chasing the way around the block head. So I'm gon na get started. What I noticed is it's good to start in tiny sections. Basically, gon na go ahead, pour that dye mixture into the mixing bowl, because I'm gon na be using a spoolie, as you can see, which is busily a mascara sample brush from one of my makeup stores. Sephora goes too far up for the hook-up, but basically you're gon na go ahead and start in small sections, and I started off by doing the first clip in real time and you're just gon na go ahead and brush slowly. You want to pay attention to the front because, of course, what people are gon na see, but if you're partying, you want to pay attention as much as possible to the roots, because at first right now, as I'm brushing it on it's not gon na. Look like the color is going away, but as it processes, the black will deposit if you're gon na be doing your hearing some interesting styles and just for the sake of uniformity, if you're doing it anyway, you might as well just go ahead and part. It tiny sections, so it's basically what I'm doing throughout the wig I've sped this up just so you can see how I do it in sections and as I get higher and higher, you can see the gel the dye depositing on the roots in the getting darker. Okay now, as I mentioned earlier, it's very important to pay attention to correcting the color in the lace front, because well it's the lace front. You plan on wearing it that way, it's what's going to show. So do you pay attention to that part? I just stood this down to show you that and then I also continue to color the rest of the hair, especially the middle and sides and small sections as well. So the whole process actually took about 20 something minutes, and I'm just gon na showing you that I paid attention to how I colored the front, the lace front and after it's all done in the time, has frosted the color processed. According to the box, I went ahead and I rinsed the color out and then I went ahead and washed it with the suave professionals almond and shea butter conditioner, which is an awesome conditioner for extensions fairly or straight, and I'm just kind of running that through getting All the kings and the tangling with my Denman brush, it is like the brush to have for any kind of curly hair from like a loose weave to kinky curly months again, I am washing the conditioner at lynching, the conditioner out. Basically, I just did a co-wash with the deep conditioner. Now I'm gon na go ahead and define the curls even more so now I didn't use a salmon brush to detangle and defined the curls, and I can leave it to this day. If I wanted, like you, know more tousled waves, but I figured that if I start out, I might as well start with defined waves. So I'm going and I'm basically taking big sections and running the dental brush through it to achieve the spine curls. You want to run your Denman brush through each section about three times, especially towards the end sort of they give you the ringlets. That'S what I'm basically doing here. If you guys want me to make a particular video on how I define that cause, I can do that, but this is basically the finished look and I'm just so excited Montana, as you can see like I said, look at how gorgeous the curls are. Now I mean it almost doesn't matter what Beaven conditioner you use, but as long as you define with the Denman brush that method, you're good to go. So, look at the huge difference now between how horrible that knocked the hair in the hairline look before and what, like you know how awesome it looks now we just basically showing you before I go ahead and cut the lace off-camera, that the final lace looks great And I'm just so happy with how it turns out, as you can see,


Comments
Mosope Bolaji: Back to the YouTube grind?